研究了一个雪花飘落效果,感觉挺不错的,分享给大家,效果如下:

代码如下:
|
1
2
3
4
5
6
7
8
9
10
11
12
13
14
15
16
17
18
19
20
21
22
23
24
25
26
27
28
29
30
31
32
33
34
35
36
37
38
39
40
41
42
43
44
45
46
47
48
49
50
51
52
53
54
55
56
57
58
59
60
61
62
63
64
65
66
67
68
69
70
71
72
73
74
75
76
77
78
79
80
81
82
83
84
85
86
87
|
shader "shadertoy/flakes" { // https://www.shadertoy.com/view/4d2xzc properties{ imouse ("mouse pos", vector) = (100,100,0,0) ichannel0("ichannel0", 2d) = "white" {} ichannelresolution0 ("ichannelresolution0", vector) = (100,100,0,0) } cginclude #include "unitycg.cginc" #pragma target 3.0 #pragma glsl #define vec2 float2 #define vec3 float3 #define vec4 float4 #define mat2 float2x2 #define iglobaltime _time.y #define mod fmod #define mix lerp #define atan atan2 #define fract frac #define texture2d tex2d // 屏幕的尺寸 #define iresolution _screenparams // 屏幕中的坐标,以pixel为单位 #define gl_fragcoord ((_iparam.srcpos.xy/_iparam.srcpos.w)*_screenparams.xy) #define pi2 6.28318530718 #define pi 3.14159265358979 #define halfpi (pi * 0.5) #define oneoverpi (1.0 / pi) fixed4 imouse; sampler2d ichannel0; fixed4 ichannelresolution0; struct v2f { float4 pos : sv_position; float4 srcpos : texcoord0; }; // precision highp float; v2f vert(appdata_base v){ v2f o; o.pos = mul (unity_matrix_mvp, v.vertex); o.srcpos = computescreenpos(o.pos); return o; } vec4 main(v2f _iparam); fixed4 frag(v2f _iparam) : color0 { return main(_iparam); } vec4 main(v2f _iparam) { vec2 p = gl_fragcoord.xy/iresolution.xy; vec3 col = vec3(0,0,0); float dd = 150; for( int i=0; i<dd; i++ ) { float an = 6.2831*float(i)/dd; vec2 of = vec2( cos(an), sin(an) ) * (1.0+0.6*cos(7.0*an+iglobaltime)) + vec2( 0.0, iglobaltime ); col = max( col, texture2d( ichannel0, p + 20*of/iresolution.xy ).xyz ); col = max( col, texture2d( ichannel0, p + 5.0*of/iresolution.xy ).xyz ); } col = pow( col, vec3(1.0,2.0,3.0) ) * pow( 4.0*p.y*(1.0-p.y), 0.2); return vec4( col, 1.0 ); } endcg subshader { pass { cgprogram #pragma vertex vert #pragma fragment frag #pragma fragmentoption arb_precision_hint_fastest endcg } } fallback off } |
代码分析:
1)七边形雪花的绘制算法
具体代码如下:
|
1
2
3
4
5
6
7
8
|
float dd = 150;for( int i=0; i<dd; i++ ){ float an = 6.2831*float(i)/dd; vec2 of = vec2( cos(an), sin(an) ) * (1.0+0.6*cos(7.0*an+iglobaltime)) + vec2( 0.0, iglobaltime ); col = max( col, texture2d( ichannel0, p + 20*of/iresolution.xy ).xyz ); col = max( col, texture2d( ichannel0, p + 5.0*of/iresolution.xy ).xyz );} |
在理解这段代码前,先理解怎么画一个圈,代码如下:
|
1
2
3
4
5
6
7
|
float dd = 30;for( int i=0; i<dd; i++ ){ float an = 6.2831*float(i)/dd; vec2 of = vec2( cos(an), sin(an) ); col = max( col, texture2d( ichannel0, p + 20*of/iresolution.xy ).xyz );} |
然后再准备一张贴图,图片中间是一个白色像素,周围都是黑色

效果如下:

这段代码处于fragment shader中,意味着屏幕上每个点都会进行上述的算法。具体如下,遍历贴图中该点周围的点(上面的代码中为距离该点为20单位的圆上的点),把周围点中最亮的作为该点的颜色。 上面的贴图有点特殊,只有一个点是白色,其余点都是黑色的。那么只有距离该点正好为20单位的点才会变成亮色,其余的点都是黑色,如上图的结果。一句话总结上面算法的效果:贴图中的每一个“相对亮点”的周围都会产生“相对亮的特定图形”,图形的亮度取决于该点的亮度,越亮越明显。效果可以参考文末的图片。
接下来理解这段代码:
|
1
2
3
4
5
6
7
8
|
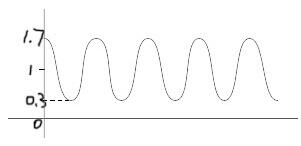
float dd = 150;for( int i=0; i<dd; i++ ){ float an = 6.2831*float(i)/dd; vec2 of = vec2( cos(an), sin(an) ) * (1.0+0.7*cos(7.0*an)); col = max( col, texture2d( ichannel0, p + 20*of/iresolution.xy ).xyz );// col = max( col, texture2d( ichannel0, p + 5.0*of/iresolution.xy ).xyz );} |
输出结果如下:

a) 1.0+0.7*cos(7.0*an)的图像如下:
b)算法中 of 向量的路径为:
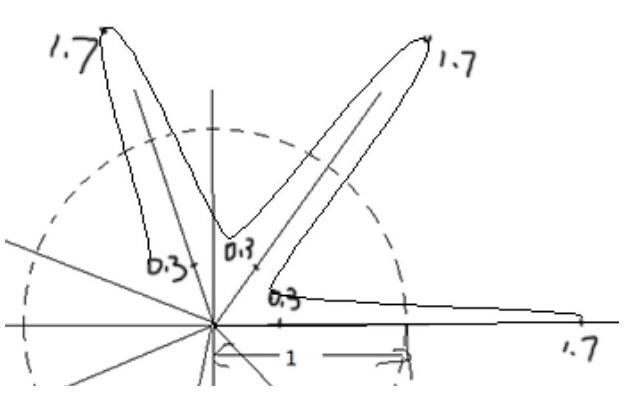
结果就很清晰了;其实这里算法和《【opengl】shader实例分析(二)- heart》中绘制心形的算法很类似。
最后加上时间就可以实现动画了:
|
1
|
vec2 of = vec2( cos(an), sin(an) ) * (1.0+0.6*cos(7.0*an+iglobaltime)) + vec2( 0.0, iglobaltime ); |
第一个iglobaltime,用来控制雪花的旋转,第二个iglobaltime使雪花下落。
2)后期颜色等处理
这里可以理解为一种posteffect处理,具体是如下的代码贡献的效果:
|
1
|
col = pow( col, vec3(1.0,2.0,3.0) ) * pow( 4.0*p.y*(1.0-p.y), 0.2); |
a) pow(col, vec3(1.0, 2.0, 3.0)) 这句话使得颜色变成暖色调。col值的范围为[0,1],对小数继续pow运算,次数越高,该值越小。比如:0.5的1次方是0.5, 2次方为0.25, 3次方为0.125等;所以这句话的作用很明显:red成份不变,green变小一些,blue变的更小。达到的效果,使得整体颜色会偏向暖色调。
b)pow(4.0*p.y*(1.0-p.y), 0.2) 使得屏幕上下两边变暗。
最后附上shader中用到的贴图:
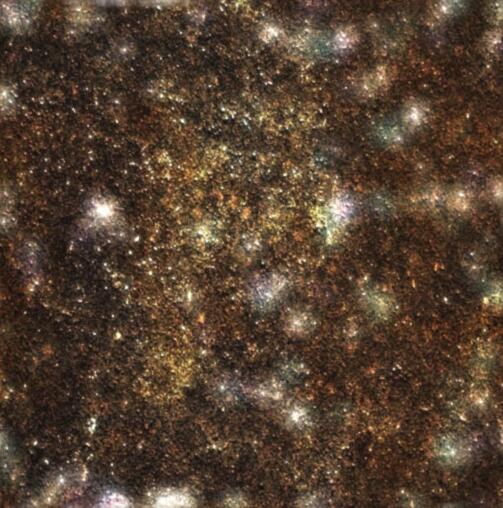
经过程序处理后,得到如下:

文章完毕,欢迎讨论。
以上就是本文的全部内容,希望对大家的学习有所帮助,也希望大家多多支持服务器之家。
原文链接:https://blog.csdn.net/stalendp/article/details/40624603


