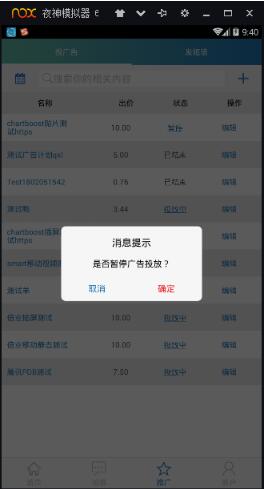
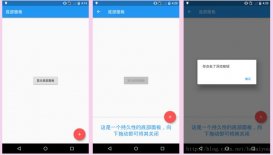
本文实例为大家分享了android自定义Dialog弹框和背景阴影显示的具体代码,供大家参考,具体内容如下

首先需要自定义一个类,继承Dialog
|
1
2
3
4
5
6
7
8
9
10
11
12
13
14
15
16
17
18
19
20
21
22
23
24
25
26
27
28
29
30
31
32
33
34
35
36
37
38
39
40
41
42
43
44
45
46
47
48
49
50
51
52
53
54
55
56
57
58
59
60
61
62
63
64
65
66
67
68
69
70
71
72
73
74
75
76
77
78
79
80
81
82
83
84
85
86
87
88
89
90
91
92
93
94
95
96
97
98
99
100
101
102
103
104
105
106
107
108
109
110
111
112
113
114
115
116
117
118
119
120
121
122
123
124
125
126
127
128
129
130
131
132
133
134
135
136
137
138
139
140
141
142
143
144
145
146
147
148
149
150
151
152
153
154
155
156
157
158
159
160
161
162
163
164
165
166
|
import android.app.Dialog;import android.content.Context;import android.os.Bundle;import android.view.View;import android.view.ViewGroup;import android.view.WindowManager;import android.widget.Button;import android.widget.TextView;import com.zhiziyun.dmptest.bot.R;/** * Created by Administrator on 2018/1/31. */public class CustomDialog extends Dialog { private Button yes, no;//确定按钮 private TextView titleTv;//消息标题文本 private TextView messageTv;//消息提示文本 private String titleStr;//从外界设置的title文本 private String messageStr;//从外界设置的消息文本 //确定文本和取消文本的显示内容 private String yesStr, noStr; private onNoOnclickListener noOnclickListener;//取消按钮被点击了的监听器 private onYesOnclickListener yesOnclickListener;//确定按钮被点击了的监听器 /** * 设置取消按钮的显示内容和监听 * * @param str * @param onNoOnclickListener */ public void setNoOnclickListener(String str, onNoOnclickListener onNoOnclickListener) { if (str != null) { noStr = str; } this.noOnclickListener = onNoOnclickListener; } /** * 设置确定按钮的显示内容和监听 * * @param str * @param onYesOnclickListener */ public void setYesOnclickListener(String str, onYesOnclickListener onYesOnclickListener) { if (str != null) { yesStr = str; } this.yesOnclickListener = onYesOnclickListener; } public CustomDialog(Context context) { super(context, R.style.Dialog_Msg); } @Override protected void onCreate(Bundle savedInstanceState) { super.onCreate(savedInstanceState); setContentView(R.layout.dialog_custom); //按空白处不能取消动画 setCanceledOnTouchOutside(false); //初始化界面控件 initView(); //初始化界面数据 initData(); //初始化界面控件的事件 initEvent(); } /** * 初始化界面的确定和取消监听器 */ private void initEvent() { //设置确定按钮被点击后,向外界提供监听 yes.setOnClickListener(new View.OnClickListener() { @Override public void onClick(View v) { if (yesOnclickListener != null) { yesOnclickListener.onYesClick(); } } }); no.setOnClickListener(new View.OnClickListener() { @Override public void onClick(View v) { if (noOnclickListener != null) { noOnclickListener.onNoClick(); } } }); } /** * 初始化界面控件的显示数据 */ private void initData() { //如果用户自定了title和message if (titleStr != null) { titleTv.setText(titleStr); } if (messageStr != null) { messageTv.setText(messageStr); } //如果设置按钮的文字 if (yesStr != null) { yes.setText(yesStr); } } /** * 初始化界面控件 */ private void initView() { yes = (Button) findViewById(R.id.yes); no = (Button) findViewById(R.id.no); titleTv = (TextView) findViewById(R.id.title); messageTv = (TextView) findViewById(R.id.message); } /** * 从外界Activity为Dialog设置标题 * * @param title */ public void setTitle(String title) { titleStr = title; } /** * 从外界Activity为Dialog设置dialog的message * * @param message */ public void setMessage(String message) { messageStr = message; } /** * 设置确定按钮和取消被点击的接口 */ public interface onYesOnclickListener { public void onYesClick(); } public interface onNoOnclickListener { public void onNoClick(); } @Override public void show() { super.show(); /** * 设置宽度全屏,要设置在show的后面 */ WindowManager.LayoutParams layoutParams = getWindow().getAttributes(); layoutParams.width= ViewGroup.LayoutParams.MATCH_PARENT; layoutParams.height= ViewGroup.LayoutParams.MATCH_PARENT; getWindow().getDecorView().setPadding(0, 0, 0, 0); getWindow().setAttributes(layoutParams); }} |
这是实体类中的style:
|
1
2
3
4
5
6
7
8
9
|
<style name="custom_dialog_style" parent="android:Theme.Dialog"> <item name="android:windowFrame">@null</item> <item name="android:windowIsFloating">true</item> <item name="android:windowIsTranslucent">false</item> <item name="android:windowNoTitle">true</item><!--除去title--> <item name="android:backgroundDimEnabled">true</item><!--半透明--> <item name="android:windowBackground">@color/transparent</item><!--除去背景色--> <item name="android:radius">10dp</item></style> |
其中@color/transparent是一个透明色
|
1
|
<color name="transparent">#00000000</color> |
然后是布局
|
1
2
3
4
5
6
7
8
9
10
11
12
13
14
15
16
17
18
19
20
21
22
23
24
25
26
27
28
29
30
31
32
33
34
35
36
37
38
39
40
41
42
43
44
45
46
47
48
49
50
51
52
53
54
55
56
57
58
59
60
61
62
63
64
65
66
67
68
69
70
71
72
73
74
|
<?xml version="1.0" encoding="utf-8"?><RelativeLayout xmlns:android="http://schemas.android.com/apk/res/android" android:layout_width="match_parent" android:layout_height="match_parent" android:background="#A5000000"> <LinearLayout android:layout_width="260dp" android:layout_height="wrap_content" android:layout_centerInParent="true" android:background="@drawable/shape_dialog_msg" android:orientation="vertical"> <TextView android:id="@+id/title" android:layout_width="wrap_content" android:layout_height="wrap_content" android:layout_gravity="center" android:layout_margin="15dp" android:gravity="center" android:text="消息提示" android:textColor="@color/colorBlack" android:textSize="@dimen/title_text_size" /> <TextView android:id="@+id/message" android:layout_width="wrap_content" android:layout_height="wrap_content" android:layout_gravity="center" android:layout_marginLeft="@dimen/padding_left_right4" android:layout_marginRight="@dimen/padding_left_right4" android:text="提示消息" android:textColor="@color/colorBlack" android:textSize="@dimen/textsizi3" /> <View android:layout_width="match_parent" android:layout_height="1px" android:layout_marginTop="15dp" android:background="#E4E4E4" /> <LinearLayout android:layout_width="match_parent" android:layout_height="@dimen/buttom_height" android:orientation="horizontal"> <Button android:id="@+id/no" android:layout_width="match_parent" android:layout_height="match_parent" android:layout_weight="1" android:background="@null" android:gravity="center" android:singleLine="true" android:text="取消" android:textColor="@color/blue" android:textSize="@dimen/textsizi3" /> <Button android:id="@+id/yes" android:layout_width="match_parent" android:layout_height="match_parent" android:layout_weight="1" android:background="@null" android:gravity="center" android:singleLine="true" android:text="确 定" android:textColor="@color/red" android:textSize="@dimen/textsizi3" /> </LinearLayout> </LinearLayout></RelativeLayout> |
下面是shape_dialog_msg的代码
|
1
2
3
4
5
6
7
8
9
10
11
12
13
14
|
<?xml version="1.0" encoding="UTF-8"?><selector xmlns:android="http://schemas.android.com/apk/res/android"> <item android:state_pressed="false"> <shape android:shape="rectangle" > <!-- 填充的颜色 前两位是透明度--> <solid android:color="#f7f6f6"></solid> <!-- 设置按钮的四个角为弧形 --> <!-- android:radius 弧形的半径 --> <corners android:radius="8dip" /> <!-- padding:Button里面的文字与Button边界的间隔 --> <padding android:bottom="2dp" android:left="2dp" android:right="2dp" android:top="2dp" /> </shape> </item></selector> |
准备工作都做好了,下面就是如何使用了
|
1
2
3
4
5
6
7
8
9
10
11
12
13
14
15
16
17
18
|
//点击弹出对话框 final CustomDialog customDialog = new CustomDialog(getActivity()); customDialog.setTitle("消息提示"); customDialog.setMessage("是否暂停广告投放?"); customDialog.setYesOnclickListener("确定", new CustomDialog.onYesOnclickListener() { @Override public void onYesClick() { //这里是确定的逻辑代码,别忘了点击确定后关闭对话框 customDialog.dismiss(); } }); customDialog.setNoOnclickListener("取消", new CustomDialog.onNoOnclickListener() {@Override public void onNoClick() { customDialog.dismiss(); } }); customDialog.show(); |
以上就是本文的全部内容,希望对大家的学习有所帮助,也希望大家多多支持服务器之家。
原文链接:https://blog.csdn.net/qq_33919497/article/details/79384749


