前言:Android开发中,自定义View实现自己想要的效果已成为一项必备的技能,当然自定义View也是Android开发中比较难的部分,涉及到的知识有Canvas(画布),Paint(画笔)等,自定义控件分为三种:一是直接继承自View,完全的自定义;二是在原有控件的基础上进行改造,达到自己想要的效果;还有一种就是自定义组合控件,将已有的控件根据自己的需要进行组合实现的效果。本人对自定义View也是一知半解,简单记录下自己学习自定义View(继承自View)的过程,方便日后翻阅。
技术实现
1.ArcView继承自View
2.Canvas(画布)
3.Paint(画笔)
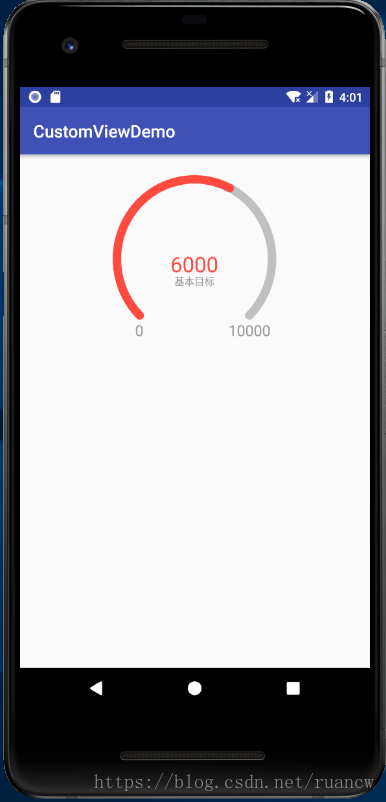
效果图:类似于QQ的计步效果

1.继承自View
(1)重写3个构造方法(新的API中的构造方法是4个)
|
1
2
3
4
5
6
7
8
9
10
11
12
|
public ArcView(Context context) { this(context,null);}public ArcView(Context context, @Nullable AttributeSet attrs) { this(context, attrs,0);}public ArcView(Context context, @Nullable AttributeSet attrs, int defStyleAttr) { super(context, attrs, defStyleAttr); //init();} |
(2)重写View的OnDraw方法
|
1
2
3
4
5
6
7
8
9
10
11
12
13
|
@SuppressLint("DrawAllocation")@Overrideprotected void onDraw(Canvas canvas) { super.onDraw(canvas); centerX=getWidth()/2; centerY=getHeight()/2; //初始化paint initPaint(); //绘制弧度 drawArc(canvas); //绘制文本 drawText(canvas);} |
注:这里的paint初始化我放在了onDraw方法中进行的,当然你也可以放在有三个参数的构造方法中初始化。
2.Paint初始化
(1)圆弧的画笔mArcPaint
|
1
2
3
4
5
6
7
8
9
10
11
12
13
|
//圆弧的paintmArcPaint=new Paint(Paint.ANTI_ALIAS_FLAG);//抗锯齿mArcPaint.setAntiAlias(true);mArcPaint.setColor(Color.parseColor("#666666"));//设置透明度(数值为0-255)mArcPaint.setAlpha(100);//设置画笔的画出的形状mArcPaint.setStrokeJoin(Paint.Join.ROUND);mArcPaint.setStrokeCap(Paint.Cap.ROUND);//设置画笔类型mArcPaint.setStyle(Paint.Style.STROKE);mArcPaint.setStrokeWidth(dp2px(mStrokeWith)); |
(2)文字的画笔mTextPaint
|
1
2
3
4
5
6
7
8
|
//中心文字的paintmTextPaint=new Paint();mTextPaint.setAntiAlias(true);mTextPaint.setColor(Color.parseColor("#FF4A40"));//设置文本的对齐方式mTextPaint.setTextAlign(Paint.Align.CENTER);//mTextPaint.setTextSize(getResources().getDimensionPixelSize(R.dimen.dp_12));mTextPaint.setTextSize(dp2px(25)); |
3.Canvas绘制
(1)圆弧的绘制
|
1
2
3
4
5
6
7
8
9
10
11
12
13
|
/** * 绘制圆弧 * @param canvas */private void drawArc(Canvas canvas) { //绘制圆弧背景 RectF mRectF=new RectF(mStrokeWith+dp2px(5),mStrokeWith+dp2px(5),getWidth()-mStrokeWith-dp2px(5),getHeight()-mStrokeWith); canvas.drawArc(mRectF,startAngle,mAngle,false,mArcPaint); //绘制当前数值对应的圆弧 mArcPaint.setColor(Color.parseColor("#FF4A40")); //根据当前数据绘制对应的圆弧 canvas.drawArc(mRectF,startAngle,mIncludedAngle,false,mArcPaint);} |
(2)文本的绘制
|
1
2
3
4
5
6
7
8
9
10
11
12
13
14
15
16
17
18
19
20
21
22
23
24
25
26
27
|
/** * 绘制文本 * @param canvas */private void drawText(Canvas canvas) { Rect mRect=new Rect(); String mValue=String.valueOf(mAnimatorValue); //绘制中心的数值 mTextPaint.getTextBounds(mValue,0,mValue.length(),mRect); canvas.drawText(String.valueOf(mAnimatorValue),centerX,centerY+mRect.height(),mTextPaint); //绘制中心文字描述 mTextPaint.setColor(Color.parseColor("#999999")); mTextPaint.setTextSize(dp2px(12)); mTextPaint.getTextBounds(mDes,0,mDes.length(),mRect); canvas.drawText(mDes,centerX,centerY+2*mRect.height()+dp2px(10),mTextPaint); //绘制最小值 String minValue=String.valueOf(mMinValue); String maxValue=String.valueOf(mMaxValue); mTextPaint.setTextSize(dp2px(18)); mTextPaint.getTextBounds(minValue,0,minValue.length(),mRect); canvas.drawText(minValue, (float) (centerX-0.6*centerX-dp2px(5)), (float) (centerY+0.75*centerY+mRect.height()+dp2px(5)),mTextPaint); //绘制最大值 mTextPaint.getTextBounds(maxValue,0,maxValue.length(),mRect); canvas.drawText(maxValue, (float) (centerX+0.6*centerX+dp2px(5)), (float) (centerY+0.75*centerY+mRect.height()+dp2px(5)),mTextPaint);} |
4.添加动画效果及数据
(1)动画效果
|
1
2
3
4
5
6
7
8
9
10
11
12
13
14
15
16
17
18
19
20
21
22
23
24
25
26
27
28
29
30
31
32
33
34
35
36
37
38
39
|
/** * 为绘制弧度及数据设置动画 * * @param startAngle 开始的弧度 * @param currentAngle 需要绘制的弧度 * @param currentValue 需要绘制的数据 * @param time 动画执行的时长 */private void setAnimation(float startAngle, float currentAngle,int currentValue, int time) { //绘制当前数据对应的圆弧的动画效果 ValueAnimator progressAnimator = ValueAnimator.ofFloat(startAngle, currentAngle); progressAnimator.setDuration(time); progressAnimator.setTarget(mIncludedAngle); progressAnimator.addUpdateListener(new ValueAnimator.AnimatorUpdateListener() { @Override public void onAnimationUpdate(ValueAnimator animation) { mIncludedAngle = (float) animation.getAnimatedValue(); //重新绘制,不然不会出现效果 postInvalidate(); } }); //开始执行动画 progressAnimator.start(); //中心数据的动画效果 ValueAnimator valueAnimator = ValueAnimator.ofInt(mAnimatorValue, currentValue); valueAnimator.setDuration(2500); valueAnimator.setInterpolator(new LinearInterpolator()); valueAnimator.addUpdateListener(new ValueAnimator.AnimatorUpdateListener() { @Override public void onAnimationUpdate(ValueAnimator valueAnimator) { mAnimatorValue = (int) valueAnimator.getAnimatedValue(); postInvalidate(); } }); valueAnimator.start();} |
(2)数据添加
|
1
2
3
4
5
6
7
8
9
10
11
12
13
14
15
16
17
18
19
20
21
|
/** * 设置数据 * @param minValue 最小值 * @param maxValue 最大值 * @param currentValue 当前绘制的值 * @param des 描述信息 */public void setValues(int minValue,int maxValue, int currentValue,String des) { mDes=des; mMaxValue=maxValue; mMinValue=minValue; //完全覆盖背景弧度 if (currentValue > maxValue) { currentValue = maxValue; } //计算弧度比重 float scale = (float) currentValue / maxValue; //计算弧度 float currentAngle = scale * mAngle; //开始执行动画 setAnimation(0, currentAngle, currentValue,2500); |
完整代码:
|
1
2
3
4
5
6
7
8
9
10
11
12
13
14
15
16
17
18
19
20
21
22
23
24
25
26
27
28
29
30
31
32
33
34
35
36
37
38
39
40
41
42
43
44
45
46
47
48
49
50
51
52
53
54
55
56
57
58
59
60
61
62
63
64
65
66
67
68
69
70
71
72
73
74
75
76
77
78
79
80
81
82
83
84
85
86
87
88
89
90
91
92
93
94
95
96
97
98
99
100
101
102
103
104
105
106
107
108
109
110
111
112
113
114
115
116
117
118
119
120
121
122
123
124
125
126
127
128
129
130
131
132
133
134
135
136
137
138
139
140
141
142
143
144
145
146
147
148
149
150
151
152
153
154
155
156
157
158
159
160
161
162
163
164
165
166
167
168
169
170
171
172
173
174
175
176
177
178
179
180
181
182
183
184
185
186
187
188
189
190
191
|
/** * Created by ruancw on 2018/6/13. * 自定义的圆弧形view */public class ArcView extends View { //根据数据显示的圆弧Paint private Paint mArcPaint; //文字描述的paint private Paint mTextPaint; //圆弧开始的角度 private float startAngle=135; //圆弧结束的角度 private float endAngle=45; //圆弧背景的开始和结束间的夹角大小 private float mAngle=270; //当前进度夹角大小 private float mIncludedAngle=0; //圆弧的画笔的宽度 private float mStrokeWith=10; //中心的文字描述 private String mDes=""; //动画效果的数据及最大/小值 private int mAnimatorValue,mMinValue,mMaxValue; //中心点的XY坐标 private float centerX,centerY; public ArcView(Context context) { this(context,null); } public ArcView(Context context, @Nullable AttributeSet attrs) { this(context, attrs,0); } public ArcView(Context context, @Nullable AttributeSet attrs, int defStyleAttr) { super(context, attrs, defStyleAttr); //init(); } private void initPaint() { //圆弧的paint mArcPaint=new Paint(Paint.ANTI_ALIAS_FLAG); //抗锯齿 mArcPaint.setAntiAlias(true); mArcPaint.setColor(Color.parseColor("#666666")); //设置透明度(数值为0-255) mArcPaint.setAlpha(100); //设置画笔的画出的形状 mArcPaint.setStrokeJoin(Paint.Join.ROUND); mArcPaint.setStrokeCap(Paint.Cap.ROUND); //设置画笔类型 mArcPaint.setStyle(Paint.Style.STROKE); mArcPaint.setStrokeWidth(dp2px(mStrokeWith)); //中心文字的paint mTextPaint=new Paint(); mTextPaint.setAntiAlias(true); mTextPaint.setColor(Color.parseColor("#FF4A40")); //设置文本的对齐方式 mTextPaint.setTextAlign(Paint.Align.CENTER); //mTextPaint.setTextSize(getResources().getDimensionPixelSize(R.dimen.dp_12)); mTextPaint.setTextSize(dp2px(25)); } @SuppressLint("DrawAllocation") @Override protected void onDraw(Canvas canvas) { super.onDraw(canvas); centerX=getWidth()/2; centerY=getHeight()/2; //初始化paint initPaint(); //绘制弧度 drawArc(canvas); //绘制文本 drawText(canvas); } /** * 绘制文本 * @param canvas */ private void drawText(Canvas canvas) { Rect mRect=new Rect(); String mValue=String.valueOf(mAnimatorValue); //绘制中心的数值 mTextPaint.getTextBounds(mValue,0,mValue.length(),mRect); canvas.drawText(String.valueOf(mAnimatorValue),centerX,centerY+mRect.height(),mTextPaint); //绘制中心文字描述 mTextPaint.setColor(Color.parseColor("#999999")); mTextPaint.setTextSize(dp2px(12)); mTextPaint.getTextBounds(mDes,0,mDes.length(),mRect); canvas.drawText(mDes,centerX,centerY+2*mRect.height()+dp2px(10),mTextPaint); //绘制最小值 String minValue=String.valueOf(mMinValue); String maxValue=String.valueOf(mMaxValue); mTextPaint.setTextSize(dp2px(18)); mTextPaint.getTextBounds(minValue,0,minValue.length(),mRect); canvas.drawText(minValue, (float) (centerX-0.6*centerX-dp2px(5)), (float) (centerY+0.75*centerY+mRect.height()+dp2px(5)),mTextPaint); //绘制最大指 mTextPaint.getTextBounds(maxValue,0,maxValue.length(),mRect); canvas.drawText(maxValue, (float) (centerX+0.6*centerX+dp2px(5)), (float) (centerY+0.75*centerY+mRect.height()+dp2px(5)),mTextPaint); } /** * 绘制当前的圆弧 * @param canvas */ private void drawArc(Canvas canvas) { //绘制圆弧背景 RectF mRectF=new RectF(mStrokeWith+dp2px(5),mStrokeWith+dp2px(5),getWidth()-mStrokeWith-dp2px(5),getHeight()-mStrokeWith); canvas.drawArc(mRectF,startAngle,mAngle,false,mArcPaint); //绘制当前数值对应的圆弧 mArcPaint.setColor(Color.parseColor("#FF4A40")); //根据当前数据绘制对应的圆弧 canvas.drawArc(mRectF,startAngle,mIncludedAngle,false,mArcPaint); } /** * 为绘制弧度及数据设置动画 * * @param startAngle 开始的弧度 * @param currentAngle 需要绘制的弧度 * @param currentValue 需要绘制的数据 * @param time 动画执行的时长 */ private void setAnimation(float startAngle, float currentAngle,int currentValue, int time) { //绘制当前数据对应的圆弧的动画效果 ValueAnimator progressAnimator = ValueAnimator.ofFloat(startAngle, currentAngle); progressAnimator.setDuration(time); progressAnimator.setTarget(mIncludedAngle); progressAnimator.addUpdateListener(new ValueAnimator.AnimatorUpdateListener() { @Override public void onAnimationUpdate(ValueAnimator animation) { mIncludedAngle = (float) animation.getAnimatedValue(); //重新绘制,不然不会出现效果 postInvalidate(); } }); //开始执行动画 progressAnimator.start(); //中心数据的动画效果 ValueAnimator valueAnimator = ValueAnimator.ofInt(mAnimatorValue, currentValue); valueAnimator.setDuration(2500); valueAnimator.setInterpolator(new LinearInterpolator()); valueAnimator.addUpdateListener(new ValueAnimator.AnimatorUpdateListener() { @Override public void onAnimationUpdate(ValueAnimator valueAnimator) { mAnimatorValue = (int) valueAnimator.getAnimatedValue(); postInvalidate(); } }); valueAnimator.start(); } /** * 设置数据 * @param minValue 最小值 * @param maxValue 最大值 * @param currentValue 当前绘制的值 * @param des 描述信息 */ public void setValues(int minValue,int maxValue, int currentValue,String des) { mDes=des; mMaxValue=maxValue; mMinValue=minValue; //完全覆盖 if (currentValue > maxValue) { currentValue = maxValue; } //计算弧度比重 float scale = (float) currentValue / maxValue; //计算弧度 float currentAngle = scale * mAngle; //开始执行动画 setAnimation(0, currentAngle, currentValue,2500); } public float dp2px(float dp) { DisplayMetrics metrics = Resources.getSystem().getDisplayMetrics(); return dp * metrics.density; }} |
总结:设置Paint的画笔形状(Cap和Join设置为弧形);使用Canvas的drawArc方法绘制圆弧及drawText绘制文本信息等;ValueAnimator设置数据及当前圆弧进度的动画效果。
以上就是本文的全部内容,希望对大家的学习有所帮助,也希望大家多多支持服务器之家。
原文链接:https://blog.csdn.net/ruancw/article/details/80744905


