一、前言
程序界面上的按钮多种多样,常用的就这几种:普通按钮、图标按钮、文字按钮、图片文字混合按钮。本文章记录了不同样式类型的按钮实现方法。下面话不多说了,来一起看看详细的介绍吧。
二、固定样式的按钮
固定样式的按钮一般在临时使用时或程序的样式比较固定时才会使用,按钮整体样式不需要做大的改动。
2.1 普通按钮-扁平化风格
先看效果:
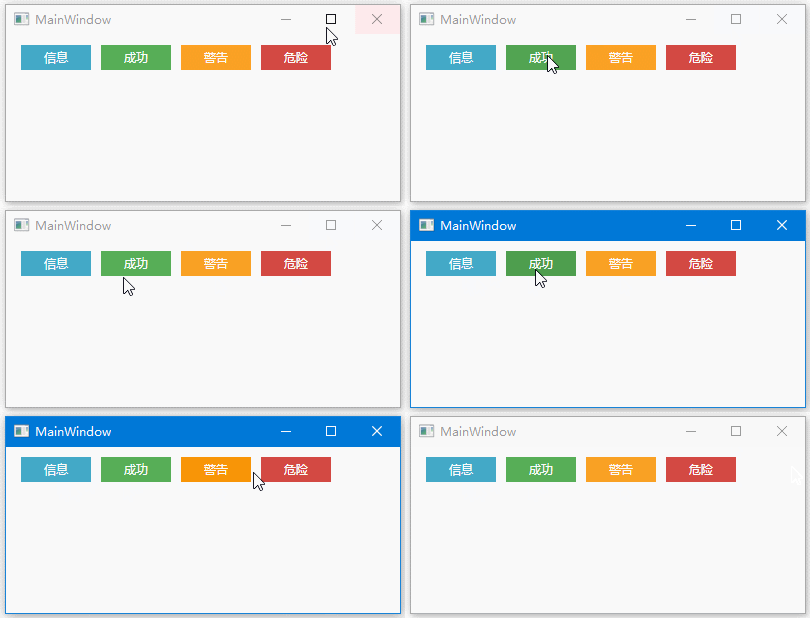
定义button的样式,详见代码:
|
1
2
3
4
5
6
7
8
9
10
11
12
13
14
15
16
17
18
19
20
21
22
23
24
|
<style x:key="btninfostyle" targettype="button"> <setter property="width" value="70"/> <setter property="height" value="25"/> <setter property="foreground" value="white"/> <setter property="borderthickness" value="0"/> <setter property="background" value="#43a9c7"/> <setter property="template"> <setter.value> <controltemplate targettype="button"> <border x:name="border" background="{templatebinding background}" borderbrush="{templatebinding borderbrush}" borderthickness="{templatebinding borderthickness}" snapstodevicepixels="true"> <textblock text="{templatebinding content}" foreground="{templatebinding foreground}" verticalalignment="center" horizontalalignment="center"/> </border> <controltemplate.triggers> <trigger property="ismouseover" value="true"> <setter targetname="border" property="background" value="#2f96b4"/> </trigger> <trigger property="ispressed" value="true"> <setter targetname="border" property="background" value="#2a89a4"/> </trigger> </controltemplate.triggers> </controltemplate> </setter.value> </setter></style> |
引用方法:
|
1
2
3
4
|
<grid background="white"> <stackpanel orientation="horizontal" margin="10" verticalalignment="top"> <button style="{staticresource btninfostyle}" content="信息" margin="5 0"/></grid> |
上述代码实现了button按钮的扁平化样式,如果你想调整颜色风格,通过修改background的值可实现默认颜色,鼠标经过颜色以及鼠标按下颜色。
2.2 图标按钮
先看效果:
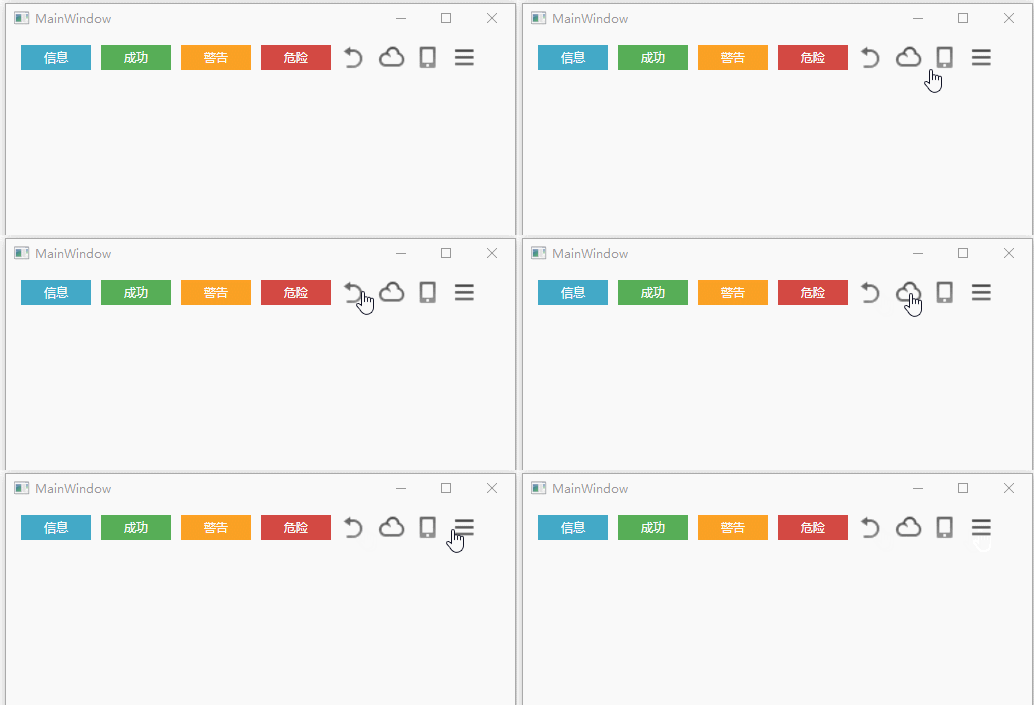
button样式的代码和扁平化button差不多,只是把textblock控件替换成了image控件,另外需要设置button默认的背景色为透明。废话不多说看代码:
|
1
2
3
4
5
6
7
8
9
10
11
12
13
14
15
16
17
18
19
20
|
<style x:key="btnimagestyle1" targettype="button"> <setter property="cursor" value="hand"/> <setter property="template"> <setter.value> <controltemplate targettype="button"> <border width="{templatebinding width}" height="{templatebinding height}"> <image x:name="img" verticalalignment="center" horizontalalignment="center" source="/images/button1.png" stretch="none"/> </border> <controltemplate.triggers> <trigger property="ismouseover" value="true"> <setter targetname="img" property="source" value="/images/button1.png"/> </trigger> <trigger property="ispressed" value="true"> <setter targetname="img" property="source" value="/images/button1.png"/> </trigger> </controltemplate.triggers> </controltemplate> </setter.value> </setter> </style> |
这里的button1.png需要自己准备图片资源,ismouseover和ispressed的图片资源可自己替换,替换之后能有更丰富的效果呈现。
2.3 图标文字混合按钮
效果:

实现代码:
|
1
2
3
4
5
6
7
8
9
10
11
12
13
14
15
16
17
18
19
20
|
<style x:key="btnimgtxtstyle1" targettype="button"> <setter property="foreground" value="#555"/> <setter property="template"> <setter.value> <controltemplate targettype="button"> <border> <stackpanel orientation="horizontal" horizontalalignment="center"> <image source="images/adshut.png" stretch="none"/> <textblock x:name="txt" text="{templatebinding content}" foreground="{templatebinding foreground}" verticalalignment="center" horizontalalignment="center"/> </stackpanel> </border> <controltemplate.triggers> <trigger property="ismouseover" value="true"> <setter property="foreground" value="#333333" targetname="txt"/> </trigger> </controltemplate.triggers> </controltemplate> </setter.value> </setter> </style> |
2.4 文字按钮和2.3中的图标文字按钮样式差不多,只需要把image控件去掉就行。
三、复用性高的按钮
要想实现复用性高的按钮,就必须新建自定义控件。下面这个实例通过自定义控件实现上述所有效果,并且可以随意更改风格。
首先在项目中右键-添加-新建项-自定义控件。
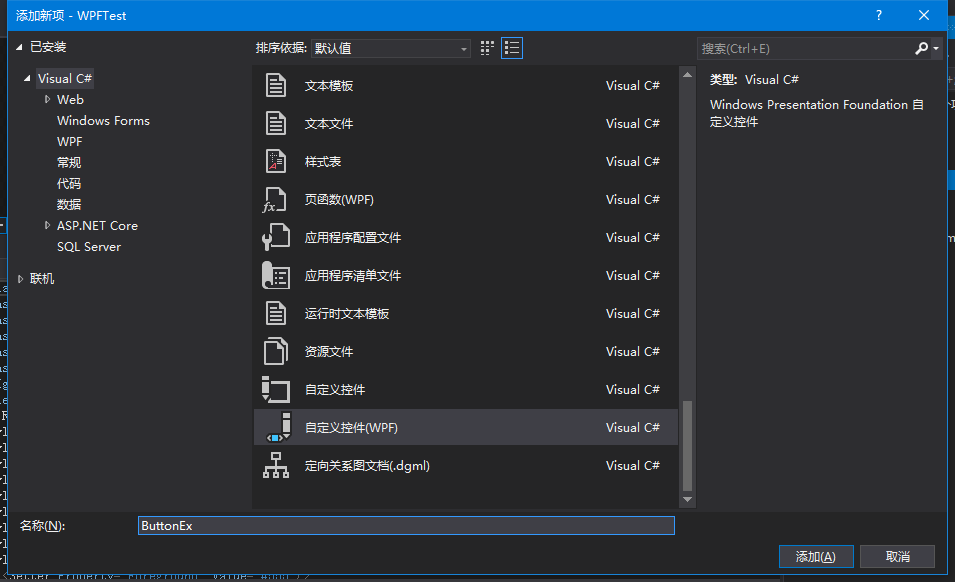
新建自定义控件之后,添加依赖属性。代码如下:
|
1
2
3
4
5
6
7
8
9
10
11
12
13
14
15
16
17
18
19
20
21
22
23
24
25
26
27
28
29
30
31
32
33
34
35
36
37
38
39
40
41
42
43
44
45
46
47
48
49
50
51
52
53
54
55
56
57
58
59
60
61
62
63
64
65
66
67
68
69
70
71
72
73
74
75
76
77
78
79
80
81
82
83
84
85
86
87
88
89
90
91
92
93
94
95
|
public class buttonex : button { static buttonex() { defaultstylekeyproperty.overridemetadata(typeof(buttonex), new frameworkpropertymetadata(typeof(buttonex))); } public buttontype buttontype { get { return (buttontype)getvalue(buttontypeproperty); } set { setvalue(buttontypeproperty, value); } } public static readonly dependencyproperty buttontypeproperty = dependencyproperty.register("buttontype", typeof(buttontype), typeof(buttonex), new propertymetadata(buttontype.normal)); public imagesource icon { get { return (imagesource)getvalue(iconproperty); } set { setvalue(iconproperty, value); } } public static readonly dependencyproperty iconproperty = dependencyproperty.register("icon", typeof(imagesource), typeof(buttonex), new propertymetadata(null)); public cornerradius cornerradius { get { return (cornerradius)getvalue(cornerradiusproperty); } set { setvalue(cornerradiusproperty, value); } } public static readonly dependencyproperty cornerradiusproperty = dependencyproperty.register("cornerradius", typeof(cornerradius), typeof(buttonex), new propertymetadata(new cornerradius(0))); public brush mouseoverforeground { get { return (brush)getvalue(mouseoverforegroundproperty); } set { setvalue(mouseoverforegroundproperty, value); } } public static readonly dependencyproperty mouseoverforegroundproperty = dependencyproperty.register("mouseoverforeground", typeof(brush), typeof(buttonex), new propertymetadata()); public brush mousepressedforeground { get { return (brush)getvalue(mousepressedforegroundproperty); } set { setvalue(mousepressedforegroundproperty, value); } } public static readonly dependencyproperty mousepressedforegroundproperty = dependencyproperty.register("mousepressedforeground", typeof(brush), typeof(buttonex), new propertymetadata()); public brush mouseoverborderbrush { get { return (brush)getvalue(mouseoverborderbrushproperty); } set { setvalue(mouseoverborderbrushproperty, value); } } public static readonly dependencyproperty mouseoverborderbrushproperty = dependencyproperty.register("mouseoverborderbrush", typeof(brush), typeof(buttonex), new propertymetadata()); public brush mouseoverbackground { get { return (brush)getvalue(mouseoverbackgroundproperty); } set { setvalue(mouseoverbackgroundproperty, value); } } public static readonly dependencyproperty mouseoverbackgroundproperty = dependencyproperty.register("mouseoverbackground", typeof(brush), typeof(buttonex), new propertymetadata()); public brush mousepressedbackground { get { return (brush)getvalue(mousepressedbackgroundproperty); } set { setvalue(mousepressedbackgroundproperty, value); } } public static readonly dependencyproperty mousepressedbackgroundproperty = dependencyproperty.register("mousepressedbackground", typeof(brush), typeof(buttonex), new propertymetadata()); } public enum buttontype { normal, icon, text, icontext } |
为不同类型按钮设置样式,代码如下:
|
1
2
3
4
5
6
7
8
9
10
11
12
13
14
15
16
17
18
19
20
21
22
23
24
25
26
27
28
29
30
31
32
33
34
35
36
37
38
39
40
41
42
43
44
45
46
47
48
49
50
51
52
53
54
55
56
57
58
59
60
61
62
63
64
65
66
67
68
69
70
71
72
73
74
75
76
77
78
79
80
81
82
83
84
85
86
87
88
89
90
91
92
93
94
95
96
97
98
99
100
101
102
|
<style targettype="{x:type local:buttonex}"> <style.triggers> <trigger property="buttontype" value="normal"> <setter property="background" value="#43a9c7"/> <setter property="mouseoverbackground" value="#2f96b4"/> <setter property="mousepressedbackground" value="#2a89a4"/> <setter property="foreground" value="white"/> <setter property="mouseoverforeground" value="white"/> <setter property="mousepressedforeground" value="white"/> <setter property="borderbrush" value="transparent"/> <setter property="borderthickness" value="0"/> <setter property="template"> <setter.value> <controltemplate targettype="{x:type local:buttonex}"> <border x:name="border" background="{templatebinding background}" cornerradius="{templatebinding cornerradius}" borderbrush="{templatebinding borderbrush}" borderthickness="{templatebinding borderthickness}" width="{templatebinding width}" height="{templatebinding height}" snapstodevicepixels="true"> <textblock x:name="txt" text="{templatebinding content}" foreground="{templatebinding foreground}" verticalalignment="center" horizontalalignment="center"/> </border> <controltemplate.triggers> <trigger property="ismouseover" value="true"> <setter targetname="border" property="background" value="{binding mouseoverbackground,relativesource={relativesource templatedparent}}"/> <setter targetname="txt" property="foreground" value="{binding mouseoverforeground,relativesource={relativesource templatedparent}}"/> <setter targetname="border" property="borderbrush" value="{binding mouseoverborderbrush,relativesource={relativesource templatedparent}}"/> </trigger> <trigger property="ispressed" value="true"> <setter targetname="border" property="background" value="{binding mousepressedbackground,relativesource={relativesource templatedparent}}"/> <setter targetname="txt" property="foreground" value="{binding mousepressedforeground,relativesource={relativesource templatedparent}}"/> </trigger> </controltemplate.triggers> </controltemplate> </setter.value> </setter> </trigger> <trigger property="buttontype" value="icon"> <setter property="cursor" value="hand"/> <setter property="template"> <setter.value> <controltemplate targettype="{x:type local:buttonex}"> <border width="{templatebinding width}" height="{templatebinding height}"> <image x:name="img" verticalalignment="center" horizontalalignment="center" source="{templatebinding icon}" stretch="none"/> </border> <controltemplate.triggers> <trigger property="ismouseover" value="true"> <setter property="opacity" value="0.8"/> </trigger> <trigger property="ispressed" value="true"> <setter property="opacity" value="0.9"/> </trigger> </controltemplate.triggers> </controltemplate> </setter.value> </setter> </trigger> <trigger property="buttontype" value="text"> <setter property="cursor" value="hand"/> <setter property="foreground" value="#002c99"/> <setter property="mouseoverforeground" value="#ff2c99"/> <setter property="mousepressedforeground" value="#002c99"/> <setter property="template"> <setter.value> <controltemplate targettype="{x:type local:buttonex}"> <textblock x:name="txt" text="{templatebinding content}" foreground="{templatebinding foreground}" verticalalignment="center" horizontalalignment="center"/> <controltemplate.triggers> <trigger property="ismouseover" value="true"> <setter property="foreground" value="{binding mouseoverforeground,relativesource={relativesource templatedparent}}" targetname="txt"/> </trigger> <trigger property="ispressed" value="true"> <setter property="foreground" value="{binding mousepressedforeground,relativesource={relativesource templatedparent}}" targetname="txt"/> </trigger> </controltemplate.triggers> </controltemplate> </setter.value> </setter> </trigger> <trigger property="buttontype" value="icontext"> <setter property="cursor" value="hand"/> <setter property="foreground" value="#555"/> <setter property="mouseoverforeground" value="#555"/> <setter property="mousepressedforeground" value="#555"/> <setter property="template"> <setter.value> <controltemplate targettype="{x:type local:buttonex}"> <border> <stackpanel orientation="horizontal" horizontalalignment="center"> <image source="{templatebinding icon}" stretch="none"/> <textblock x:name="txt" text="{templatebinding content}" foreground="{templatebinding foreground}" verticalalignment="center" horizontalalignment="center"/> </stackpanel> </border> <controltemplate.triggers> <trigger property="ismouseover" value="true"> <setter property="foreground" value="{binding mouseoverforeground,relativesource={relativesource templatedparent}}" targetname="txt"/> </trigger> <trigger property="ispressed" value="true"> <setter property="foreground" value="{binding mousepressedforeground,relativesource={relativesource templatedparent}}" targetname="txt"/> </trigger> </controltemplate.triggers> </controltemplate> </setter.value> </setter> </trigger> </style.triggers> </style> |
然后就可以引用该控件了:
|
1
2
3
4
5
6
7
8
|
<grid> <wrappanel> <local:buttonex content="信息" width="75" height="25" margin="10" buttontype="normal"/> <local:buttonex icon="/images/button1.png" margin="10" buttontype="icon"/> <local:buttonex content="文字按钮" margin="10" buttontype="text"/> <local:buttonex content="图文按钮" icon="/images/adshut.png" margin="10" buttontype="icontext"/> </wrappanel> </grid> |
效果如下:
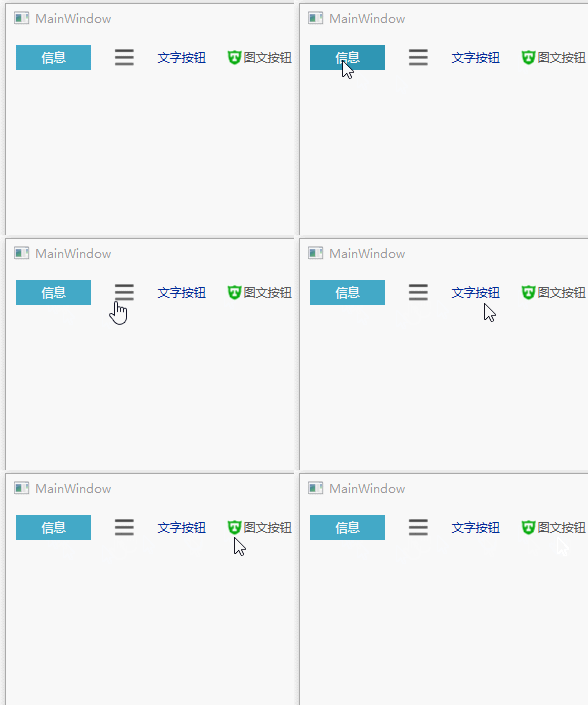
至此已经完成button控件的扩展功能,如果想要添加动画或者设置图标的位置和边距等,可以自己另外添加依赖属性来扩展。
总结
以上就是这篇文章的全部内容了,希望本文的内容对大家的学习或者工作具有一定的参考学习价值,如果有疑问大家可以留言交流,谢谢大家对服务器之家的支持。
原文链接:http://www.cnblogs.com/xiaomingg/p/8699125.html


