哈喽,大家好,我是了不起。
Redis平常作为缓存使用较多,但是也可以作为发布订阅的消息队列来使用,本篇给大家介绍一下如何简单使用!右手就能操作
前言
本篇我们会使用Spring Data Redis中集成的发布订阅功能来展示这个示例,
先看我们需要的依赖, 其实只需要引入spring-boot-starter-data-redis 就够了,另外再写一个接口来触发消息发布。
<dependency>
   <groupId>org.springframework.boot</groupId>
   <artifactId>spring-boot-starter-data-redis</artifactId>
  </dependency>
  <dependency>
   <groupId>org.springframework.boot</groupId>
   <artifactId>spring-boot-starter-webflux</artifactId>
  </dependency>
Spring Data 为 Redis 提供了专用的消息传递集成,其功能和命名与 Spring Framework 中的 JMS 集成类似。
Redis 消息传递大致可分为两个功能领域:
- 消息的发布或制作
- 消息的订阅或消费
其中主要的类都在这两个包下面,感兴趣的小伙伴可以去看看,原理就先不讲了,下期再安排吧。
org.springframework.data.redis.connection
org.springframework.data.redis.listener
发布消息
发布消息我们可以直接使用RedisTemplate的 convertAndSend , 这个方法有两个参数,分别是channel, 还有消息内容。
public Long convertAndSend(String channel, Object message) {
        Assert.hasText(channel, "a non-empty channel is required");
        byte[] rawChannel = this.rawString(channel);
        byte[] rawMessage = this.rawValue(message);
        return (Long)this.execute((connection) -> {
            return connection.publish(rawChannel, rawMessage);
        }, true);
    }
本次我们使用如下类来发布消息。作为示例就要简单粗暴。
public interface MessagePublisher {
    void publish(String message);
}


import org.springframework.data.redis.core.RedisTemplate;
import org.springframework.data.redis.listener.ChannelTopic;

public class RedisMessagePublisher implements MessagePublisher {

    private RedisTemplate<String, Object> redisTemplate;
    private ChannelTopic topic;

    public RedisMessagePublisher() {
    }

    public RedisMessagePublisher(
            RedisTemplate<String, Object> redisTemplate, ChannelTopic topic) {
        this.redisTemplate = redisTemplate;
        this.topic = topic;
    }

    public void publish(String message) {
        redisTemplate.convertAndSend(topic.getTopic(), message);
    }
}
订阅消息
订阅消息需要实现MessageListener的接口 ,onMessage的方法是收到消息后的消费方法。
import org.springframework.data.redis.connection.Message;
import org.springframework.data.redis.connection.MessageListener;
import org.springframework.stereotype.Service;

@Service
public class RedisMessageSubscriber implements MessageListener {

    public void onMessage(Message message, byte[] pattern) {
        System.*out*.println("Message received: " + message.toString());
    }

}

// 消息订阅2
@Service("redisMessageSubscriber2")
public class RedisMessageSubscriber2 implements MessageListener {

    public void onMessage(Message message, byte[] pattern) {
        System.out.println("Message received2: " + message.toString());
    }

}
消息监听容器和适配器
另外就是订阅方订阅发布者,SpringDataRedis这里使用了一个消息监听容器和适配器来处理。我们直接贴出代码:
import com.north.redis.message.MessagePublisher;
import com.north.redis.message.RedisMessagePublisher;
import com.north.redis.message.RedisMessageSubscriber;
import jakarta.annotation.Resource;
import org.springframework.beans.factory.annotation.Autowired;
import org.springframework.context.annotation.Bean;
import org.springframework.context.annotation.Configuration;
import org.springframework.data.redis.connection.MessageListener;
import org.springframework.data.redis.connection.RedisConnectionFactory;
import org.springframework.data.redis.core.RedisTemplate;
import org.springframework.data.redis.listener.ChannelTopic;
import org.springframework.data.redis.listener.RedisMessageListenerContainer;
import org.springframework.data.redis.listener.adapter.MessageListenerAdapter;
import org.springframework.data.redis.serializer.GenericJackson2JsonRedisSerializer;
import org.springframework.data.redis.serializer.StringRedisSerializer;

@Configuration
public class RedisConfig {

    @Autowired
    private RedisConnectionFactory redisConnectionFactory;

    @Resource
    MessageListener redisMessageSubscriber2;

    @Bean
    public RedisTemplate<String, Object> redisTemplate() {
        RedisTemplate<String, Object> template = new RedisTemplate<>();
        template.setConnectionFactory(redisConnectionFactory);
        // 使用StringRedisSerializer来序列化和反序列化redis的key值
        template.setKeySerializer(new StringRedisSerializer());
        // 使用GenericJackson2JsonRedisSerializer来序列化和反序列化redis的value值
        template.setValueSerializer(new GenericJackson2JsonRedisSerializer());
        template.afterPropertiesSet();
        return template;
    }

    @Bean
    MessageListenerAdapter messageListener() {
        return new MessageListenerAdapter(new RedisMessageSubscriber());
    }


    @Bean
    RedisMessageListenerContainer redisContainer() {
        RedisMessageListenerContainer container
                = new RedisMessageListenerContainer();
        container.setConnectionFactory(redisConnectionFactory);
        container.addMessageListener(messageListener(), topic());
        container.addMessageListener(redisMessageSubscriber2, topic());
        return container;
    }

    @Bean
    MessagePublisher redisPublisher() {
        return new RedisMessagePublisher(redisTemplate(), topic());
    }

    @Bean
    ChannelTopic topic() {
        return new ChannelTopic("northQueue");
    }

}
以上代码中有几个点:
- 创建适配器时,这里面我们使用了MessageListener的实现类,简单容易理解。
- 使用消息容器来订阅消息队列,其中addMessageListener中可以订阅多个队列,其中第二个参数可以传入队列名数组。而且可以添加多个订阅方。
RedisMessageListenerContainer 是处理消费者和发布者的关系的类 ,使用起来也比较简单。
测试
下面我们做一个小测试:
写一个接口来出发消息发布,使用多个订阅者
@RestController
public class TestController {
    @Resource
    private MessagePublisher redisMessagePublisher;

    @GetMapping("/hello")
    public Flux<String> hello(@RequestParam String message) {
        redisMessagePublisher.publish(message);
        return Flux.*just*("Hello", "Webflux");
    }
}
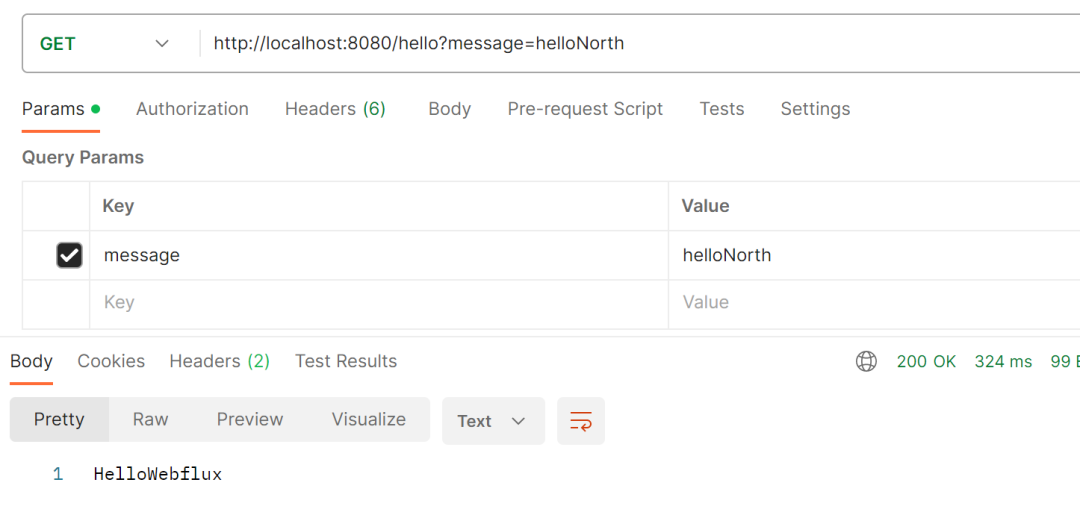
启动SpringBoot项目后我们发送消息测试:
 图片
图片
两个消费者都接到了消息:
 图片
图片
原文地址:https://mp.weixin.qq.com/s/9QDmbq3eI0qTzBuG1ulWbA


