这里接上一篇LayoutInflater源码分析继续分析。
rinflate源码解析
这里详细理一理rinflate方法,作用就是找到传入的XmlPullParser当前层级所有的view并add到parent上:
|
1
2
3
4
5
6
7
8
9
10
11
12
13
14
15
16
17
18
19
20
21
22
23
24
25
26
27
28
29
30
31
32
33
34
35
36
37
38
39
40
41
42
43
44
45
46
47
48
49
50
|
final void rInflateChildren(XmlPullParser parser, View parent, AttributeSet attrs, boolean finishInflate) throws XmlPullParserException, IOException { rInflate(parser, parent, parent.getContext(), attrs, finishInflate);}void rInflate(XmlPullParser parser, View parent, Context context, AttributeSet attrs, boolean finishInflate) throws XmlPullParserException, IOException { final int depth = parser.getDepth(); int type; boolean pendingRequestFocus = false; while (((type = parser.next()) != XmlPullParser.END_TAG || parser.getDepth() > depth) && type != XmlPullParser.END_DOCUMENT) { if (type != XmlPullParser.START_TAG) { continue; } final String name = parser.getName(); if (TAG_REQUEST_FOCUS.equals(name)) { pendingRequestFocus = true; consumeChildElements(parser); } else if (TAG_TAG.equals(name)) { parseViewTag(parser, parent, attrs); } else if (TAG_INCLUDE.equals(name)) { if (parser.getDepth() == 0) { throw new InflateException("<include /> cannot be the root element"); } parseInclude(parser, context, parent, attrs); } else if (TAG_MERGE.equals(name)) { throw new InflateException("<merge /> must be the root element"); } else { final View view = createViewFromTag(parent, name, context, attrs); final ViewGroup viewGroup = (ViewGroup) parent; final ViewGroup.LayoutParams params = viewGroup.generateLayoutParams(attrs); rInflateChildren(parser, view, attrs, true); viewGroup.addView(view, params); } } if (pendingRequestFocus) { parent.restoreDefaultFocus(); } if (finishInflate) { parent.onFinishInflate(); }} |
很明显rinflate是个递归方法,代码很简单,递归-判断类型决定是否继续递归-递归。
递归
我们知道,递归最重要的就是结束条件的选取,这里的结束条件有这么几个:
- type != XmlPullParser.END_TAG
- parser.getDepth() > depth
- type != XmlPullParser.END_DOCUMENT
其实1和3都是常规的结束条件,最重要的是2这个条件,这个结束条件保证了当前循环只读取本层的view,我们结合一个例子来看一下。
下面是一个很简单的XmlPullParser解析的例子:
|
1
2
3
4
5
6
7
8
9
10
11
12
13
14
15
16
17
18
19
20
21
|
<?xml version="1.0" encoding="utf-8"?><RelativeLayout xmlns:android="http://schemas.android.com/apk/res/android" android:layout_width="match_parent" android:layout_height="match_parent"> <LinearLayout android:layout_width="wrap_content" android:layout_height="wrap_content"> <Button android:id="@+id/btn_1" android:layout_width="80dp" android:layout_height="45dp" /> </LinearLayout> <Button android:id="@+id/btn_2" android:layout_width="match_parent" android:layout_height="60dp" /></RelativeLayout> |
解析代码如下:
|
1
2
3
4
5
6
7
8
9
10
11
12
13
14
15
16
17
18
19
20
21
22
23
24
25
26
27
28
29
30
31
32
33
34
35
36
37
38
39
40
41
42
43
44
45
46
47
48
49
50
51
52
53
|
public void readMainXml() { //1. 拿到资源文件 InputStream is = getResources().openRawResource(R.raw.activity_main); //2. 拿到解析器对象 XmlPullParser parser = Xml.newPullParser(); final int depth = parser.getDepth(); try { //3. 初始化xp对象 parser.setInput(is, "utf-8"); //4.开始解析 //获取当前节点的事件类型 int type = parser.getEventType(); while (((type = parser.next()) != XmlPullParser.END_TAG || parser.getDepth() > depth) && type != XmlPullParser.END_DOCUMENT) { switch (type) { case XmlPullParser.START_TAG: int attrCount = parser.getAttributeCount(); LogUtil.d("depth:" + parser.getDepth() + " - " + parser.getName() + " 标签开始"); for (int i = 0; i < attrCount; i++) { String attrName = parser.getAttributeName(i); String attrValue = parser.getAttributeValue(i); //layout_width : match_parent LogUtil.d("depth:" + parser.getDepth() + " - " + parser.getName() + "属性: " + attrName + " : " + attrValue); } break; case XmlPullParser.END_TAG: LogUtil.d("depth:" + parser.getDepth() + " - " + parser.getName() + "标签结束"); break; default: } } } catch (Exception e) { e.printStackTrace(); } }// D: depth:1 - RelativeLayout 标签开始// D: depth:1 - RelativeLayout属性: layout_width : match_parent// D: depth:1 - RelativeLayout属性: layout_height : match_parent// D: depth:2 - LinearLayout 标签开始// D: depth:2 - LinearLayout属性: layout_width : wrap_content// D: depth:2 - LinearLayout属性: layout_height : wrap_content// D: depth:3 - Button 标签开始// D: depth:3 - Button属性: id : @+id/btn_1// D: depth:3 - Button属性: layout_width : 80dp// D: depth:3 - Button属性: layout_height : 45dp// D: depth:3 - Button标签结束// D: depth:2 - LinearLayout标签结束// D: depth:2 - Button 标签开始// D: depth:2 - Button属性: id : @+id/btn_2// D: depth:2 - Button属性: layout_width : match_parent// D: depth:2 - Button属性: layout_height : 60dp// D: depth:2 - Button标签结束// D: depth:1 - RelativeLayout标签结束 |
这里展示一个简单的XmlPullParser的例子,可以看到RelativeLayout有两个子View,分别是LinearLayout和Button2,depth都是2,结合上面的rinflate的代码可以理解,在View的递归树上,XmlPullParser的depth保证了层级,只会处理当前层级的View。
类型判断
方法体中做了类型的判断,特殊判断了几种类型如下:
TAG_REQUEST_FOCUS
非容器控件标签中放标签,表示将当前控件设为焦点,可以放到标签里面,多个EditText的时候使用标签首先获得焦点。
TAG_TAG
标签里面都可以放,类似于代码中使用View.setTag:
|
1
2
3
4
5
6
7
8
9
10
11
|
private void parseViewTag(XmlPullParser parser, View view, AttributeSet attrs) throws XmlPullParserException, IOException { final Context context = view.getContext(); final TypedArray ta = context.obtainStyledAttributes(attrs, R.styleable.ViewTag); final int key = ta.getResourceId(R.styleable.ViewTag_id, 0); final CharSequence value = ta.getText(R.styleable.ViewTag_value); view.setTag(key, value); ta.recycle(); consumeChildElements(parser);} |
根据id获取value,并把id当做key,设置parent的Tag。可以看下面这个例子:
|
1
2
3
4
5
6
7
8
9
10
|
<EditText android:id="@+id/et_1" android:layout_width="match_parent" android:layout_height="50dp"> <tag android:id="@+id/tag1" android:value="tag_value" /></EditText> |
可以使用findViewById(R.id.et_1).getTag(R.id.tag1),得到tag_value值,注意不可以使用getTag(),有参数无参数获取的不是同一个属性。
TAG_MERGE
这里还对标签做了二次的判断,保证标签不会出现在非root元素的位置。 如果不是上述特殊的标签,使用createViewFromTag加载出来view,并用当前的attrs加载成LayoutParams设置给当前View,继续向下递归的同时把view add到parent.
TAG_INCLUDE
<include>标签可以实现在一个layout中引用另一个layout的布局,这通常适合于界面布局复杂、不同界面有共用布局的APP中,比如一个APP的顶部布局、侧边栏布局、底部Tab栏布局、ListView和GridView每一项的布局等,将这些同一个APP中有多个界面用到的布局抽取出来再通过<include>标签引用,既可以降低layout的复杂度,又可以做到布局重用(布局有改动时只需要修改一个地方就可以了)。
这些类型之外就类似于之前分析过的处理,先调用createViewFromTag方法创建View,设置attrs属性,再调用递归方法rInflateChildren把view的子View add到view上,然后添加到parent上,直到层级遍历结束。
下面重点看parseInclude的源码分析:
parseInclude
|
1
2
3
4
5
6
7
8
9
10
11
12
13
14
15
16
17
18
19
20
21
22
23
24
25
26
27
28
29
30
31
32
33
34
35
36
37
38
39
40
41
42
43
44
45
46
47
48
49
50
51
52
53
54
55
56
57
58
59
60
61
62
63
64
65
66
67
68
69
70
71
72
73
74
75
76
77
78
79
80
81
82
83
84
85
86
87
88
89
90
91
92
93
94
95
96
97
98
99
100
101
102
103
104
105
106
107
108
109
110
111
112
113
114
115
116
117
118
119
120
121
122
123
124
125
|
private void parseInclude(XmlPullParser parser, Context context, View parent, AttributeSet attrs) throws XmlPullParserException, IOException { int type;//-------------------------------------第1部分-------------------------------------// if (!(parent instanceof ViewGroup)) { throw new InflateException("<include /> can only be used inside of a ViewGroup"); } // 如果有theme属性,从当前View的attrs里面查看是否有theme属性,如果有,就重新创建ContextThemeWrapper, // 用当前View的theme替换之前ContextThemeWrapper里面的theme final TypedArray ta = context.obtainStyledAttributes(attrs, ATTRS_THEME); final int themeResId = ta.getResourceId(0, 0);//InflateActivityMergeTheme final boolean hasThemeOverride = themeResId != 0; if (hasThemeOverride) { context = new ContextThemeWrapper(context, themeResId); } ta.recycle(); // 查看当前view的attrs里面是否有layout的id,也就是'@layout/xxxx‘,如果没有就返回0 int layout = attrs.getAttributeResourceValue(null, ATTR_LAYOUT, 0); if (layout == 0) { //找不到先找这个layout属性的值'@layout/xxxx‘,看layout属性的string是否为空,如果是空就直接抛异常,不为空才去找layoutId final String value = attrs.getAttributeValue(null, ATTR_LAYOUT); if (value == null || value.length() <= 0) { throw new InflateException("You must specify a layout in the" + " include tag: <include layout=\"@layout/layoutID\" />"); } // 如果取不到,就尝试去"?attr/"下面找对应的属性。 layout = context.getResources().getIdentifier( value.substring(1), "attr", context.getPackageName()); } // The layout might be referencing a theme attribute. if (mTempValue == null) { mTempValue = new TypedValue(); } if (layout != 0 && context.getTheme().resolveAttribute(layout, mTempValue, true)) { layout = mTempValue.resourceId; } if (layout == 0) { final String value = attrs.getAttributeValue(null, ATTR_LAYOUT); throw new InflateException("You must specify a valid layout " + "reference. The layout ID " + value + " is not valid."); }//-------------------------------------第2部分-------------------------------------// final View precompiled = tryInflatePrecompiled(layout, context.getResources(), (ViewGroup) parent, /*attachToRoot=*/true); if (precompiled == null) { final XmlResourceParser childParser = context.getResources().getLayout(layout); try { final AttributeSet childAttrs = Xml.asAttributeSet(childParser); while ((type = childParser.next()) != XmlPullParser.START_TAG && type != XmlPullParser.END_DOCUMENT) { // Empty. } final String childName = childParser.getName(); if (TAG_MERGE.equals(childName)) { // 如果是merge标签,不支持属性的设置,注意此处直接把parent作为父布局传入,也就是加载出来的子View直接挂到parent上。 rInflate(childParser, parent, context, childAttrs, false); } else { final View view = createViewFromTag(parent, childName, context, childAttrs, hasThemeOverride); final ViewGroup group = (ViewGroup) parent; // 获取include设置的id和visible。也就是说如果include设置了id和visible,会使用include设置的这两个属性 // 真正view设置的id和visible会不起作用 final TypedArray a = context.obtainStyledAttributes( attrs, R.styleable.Include); final int id = a.getResourceId(R.styleable.Include_id, View.NO_ID); final int visibility = a.getInt(R.styleable.Include_visibility, -1); a.recycle(); // 先尝试使用<include >标签的属性去创建params,判断的标准是有没有width/height属性 // 如果没有则使用view的属性去创建params,然后调用view.setLayoutParams给View设置属性 // 换言之,如果<include>设置了width/height属性,会整体覆盖view的属性,反之则不会。 ViewGroup.LayoutParams params = null; try { params = group.generateLayoutParams(attrs); } catch (RuntimeException e) { // Ignore, just fail over to child attrs. } if (params == null) { params = group.generateLayoutParams(childAttrs); } view.setLayoutParams(params); // Inflate all children. rInflateChildren(childParser, view, childAttrs, true); // 如果<include>标签设置了id和visibility属性则一定会替换里面的id和visibility属性 // 换言之,<include>标签设置了id和visibility属性,里面View的id和visibility会不起作用。 if (id != View.NO_ID) { view.setId(id); } switch (visibility) { case 0: view.setVisibility(View.VISIBLE); break; case 1: view.setVisibility(View.INVISIBLE); break; case 2: view.setVisibility(View.GONE); break; } group.addView(view); } } finally { childParser.close(); } } LayoutInflater.consumeChildElements(parser); } |
两个部分:
-
查找
<include />标签是否有layout属性,并应用适合的theme属性 -
判断是否是
<merge>,不同的方式加载对应的view,替换对应的属性
第一部分:查找layout属性
<include />最重要的就是用来做layout的替换,所以必须设置一个layout属性,没有设置layout属性的<include />是没有意义的,有两种方式去设置这个layout属性: 一种是直接设置:
|
1
2
|
<include layout="@layout/include_test_viewgroup"/> |
这种也是我们最常用的方式,这种方式我们称作①。
第二种方式是自定义一个reference,在attrs中定义,这样也可以用来实现重用,比如:
|
1
2
3
4
5
6
7
8
9
10
|
//attrs.xml <declare-styleable name="TestInclude"> <attr name="theme_layout" format="reference" /> </declare-styleable>//style.xml <style name="InflateActivityTheme" parent="AppTheme"> <!-- Customize your theme here. --> <item name="colorPrimary">@color/red</item> <item name="theme_layout">@layout/include_test_merge</item> </style> |
然后在layout中使用:
|
1
2
3
4
5
6
7
|
<?xml version="1.0" encoding="utf-8"?><RelativeLayout xmlns:android="http://schemas.android.com/apk/res/android" android:layout_width="match_parent" android:layout_height="match_parent" android:theme="@style/InflateActivityTheme"> <include layout="?attr/theme_layout"/></RelativeLayout> |
上面这种方式我们称作②,或者下面这种我们称作③
|
1
2
3
|
<include layout="?attr/theme_layout" android:theme="@style/InflateActivityTheme" /> |
按照这几种的介绍我们来走一遍上面查找layout的代码:
|
1
2
3
4
5
6
7
|
final TypedArray ta = context.obtainStyledAttributes(attrs, ATTRS_THEME);final int themeResId = ta.getResourceId(0, 0);final boolean hasThemeOverride = themeResId != 0;if (hasThemeOverride) { context = new ContextThemeWrapper(context, themeResId);}ta.recycle(); |
这是方式②和③的区别,方式②说明传过来的context就有theme,方式③表示能从attrs中找到theme属性,所以hasThemeOverride=true,如果需要覆盖就用当前view的theme重新创建了ContextThemeWrapper。这两者有一即可。
|
1
2
3
4
5
6
7
8
9
10
11
12
13
14
15
|
// 查看当前view的attrs里面是否有layout的id,也就是'@layout/xxxx‘,如果没有就返回0int layout = attrs.getAttributeResourceValue(null, ATTR_LAYOUT, 0);if (layout == 0) { //找不到先找这个layout属性的值'@layout/xxxx‘,看layout属性的string是否为空,如果是空就直接抛异常,不为空才去找layoutId final String value = attrs.getAttributeValue(null, ATTR_LAYOUT); if (value == null || value.length() <= 0) { throw new InflateException("You must specify a layout in the" + " include tag: <include layout=\"@layout/layoutID\" />"); } // 如果取不到,就尝试去"?attr/"下面找对应的属性。 layout = context.getResources().getIdentifier( value.substring(1), "attr", context.getPackageName());} |
关于方式①,代码里其实写清楚了,先找@layout/xxx这样的,如果找不到就到?attr/下面找。
第二部分:加载对应的View并替换
这段的代码其实看上面代码里的注释就好了,很清晰。加载替换的layout有两种情况:
1.merge标签,我们知道 merge标签用于降低View树的层次来优化Android的布局,所以merge标签并不是一层View结构,可以理解成一个占位,遇到merge标签就直接调用rinflate方法,找到所有的子view挂到parent上就好了,所以给设置什么属性,其实没什么作用。
2.非merge标签的其他ViewGroup,createViewFromTag加载进来对应的ViewGroup后
2.1. 尝试使用<include />的属性,如果标签没有设置width/height这样的基础属性就使用加载进来的layout的属性。
2.2. <include />标签总是起作用的属性有两个,一个是id,一个是visibility,如果<include />设置了这两个属性,总是会替换加载的layout的对应属性
设置完上面的属性之后,继续调用rInflateChildren去递归加载完所有的子view。
其实这个逻辑很像刚inflate刚开始执行时候的逻辑,可以回忆一下之前的代码。
这里有个小demo来看清这几个的区别:
|
1
2
3
4
5
6
7
8
9
10
11
12
13
|
#styles.xml <style name="InflateActivityTheme" parent="AppTheme"> <item name="colorPrimary">@color/red</item> <item name="theme_layout">@layout/include_test_merge</item> </style> <style name="InflateActivityMergeTheme" parent="AppTheme"> <item name="colorPrimary">@color/green</item> </style> <style name="InflateActivityIncludeTheme" parent="AppTheme"> <item name="colorPrimary">@color/blue</item> </style> |
总的布局文件如下:
|
1
2
3
4
5
6
7
8
9
10
11
12
13
14
15
16
17
18
19
20
21
22
23
24
25
26
27
|
<?xml version="1.0" encoding="utf-8"?><RelativeLayout xmlns:android="http://schemas.android.com/apk/res/android" android:layout_width="match_parent" android:layout_height="match_parent" android:background="?attr/colorPrimary" android:theme="@style/InflateActivityTheme"> <include layout="?attr/theme_layout" android:layout_width="wrap_content" android:layout_height="wrap_content" android:layout_alignParentTop="true" android:theme="@style/InflateActivityMergeTheme" /> <include layout="@layout/include_test_viewgroup" android:id="@+id/include_1" android:theme="@style/InflateActivityIncludeTheme" /> <include layout="@layout/include_test_viewgroup" android:id="@+id/include_2" android:layout_width="wrap_content" android:layout_height="wrap_content" android:layout_alignParentBottom="true" android:theme="@style/InflateActivityIncludeTheme" /></RelativeLayout> |
两个子View的布局文件如下:
|
1
2
3
4
5
6
7
8
9
10
11
12
13
14
15
16
17
18
19
20
21
22
23
24
25
26
27
28
29
30
31
32
33
34
|
#include_test_merge.xml<?xml version="1.0" encoding="utf-8"?><merge xmlns:android="http://schemas.android.com/apk/res/android"> <TextView android:layout_width="match_parent" android:layout_height="50dp" android:layout_centerInParent="true" android:background="?attr/colorPrimary" android:gravity="center" android:text="include merge" android:textColor="#fff" android:textSize="12sp" /></merge>#include_test_viewgroup.xml<?xml version="1.0" encoding="utf-8"?><LinearLayout xmlns:android="http://schemas.android.com/apk/res/android" android:id="@+id/ll_playcontroller" android:layout_width="match_parent" android:layout_height="50dp" android:background="?attr/colorPrimary" android:gravity="center"> <TextView android:layout_width="wrap_content" android:layout_height="wrap_content" android:gravity="center" android:text="include LinearLayout" android:textColor="#fff" android:textSize="15sp" /></LinearLayout> |
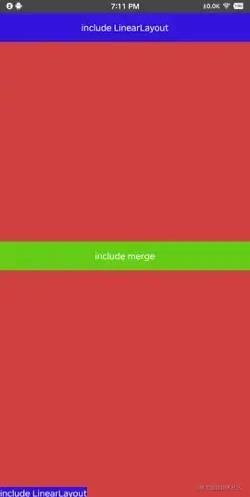
显示效果图如下:

大致覆盖了上面说的几种include的方式
-
theme中设置layout,
<include />设置了theme可以不设置layout属性 -
include子view是
<merge />标签和非<merge />标签的区别 -
<include />标签设置了width/height和其他位置相关的属性会使用外面设置的属性覆盖子View的属性,include_1没有设置属性所以使用的是include_test_viewgroup的属性,include_2设置了位置相关属性所以使用了设置的属性,从实际显示效果能看得出来。 -
关于theme的覆盖,如果子View设置了theme,会使用子View设置的theme替换context(父布局RelativeLayout)的theme,根据
android:background="?attr/colorPrimary"可以看出来
总结
rinflate是递归方法,主要的递归判断条件是XmlPullParser的depth
rinflate中判断了多种类型,有requestFocus和tag这些特殊标签的处理,View的创建还是会调用createViewFromTag来处理
如果是include标签会使用parseInclude方法,因为<include />标签的特殊性,会有一些<include />和真实标签的属性和theme的判断和替换
<include />设置theme就替换掉父布局的theme,两种方式设置layout属性,标签中直接设置layout或者使用theme中的layout。
<include />标签中设置了位置属性会替换子View的属性,<include />设置了id和visibility一定会生效。
以上就是源码分析Android rinflate的使用的详细内容,更多关于Android rinflate的资料请关注服务器之家其它相关文章!
原文链接:https://juejin.cn/post/7223201717063811130


