引言
去年经历了个虚拟人的项目,其中我参与了前端的部分,一个用electron写的编辑器,UI部分用的vue3+tsx的写法(这种组合是不是没见过?我也是第一次见,惊得我当时还发了个沸点)

我所负责的部分是让用户可以对贴图进行修改,其中就涉及到了图层功能(类似Photoshop),而我当时选用的fabric是没有图层的,因此我就得考虑如何实现图层
原理
fabric本身有提供group功能,本意是让你将画布上的一些元素组合起来,这也将成为本次图层功能的基础 既以一个group代表一个图层,画布下第一层children只有图层(group),而在group中,才是用户实际绘制的内容
效果预览
本次demo实现:
- 用户可手动添加/删除图层
- 可对每个图层进行独立显隐操作,并反馈到画布中
- 可对每个图层单独预览
效果图:
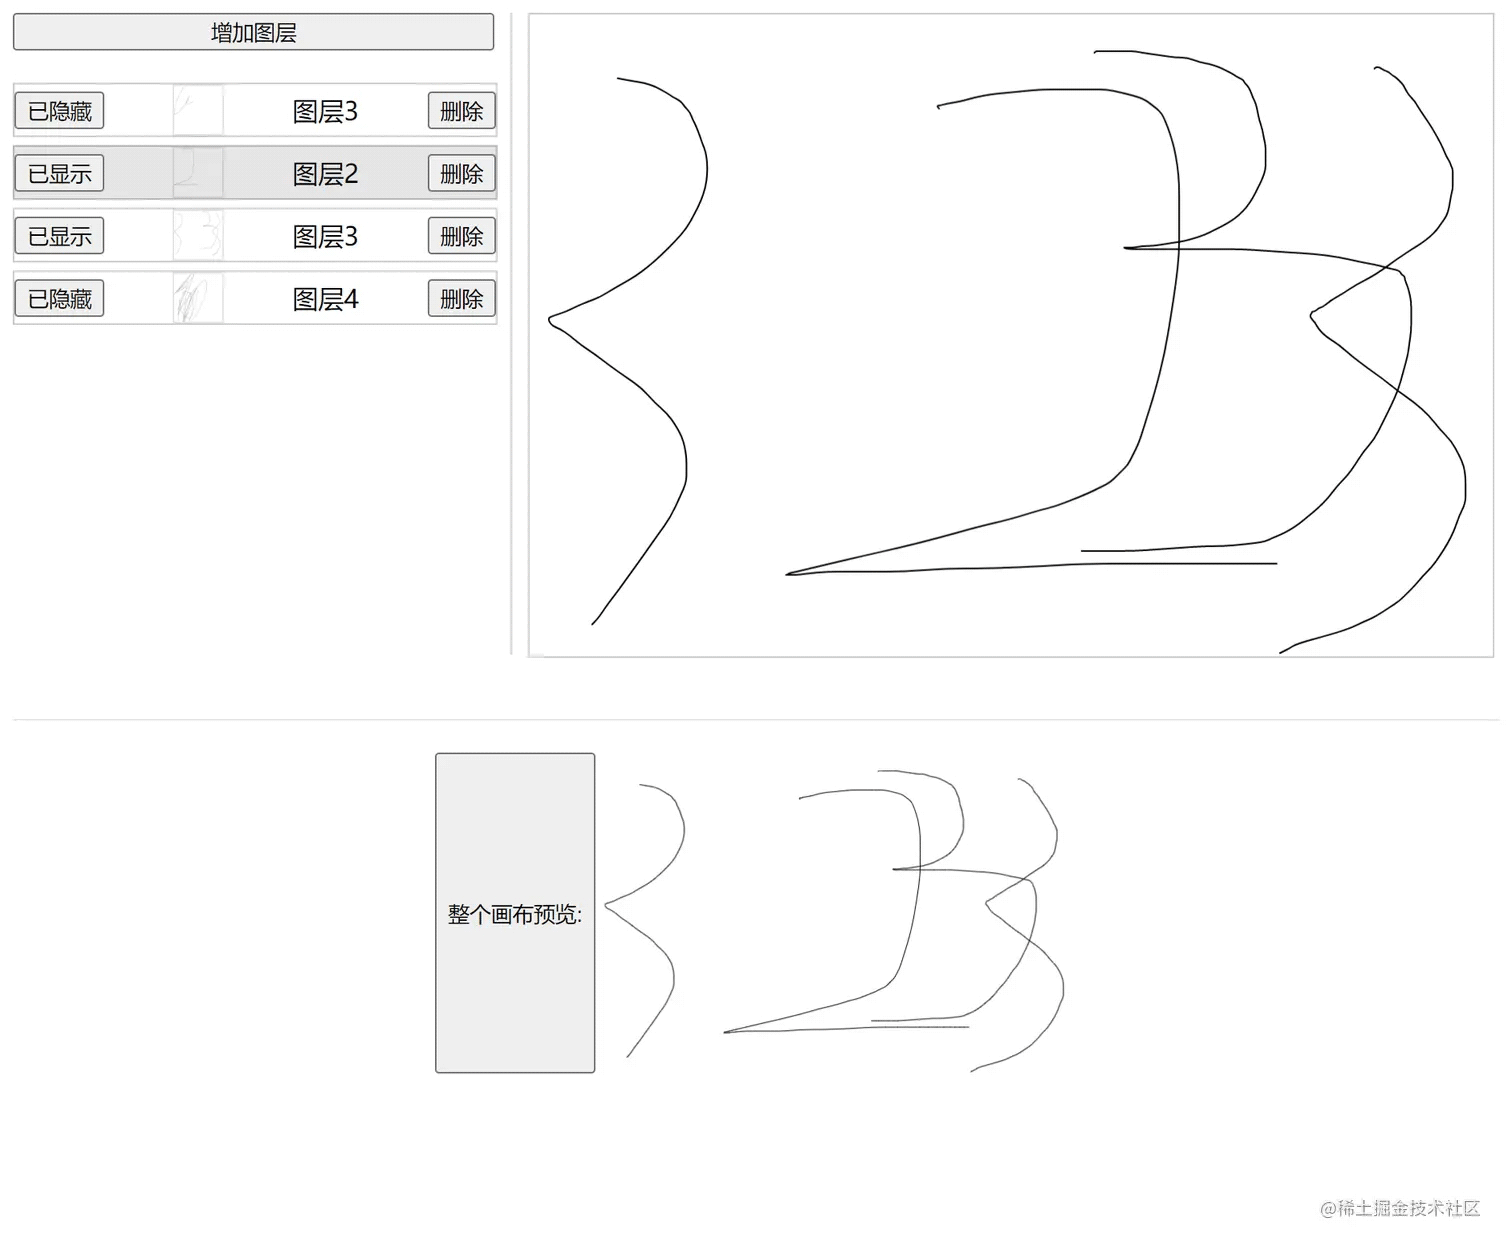
(别嫌我的样式丑,我已经下班了,没有UI能够PUSH我!)
下期预告
- 让图层能够调整图层层级
- 结合undo + redo + 橡皮擦
小Tips
首先fabric是需要到官方上下载的,在选择你需要的模块后再进行打包
虽然npm上也可以下载,但那不是官方的包,是有网友打包好以后上传的,其中没有包含橡皮擦模块,很可能会不符合你的需求
所以我个人建议你可以自行去官网上打包,然后传到你的私有npm库里,然后就可以通过npm来管理了
fabric自定义打包下载地址:Custom Fabric build — Fabric.js Javascript Canvas Library (fabricjs.com)
fabric的事件文档:Event inspector | Fabric.js Demos (fabricjs.com)
接下来的demo将会通过直接引入的方式来使用fabric,虽然我平时写项目都是ts,但练手demo我个人建议还是js,问就是省事
完整代码
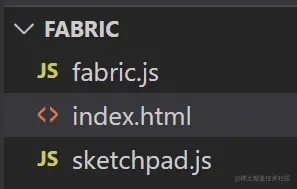
目录:
- fabric.js即为官网下载的插件包,这个文件就不放了,大家可以自行去官网打包下载
- index.html即本次的页面,主要负责dom的处理,直接扔浏览器运行就可以
- sketchpad.js 是对fabric的二次封装,同时也避免在html中写太多fabric功能代码
index.html代码
|
1
2
3
4
5
6
7
8
9
10
11
12
13
14
15
16
17
18
19
20
21
22
23
24
25
26
27
28
29
30
31
32
33
34
35
36
37
38
39
40
41
42
43
44
45
46
47
48
49
50
51
52
53
54
55
56
57
58
59
60
61
62
63
64
65
66
67
68
69
70
71
72
73
74
75
76
77
78
79
80
81
82
83
84
85
86
87
88
89
90
91
92
93
94
95
96
97
98
99
100
101
102
103
104
105
106
107
108
109
110
111
112
113
114
115
116
117
118
119
120
121
122
123
124
125
126
127
128
129
130
131
132
133
134
135
136
137
138
139
140
141
142
143
144
145
146
147
148
149
150
151
152
153
154
155
156
157
158
159
160
161
162
163
164
|
<!DOCTYPE html><html lang="en"><head> <meta charset="UTF-8"> <meta http-equiv="X-UA-Compatible" content="IE=edge"> <meta name="viewport" content="width=device-width, initial-scale=1.0"> <title>Document</title> <style> .content { display: flex; } .preview { margin-top: 40px; padding-top: 20px; width: 100%; display: flex; justify-content: center; border-top: 1px solid rgba(0,0,0,0.1); } .preview > img { width: 300px; height: 200px; } .layer-list { width: 300px; display: flex; flex-direction: column; padding-right: 10px; margin-right: 10px; box-sizing: content-box; border-right: 1px solid rgba(0,0,0, 0.2); } .layer { width: 300px; display: flex; justify-content: space-between; align-items: center; margin-bottom: 5px; border: 1px solid rgba(0,0,0, 0.2); } .layer > img { width: 30px; height: 30px; border: 1px solid rgba(0,0,0,0.1); } </style></head><body> <div id="app"> <div class="content"> <!-- 左侧的图层列表 --> <div class="layer-list"> <button style="margin-bottom: 20px;" @click="addLayer">增加图层</button> <div @click="changeCurrentLayer(item.id)" class="layer" :style="currentLayer === item.id ? 'background-color: rgba(0,0,0, 0.1)' : '' " v-for="item of layers" :key="item.id"> <button @click="changeVisible(item.id)">{{ item.show ? '已显示' : '已隐藏'}}</button> <img :src="item.data"> <span>{{ item.name }}</span> <button @click="deleteLayer(item.id)">删除</button> </div> </div> <!-- 右侧的画板 --> <div class="sketchpad-layout" style="width: 600px;"> <canvas id="sketchpad" width="600" height="400" style="border: 1px solid #ccc;"></canvas> </div> </div> <!-- 对整张画布进行图片预览 --> <div class="preview"> <button @click="updatePreview">整个画布预览:</button> <img :src="preview"> </div> </div> <!-- 使用vue3来进行ui的渲染,懒得操作dom了 --> <script src="https://unpkg.com/vue@3/dist/vue.global.js"></script> <!-- 打包好的fabric文件 --> <script src="./fabric.js"></script> <!-- sketchpad里面就是将fabric封装了一层 --> <script src="./sketchpad.js"></script> <script> const { createApp } = Vue /** 单条的数据类型定义 */ const LayerData = { /** 用于显示的名称 */ name: '图层名称', /** 图层的id,也用于管理图层 */ id: '1111', /** 图层的显示状态 */ show: true, /** 图层的数据,用于显示预览图 */ data: '', } createApp({ data() { return { layers: [],// 图层数组,方便管理 sketchpad: null,// 画板 currentLayer: '',// 当前图层的id preview: '',// 预览图的base64数据 } }, methods: { /** * 改变图层的显示/隐藏 * @param id 图层的id */ changeVisible(id) { const index = this.layers.findIndex(v => v.id === id); if (index > -1) { this.layers[index].show = !this.layers[index].show; } this.sketchpad.changeLayerVisible(id) }, /** * 删除图层 * @param id 图层的id */ deleteLayer(id) { const index = this.layers.findIndex(v => v.id === id); if (index > -1) { this.layers.splice(index, 1) this.sketchpad.deleteLayer(id) } }, /** * 增加图层 */ addLayer() { const item = { ...LayerData } item.id = new Date().getTime() item.name = `图层${this.layers.length + 1}` this.layers.push(item) this.sketchpad.addLayer(item.id) this.changeCurrentLayer(item.id) }, /** 选择当前要操作的图层 */ changeCurrentLayer(id) { this.currentLayer = id this.sketchpad.changeCurrentLayer(id) }, /** * 更新预览图 */ updatePreview() { this.preview = this.sketchpad.getImage() }, /** 图层数据更新的回调 */ onChangeData(id, data) { const index = this.layers.findIndex(v => v.id === id); if (index > -1) { this.layers[index].data = data; } } }, mounted() { this.sketchpad = new Sketchpad('sketchpad', { change: this.onChangeData }); this.addLayer() } }).mount('#app') </script></body></html> |
sketchpad.js代码
|
1
2
3
4
5
6
7
8
9
10
11
12
13
14
15
16
17
18
19
20
21
22
23
24
25
26
27
28
29
30
31
32
33
34
35
36
37
38
39
40
41
42
43
44
45
46
47
48
49
50
51
52
53
54
55
56
57
58
59
60
61
62
63
64
65
66
67
68
69
70
71
72
73
74
75
76
77
78
79
80
81
82
83
84
85
|
console.log('Sketchpad load');class Sketchpad { /** fabric实例 */ instance = null; /** 当前所在图层的id */ currentLayer = ''; /** 画布宽度 */ width = 600; /** 画布高度 */ height = 600 /** 事件订阅 */ listeners = { /** * 图层内容变化时的回调 * @param {string} id 图层id * @param {base64} data 图层内容的base64格式 */ change: (id, data) => {} } constructor(id, listeners) { this.instance = new fabric.Canvas(id); this.width = this.instance.width; this.height = this.instance.height; this.instance.isDrawingMode = true; this.listeners.change = listeners.change this.instance.on('object:added', ((options) => { if (options.target.type === 'group') return; const groups = this.instance.getObjects() groups.forEach(v => { if (v.layerId === this.currentLayer && v.type === 'group') { v.addWithUpdate(options.target); this.instance.remove(options.target); this.listeners.change(v.layerId, v.toDataURL({ width: this.width, height: this.height })) } }) })) console.log('Sketchpad init') } /** 添加图层 */ addLayer(id) { const group = new fabric.Group([], { width: this.width, height: this.width, }); // 在这里增加一个自定义属性 layerId ,用于区分图层 group.layerId = id this.instance.add(group) this.currentLayer = id; this.listeners.change(id, group.toDataURL({ width: this.width, height: this.height })) } /** 改变图层的显示/隐藏 */ changeLayerVisible(id) { const groups = this.instance.getObjects() groups.forEach(v => { if (v.layerId === id && v.type === 'group') { v.visible = !v.visible; this.instance.renderAll() // 刷新画布,改变group的visible属性,必须通过刷新画布,才能应用新属性值 } }) } /** 选择要操作的图层 */ changeCurrentLayer(id) { this.currentLayer = id } /** 删除图层 */ deleteLayer(id) { const groups = this.instance.getObjects() groups.forEach(v => { if (v.layerId === id && v.type === 'group') { this.instance.remove(v) this.instance.renderAll() // 刷新画布 } }) } /** 获取画布数据,以img标签可以识别的base64格式 */ getImage() { return this.instance.toDataURL() }} |
将以上这两个文件代码直接复制粘贴到编辑器里,然后再去打包个fabric.js也放进编辑器里,就可以运行啦
以上就是fabric.js图层功能独立显隐 添加 删除 预览实现详解的详细内容,更多关于fabric.js图层功能实现的资料请关注服务器之家其它相关文章!
原文链接:https://juejin.cn/post/7228980394014785593


