@PropertySource配置用法
功能
加载指定的属性文件(*.properties)到 Spring 的 Environment 中。可以配合 @Value 和@ConfigurationProperties 使用。
@PropertySource 和 @Value组合使用,可以将自定义属性文件中的属性变量值注入到当前类的使用@Value注解的成员变量中。
@PropertySource 和 @ConfigurationProperties组合使用,可以将属性文件与一个Java类绑定,将属性文件中的变量值注入到该Java类的成员变量中。
源码
|
1
2
3
4
5
6
7
8
9
10
11
12
13
14
15
16
17
18
19
20
21
22
23
24
25
26
27
28
29
30
31
32
33
34
|
package org.springframework.context.annotation;import java.lang.annotation.Documented;import java.lang.annotation.ElementType;import java.lang.annotation.Repeatable;import java.lang.annotation.Retention;import java.lang.annotation.RetentionPolicy;import java.lang.annotation.Target;import org.springframework.core.io.support.PropertySourceFactory;@Target(ElementType.TYPE)@Retention(RetentionPolicy.RUNTIME)@Documented@Repeatable(PropertySources.class)public @interface PropertySource { /** * 属性源的名称 */ String name() default ""; /** * 属性文件的存放路径 */ String[] value(); /** * 如果指定的属性源不存在,是否要忽略这个错误 */ boolean ignoreResourceNotFound() default false; /** * 属性源的编码格式 */ String encoding() default ""; /** * 属性源工厂 */ Class<? extends PropertySourceFactory> factory() default PropertySourceFactory.class;} |
使用示例
属性文件:demo.properties
|
1
2
3
|
demo.name=huangdemo.sex=1demo.type=demo |
示例一:@PropertySource + @Value
|
1
2
3
4
5
6
7
8
9
10
11
12
13
14
15
16
17
18
19
20
21
22
|
package com.huang.pims.demo.props;import org.springframework.beans.factory.annotation.Value;import org.springframework.context.annotation.PropertySource;import org.springframework.stereotype.Component;@Component@PropertySource(value = {"demo/props/demo.properties"})public class ReadByPropertySourceAndValue { @Value("${demo.name}") private String name; @Value("${demo.sex}") private int sex; @Value("${demo.type}") private String type; @Override public String toString() { return "ReadByPropertySourceAndValue{" + "name='" + name + '\'' + ", sex=" + sex + ", type='" + type + '\'' + '}'; }} |
示例二:@PropertySource 和 @ConfigurationProperties
|
1
2
3
4
5
6
7
8
9
10
11
12
13
14
15
16
17
18
19
20
21
22
23
24
25
26
27
28
29
30
31
32
33
34
35
36
37
38
|
package com.huang.pims.demo.props;import org.springframework.boot.context.properties.ConfigurationProperties;import org.springframework.context.annotation.PropertySource;import org.springframework.stereotype.Component;@Component@PropertySource(value = {"demo/props/demo.properties"})@ConfigurationProperties(prefix = "demo")public class ReadByPropertySourceAndConfProperties { private String name; private int sex; private String type; public void setName(String name) { this.name = name; } public void setSex(int sex) { this.sex = sex; } public void setType(String type) { this.type = type; } public String getName() { return name; } public int getSex() { return sex; } public String getType() { return type; } @Override public String toString() { return "ReadByPropertySourceAndConfProperties{" + "name='" + name + '\'' + ", sex=" + sex + ", type='" + type + '\'' + '}'; }} |
示例测试
|
1
2
3
4
5
6
7
8
9
10
11
12
13
14
15
16
17
18
19
20
|
package com.huang.pims.demo.runners;import com.huang.pims.demo.props.*;import org.slf4j.Logger;import org.slf4j.LoggerFactory;import org.springframework.beans.factory.annotation.Autowired;import org.springframework.boot.CommandLineRunner;import org.springframework.stereotype.Component;@Componentpublic class OutputPropsRunner implements CommandLineRunner { private static final Logger LOGGER = LoggerFactory.getLogger(OutputPropsRunner.class); @Autowired private ReadByPropertySourceAndValue readByPropertySourceAndValue; @Autowired private ReadByPropertySourceAndConfProperties readByPropertySourceAndConfProperties; @Override public void run(String... args) throws Exception { LOGGER.info(readByPropertySourceAndValue.toString()); LOGGER.info(readByPropertySourceAndConfProperties.toString()); }} |
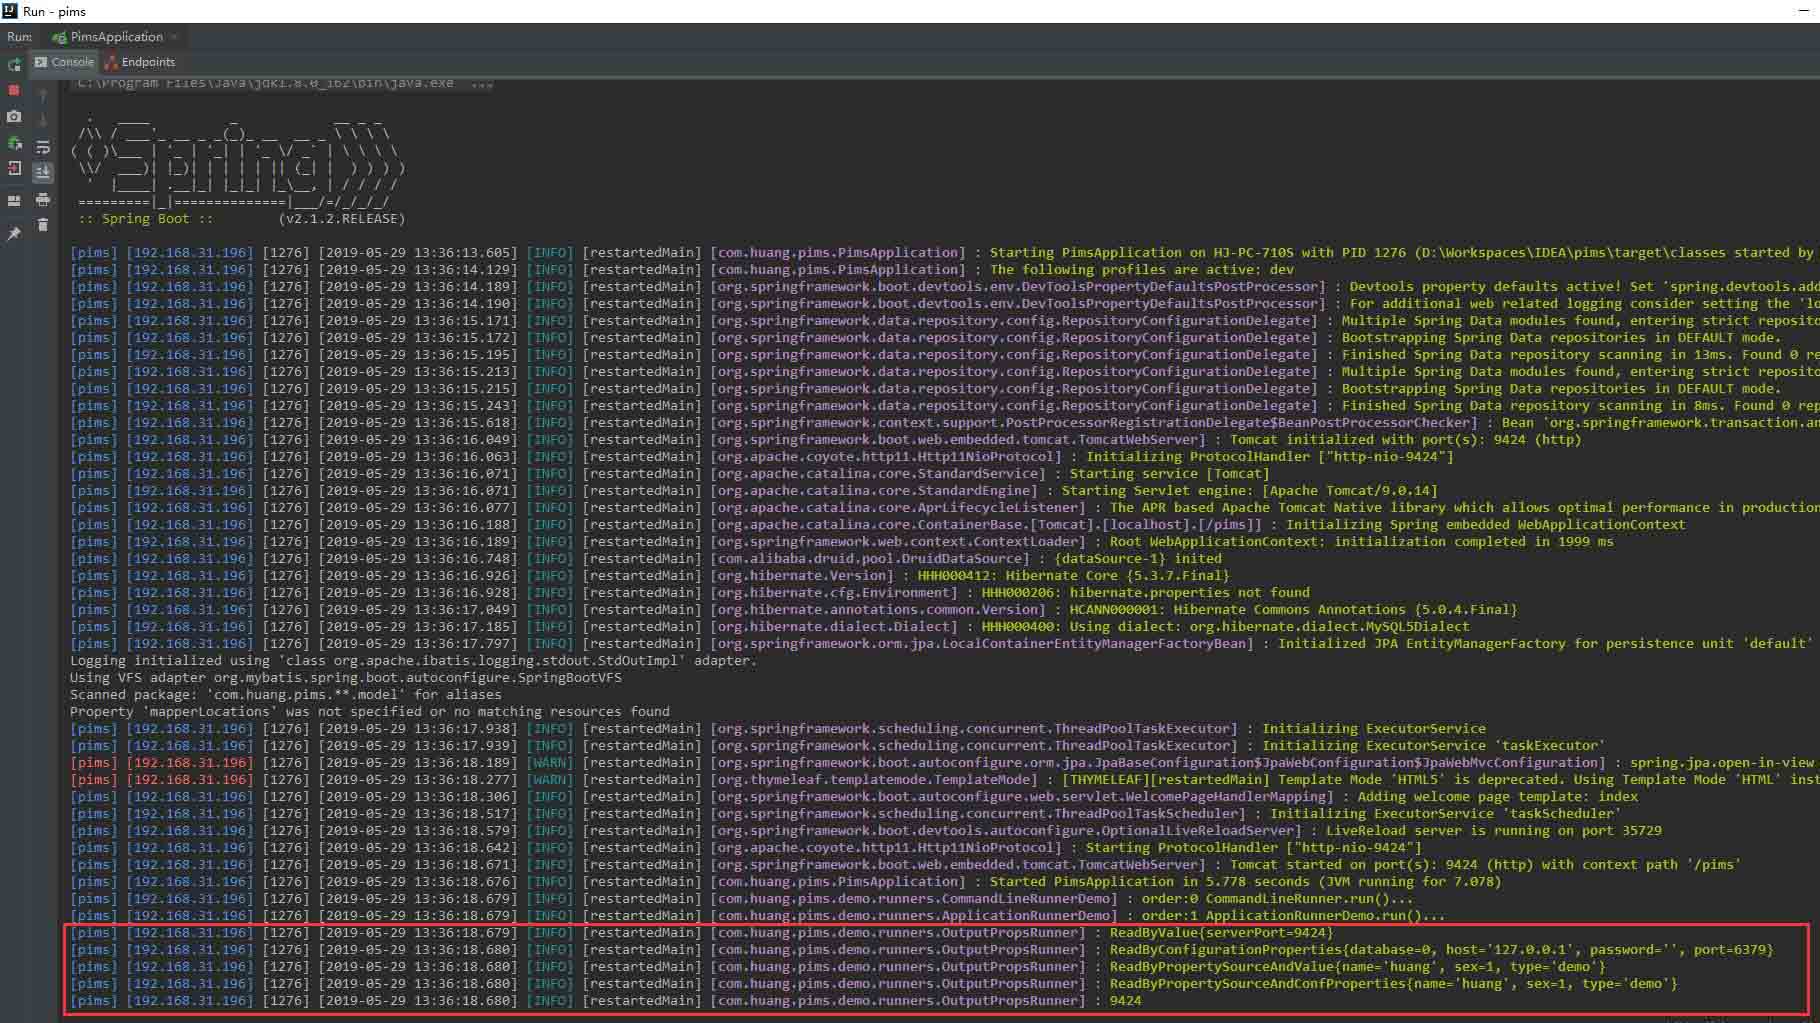
启动项目即可看到效果。

从截图中可以看出,需要读取的属性配置,都已经成功读取出来了。
@PropertySource注解
@PropertySource是Spring boot为了方便引入properties配置文件提供的一个注解,可以标注在SpringBoot的启动类上,还可以标注在配置类(使用@Configuration标注的类)上。
例如
|
1
|
@PropertySource(value = {"classpath:box.properties"}) |
将classpath下的box.properties,注入到Spring环境中,使用@Value("${key}")取值。
示例
box.properties文件:
|
1
2
|
# 工具箱配置 preserveFilePath=/box/webserver/uploadfile/preservefile/ |
注入:
|
1
2
3
4
5
6
7
8
|
@SpringBootApplication@PropertySource(value = {"classpath:box.properties"})public class ToolboxApiApplication { public static void main(String[] args) { SpringApplication.run(ToolboxApiApplication.class, args); } } |
取值:
|
1
2
3
4
5
6
7
8
9
10
|
@RestControllerpublic class DeleteFileController { @Value("${preserveFilePath}") private String preserveFilePath; @GetMapping("/deleteFile") public void test(){ System.out.println(preserveFilePath); }} |
以上为个人经验,希望能给大家一个参考,也希望大家多多支持服务器之家。
原文链接:https://blog.csdn.net/qq_37312838/article/details/108237678


