unity shader学习:水墨效果
偶然在网上看到9级铁甲蛹大神的水墨风格后处理觉得挺有意思,参照着实现一下,还是涉及到之前油画效果的算法,叫什么滤波暂时不清楚,应该用来处理手绘效果挺多的。
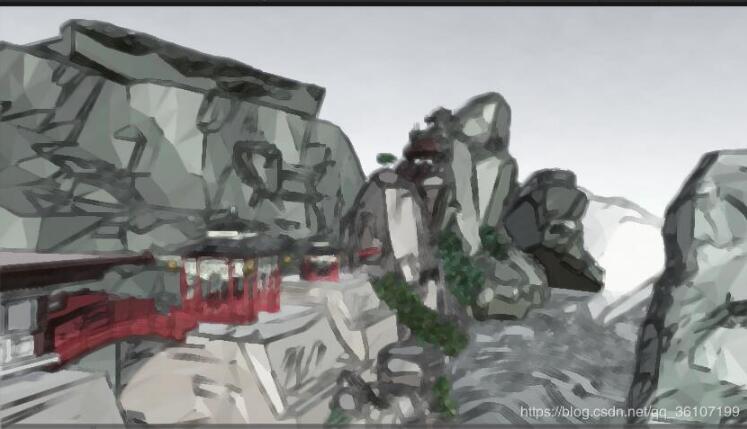
水墨风格基本原理:高斯模糊原始图像,用深度算出边缘进行描边,最后用画笔效果的滤波完成最终图像。
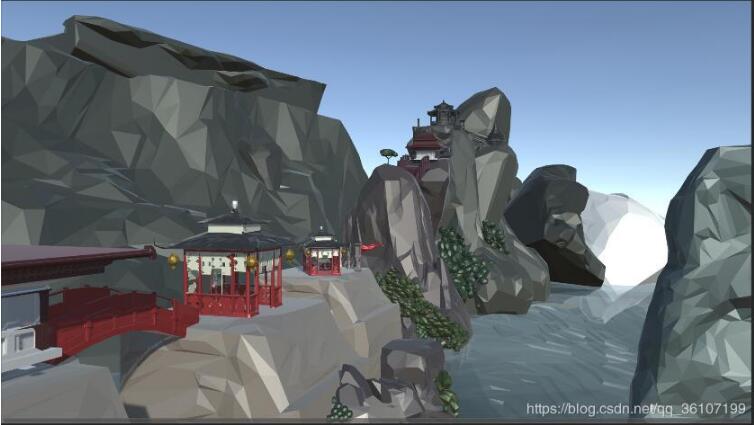
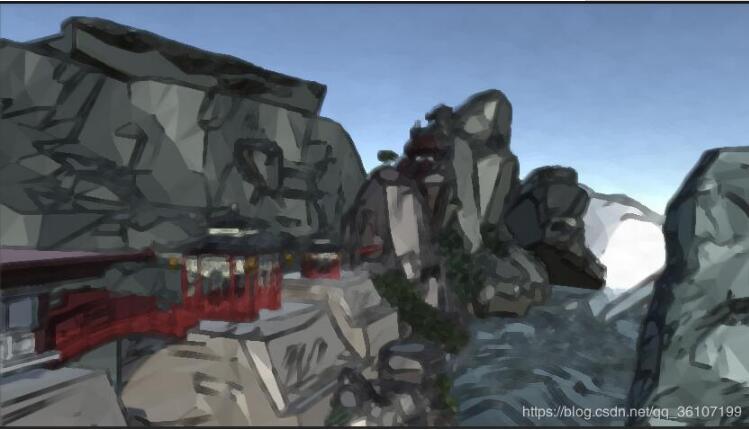
有需要可以用post proces改变颜色范围,更接近水墨的颜色。
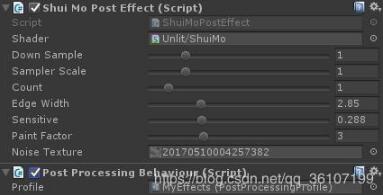
c#部分:
|
1
2
3
4
5
6
7
8
9
10
11
12
13
14
15
16
17
18
19
20
21
22
23
24
25
26
27
28
29
30
31
32
33
34
35
36
37
38
39
40
41
|
//屏幕后处理基类using unityengine;using system.collections;//非运行时也触发效果[executeineditmode]//屏幕后处理特效一般都需要绑定在摄像机上[requirecomponent(typeof(camera))]//提供一个后处理的基类,主要功能在于直接通过inspector面板拖入shader,生成shader对应的材质public class posteffectbase : monobehaviour{ //inspector面板上直接拖入 public shader shader = null; private material _material = null; public material _material { get { if (_material == null) _material = generatematerial(shader); return _material; } } //根据shader创建用于屏幕特效的材质 protected material generatematerial(shader shader) { if (shader == null) return null; //需要判断shader是否支持 if (shader.issupported == false) return null; material material = new material(shader); material.hideflags = hideflags.dontsave; if (material) return material; return null; }} |
|
1
2
3
4
5
6
7
8
9
10
11
12
13
14
15
16
17
18
19
20
21
22
23
24
25
26
27
28
29
30
31
32
33
34
35
36
37
38
39
40
41
42
43
44
45
46
47
48
49
50
51
52
53
54
55
56
57
58
59
60
61
62
63
64
65
66
67
68
69
70
71
72
73
74
75
76
77
78
79
80
81
82
|
//挂在摄像机上using system.collections;using system.collections.generic;using unityengine;[executeineditmode]public class chineseinkposteffect : posteffectbase { /// <summary> /// 降分辨率未操作 /// </summary> [range(0,5)] public int downsample = 1; /// <summary> /// 高斯模糊采样缩放系数 /// </summary> [range(0,5)] public int samplerscale = 1; /// <summary> /// 高斯模糊迭代次数 /// </summary> [range(0,10)] public int count = 1; /// <summary> /// 边缘宽度 /// </summary> [range(0.0f,10.0f)] public float edgewidth = 3.0f; /// <summary> /// 边缘最小宽度 /// </summary> [range(0.0f,1.0f)] public float sensitive = 0.35f; /// <summary> /// 画笔滤波系数 /// </summary> [range(0,10)] public int paintfactor = 4; /// <summary> /// 噪声图 /// </summary> public texture noisetexture; private camera cam; private void start() { cam = getcomponent<camera>(); //开启深度法线图 cam.depthtexturemode = depthtexturemode.depthnormals; } private void onrenderimage(rendertexture source, rendertexture destination) { if (_material) { rendertexture temp1 = rendertexture.gettemporary(source.width >> downsample, source.height >> downsample, 0, source.format); rendertexture temp2 = rendertexture.gettemporary(source.width >> downsample, source.height >> downsample, 0, source.format); graphics.blit(source, temp1); for (int i = 0; i < count; i++) { //高斯模糊横向纵向两次(pass0) _material.setvector("_offsets", new vector4(0, samplerscale, 0, 0)); graphics.blit(temp1, temp2, _material, 0); _material.setvector("_offsets", new vector4(samplerscale, 0, 0, 0)); graphics.blit(temp2, temp1, _material, 0); } //描边(pass1) _material.settexture("_blurtex", temp1); _material.settexture("_noisetex", noisetexture); _material.setfloat("_edgewidth", edgewidth); _material.setfloat("_sensitive", sensitive); graphics.blit(temp1, temp2,_material,1); //画笔滤波(pass2) _material.settexture("_painttex", temp2); _material.setint("_paintfactor", paintfactor); graphics.blit(temp2, destination, _material, 2); rendertexture.releasetemporary(temp1); rendertexture.releasetemporary(temp2); } }} |
shader部分:
|
1
2
3
4
5
6
7
8
9
10
11
12
13
14
15
16
17
18
19
20
21
22
23
24
25
26
27
28
29
30
31
32
33
34
35
36
37
38
39
40
41
42
43
44
45
46
47
48
49
50
51
52
53
54
55
56
57
58
59
60
61
62
63
64
65
66
67
68
69
70
71
72
73
74
75
76
77
78
79
80
81
82
83
84
85
86
87
88
89
90
91
92
93
94
95
96
97
98
99
100
101
102
103
104
105
106
107
108
109
110
111
112
113
114
115
116
117
118
119
120
121
122
123
124
125
126
127
128
129
130
131
132
133
134
135
136
137
138
139
140
141
142
143
144
145
146
147
148
149
150
151
152
153
154
155
156
157
158
159
160
161
162
163
164
165
166
167
168
169
170
171
172
173
174
175
176
177
178
179
180
181
182
183
184
185
186
187
188
189
|
shader "unlit/chineseink"{ properties { //原始画面 _maintex ("texture", 2d) = "white" {} //高斯模糊画面 _blurtex("blur",2d) = "white"{} //水墨画面 _painttex("painttex",2d)="white"{} } cginclude #include "unitycg.cginc" //深度法线图 sampler2d _cameradepthnormalstexture; sampler2d _maintex; sampler2d _blurtex; sampler2d _painttex; sampler2d _noisetex; float4 _blurtex_texelsize; float4 _maintex_st; float4 _maintex_texelsize; float4 _painttex_texelsize; float4 _offsets; float _edgewidth; float _sensitive; int _paintfactor; //取灰度 float luminance(fixed3 color) { return 0.2125*color.r + 0.7154*color.g + 0.0721*color.b; } //高斯模糊部分 struct v2f_blur { float2 uv : texcoord0; float4 vertex : sv_position; float4 uv01:texcoord1; float4 uv23:texcoord2; float4 uv45:texcoord3; }; v2f_blur vert_blur(appdata_img v) { v2f_blur o; o.vertex = unityobjecttoclippos(v.vertex); o.uv = v.texcoord.xy; _offsets *= _maintex_texelsize.xyxy; o.uv01 = v.texcoord.xyxy + _offsets.xyxy*float4(1, 1, -1, -1); o.uv23 = v.texcoord.xyxy + _offsets.xyxy*float4(1, 1, -1, -1)*2.0; o.uv45 = v.texcoord.xyxy + _offsets.xyxy*float4(1, 1, -1, -1)*3.0; return o; } float4 frag_blur(v2f_blur i) : sv_target { float4 color = float4(0,0,0,0); color += 0.40*tex2d(_maintex, i.uv); color += 0.15*tex2d(_maintex, i.uv01.xy); color += 0.15*tex2d(_maintex, i.uv01.zw); color += 0.10*tex2d(_maintex, i.uv23.xy); color += 0.10*tex2d(_maintex, i.uv23.zw); color += 0.05*tex2d(_maintex, i.uv45.xy); color += 0.05*tex2d(_maintex, i.uv45.zw); return color; } //边缘检测部分 struct v2f_edge{ float2 uv:texcoord0; float4 vertex:sv_position; }; v2f_edge vert_edge(appdata_img v){ v2f_edge o; o.vertex = unityobjecttoclippos(v.vertex); o.uv = v.texcoord; return o; } float4 frag_edge(v2f_edge i):sv_target{ //噪声 float n = tex2d(_noisetex,i.uv).r; float3 col0 = tex2d(_cameradepthnormalstexture, i.uv + _edgewidth * _blurtex_texelsize.xy*float2(1,1)).xyz; float3 col1 = tex2d(_cameradepthnormalstexture, i.uv + _edgewidth * _blurtex_texelsize.xy*float2(1,-1)).xyz; float3 col2 = tex2d(_cameradepthnormalstexture, i.uv + _edgewidth * _blurtex_texelsize.xy*float2(-1, 1)).xyz; float3 col3 = tex2d(_cameradepthnormalstexture, i.uv + _edgewidth * _blurtex_texelsize.xy*float2(-1,-1)).xyz; float edge = luminance(pow(col0 - col3, 2) + pow(col1 - col2, 2)); edge = pow(edge, 0.2); if (edge<_sensitive) { edge = 0; } else { edge = n; } float3 color = tex2d(_blurtex, i.uv); float3 finalcolor = edge * float3(0, 0, 0) + (1 - edge)*color*(0.95+0.1*n); return float4(finalcolor, 1.0); } //画笔滤波部分 struct v2f_paint { float2 uv:texcoord0; float4 vertex:sv_position; }; v2f_paint vert_paint(appdata_img v) { v2f_paint o; o.uv = v.texcoord; o.vertex = unityobjecttoclippos(v.vertex); return o; } float4 frag_paint(v2f_paint i):sv_target{ float3 m0 = 0.0; float3 m1 = 0.0; float3 s0 = 0.0; float3 s1 = 0.0; float3 c = 0.0; int radius = _paintfactor; int r = (radius + 1)*(radius + 1); for (int j = -radius; j <= 0; ++j) { for (int k = -radius; k <= 0; ++k) { c = tex2d(_painttex, i.uv + _painttex_texelsize.xy * float2(k, j)).xyz; m0 += c; s0 += c * c; } } for (int j = 0; j <= radius; ++j) { for (int k = 0; k <= radius; ++k) { c = tex2d(_painttex, i.uv + _painttex_texelsize.xy * float2(k, j)).xyz; m1 += c; s1 += c * c; } } float4 finalfragcolor = 0.; float min_sigma2 = 1e+2; m0 /= r; s0 = abs(s0 / r - m0 * m0); float sigma2 = s0.r + s0.g + s0.b; if (sigma2 < min_sigma2) { min_sigma2 = sigma2; finalfragcolor = float4(m0, 1.0); } m1 /= r; s1 = abs(s1 / r - m1 * m1); sigma2 = s1.r + s1.g + s1.b; if (sigma2 < min_sigma2) { min_sigma2 = sigma2; finalfragcolor = float4(m1, 1.0); } return finalfragcolor; } endcg subshader { pass { cgprogram #pragma vertex vert_blur #pragma fragment frag_blur endcg } pass { cgprogram #pragma vertex vert_edge #pragma fragment frag_edge endcg } pass { cgprogram #pragma vertex vert_paint #pragma fragment frag_paint endcg } }} |
以上就是本文的全部内容,希望对大家的学习有所帮助,也希望大家多多支持服务器之家。
原文链接:https://blog.csdn.net/qq_36107199/article/details/86507737


