最近接触了一些selenium模块的相关知识,觉得还挺有意思的,于是决定亲自尝试写一些爬虫程序来强化selenium模块(一定要多尝试、多动手、多总结)。本文主要使用python爬虫来模拟登录铁路12306官网。这儿得吐槽一句,铁路12306网站的反爬机制做的还是比较好。
话不多说,下面跟小墨一起来学习如何通过爬虫来实现铁路12306的登录。
一、 验证码破解
当我们输入账号和密码后,在点击登录按钮之前,还需要对验证码进行操作。对验证码的识别,已经有相关的处理平台,我们只需要借助第三方平台即可。
1.注册并登录超级鹰账号:点击链接进行注册https://www.chaojiying.com/user/login/;
2.点击购买题分,并进行充值;
3.点击软件id,创建一个软件Id(程序中会用到);
4.下载示例代码(开发文档—>选择相应的语言–>下载示例demo),python示例代码如下所示:
|
1
2
3
4
5
6
7
8
9
10
11
12
13
14
15
16
17
18
19
20
21
22
23
24
25
26
27
28
29
30
31
32
33
34
35
36
37
|
class Chaojiying_Client(object): def __init__(self, username, password, soft_id): self.username = username password = password.encode('utf8') self.password = md5(password).hexdigest() self.soft_id = soft_id self.base_params = { 'user': self.username, 'pass2': self.password, 'softid': self.soft_id, } self.headers = { 'Connection': 'Keep-Alive', 'User-Agent': 'Mozilla/4.0 (compatible; MSIE 8.0; Windows NT 5.1; Trident/4.0)', } def PostPic(self, im, codetype): """ im: 图片字节 codetype: 题目类型 参考 http://www.chaojiying.com/price.html """ params = { 'codetype': codetype, } params.update(self.base_params) files = {'userfile': ('ccc.jpg', im)} r = requests.post('http://upload.chaojiying.net/Upload/Processing.php', data=params, files=files, headers=self.headers) return r.json() def ReportError(self, im_id): """ im_id:报错题目的图片ID """ params = { 'id': im_id, } params.update(self.base_params) r = requests.post('http://upload.chaojiying.net/Upload/ReportError.php', data=params, headers=self.headers) return r.json() |
二、Selenium功能简介
Selenium模块和爬虫之间的关联:
–便捷的获取网站中的动态加载数据
–便捷实现模拟登录
Selenium模块的使用流程:
–环境安装:pip install selenium
–下载浏览器的驱动程序(谷歌浏览器):
–下载路径:http://chromedriver.storage.googleapis.com/index.html
– 驱动程序和浏览器的映射关系:映射链接
–将下载好的驱动程序放在当前项目目录下
Selenium模块的相关方法:http://www.tuohang.net/article/90512.html
上述内容完成后,我们就可以正式进入正题了,是不是很期待,那就跟着小墨往下走吧。
三、模拟登录
1. 进入官网
|
1
2
3
4
5
6
7
|
#创建对象#executable_path=path:下载好的驱动程序的路径bro = webdriver.Chrome(executable_path='chromedriver.exe')#12306的登录网址bro.get('https://kyfw.12306.cn/otn/resources/login.html')#窗口最大化bro.maximize_window() |
2、进入登录界面并获取验证码
|
1
2
3
4
5
6
7
8
9
10
11
12
13
14
15
16
17
18
19
20
21
22
23
24
25
26
27
28
29
30
31
32
33
34
35
36
37
38
39
40
41
42
43
44
45
46
47
48
49
|
#save_screenshot就是将当前页面进行截图且保存bro.save_screenshot('aa.png')#确定验证码图片对应的左上角和右下角的坐标(裁剪的区域就确定)code_img_ele = bro.find_element_by_xpath('//*[@id="J-loginImg"]')location = code_img_ele.location # 验证码图片左上角的坐标 x,y#print('location:',location)size = code_img_ele.size #验证码标签对应的长和宽#print('size:',size)#左上角和右下角坐标rangle = (int(location['x']), int(location['y']), int(location['x'] + size['width']), int(location['y'] + size['height']))#至此验证码图片区域就确定下来了i = Image.open('./aa.png')code_img_name = './code.png'#crop根据指定区域进行图片裁剪frame = i.crop(rangle)frame.save(code_img_name)#将验证码图片提交给超级鹰进行识别chaojiying = Chaojiying_Client('########', '#######', '#######') #用户账号>>密码>>软件IDim = open('code.png', 'rb').read() #本地图片文件路径 来替换 a.jpg 有时WIN系统须要//id=chaojiying.PostPic(im, 9004)['pic_id'] #截取的验证码照片以及验证码的类别代号result = chaojiying.PostPic(im, 9004)['pic_str'] #识别结果all_list = [] #要存储即将被点击的点的坐标 [[x1,y1],[x2,y2]]#识别错误后,会返回题分,示例代码并没有这个,就是想让你花钱chaojiying.ReportError(id)if '|' in result: list_1 = result.split('|') print(list_1) count_1 = len(list_1) for i in range(count_1): xy_list = [] x = int(list_1[i].split(',')[0]) y = int(list_1[i].split(',')[1]) xy_list.append(x) xy_list.append(y) all_list.append(xy_list)else: x = int(result.split(',')[0]) y = int(result.split(',')[1]) xy_list = [] xy_list.append(x) xy_list.append(y) all_list.append(xy_list)#遍历列表,使用动作链对每一个列表元素对应的x,y指定的位置进行点击操作for l in all_list: x = l[0] y = l[1] ActionChains(bro).move_to_element_with_offset(code_img_ele, x, y).click().perform() time.sleep(0.5) |
这样我们就实现了验证码的识别操作。
3、输入账号和密码,并点击登录按钮
|
1
2
3
4
5
6
7
8
9
10
11
12
13
14
|
#输入账号和密码 put1=bro.find_element_by_id('J-userName') #当验证码识别错误后,需要清空账号重新输入 put1.clear() #输入账号 put1.send_keys('########') time.sleep(1) put2=bro.find_element_by_id('J-password') put2.clear() #输入密码 put2.send_keys('##########') time.sleep(1) #点击登录按钮 bro.find_element_by_id('J-login').click() |
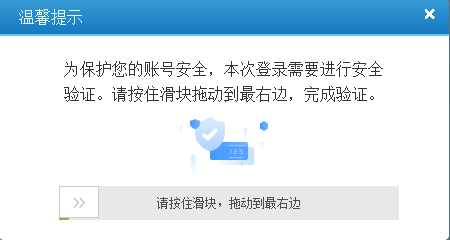
点击登录按钮后,会出现如下图所示的弹框

因此,我们需要定位到该提示框,并实现滑块的向右滑动
4、滑块滑动
|
1
2
3
4
5
6
7
|
#处理提示框time.sleep(0.5)span=bro.find_element_by_xpath('//*[@id="nc_1_n1z"]')action = ActionChains(bro)#点击长按指定的标签action.click_and_hold(span).perform()action.drag_and_drop_by_offset(span,400,0).perform() |
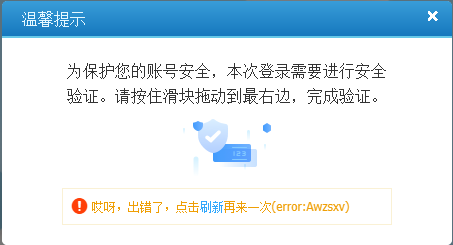
有的时候,当滑块移动后,会出现如下图所示的情况:

因此,我们需要点击刷新,并重新进行滑块的移动,所以对代码做稍微的改动:
|
1
2
3
4
5
6
7
8
9
10
11
12
13
14
15
16
17
18
|
while True: try: info=bro.find_element_by_xpath('//*[@id="J-slide-passcode"]/div/span').text print(info) if info=='哎呀,出错了,点击刷新再来一次': #点击刷新 bro.find_element_by_xpath('//*[@id="J-slide-passcode"]/div/span/a').click() time.sleep(0.2) #重新移动滑块 span = bro.find_element_by_xpath('//*[@id="nc_1_n1z"]') action = ActionChains(bro) # 点击长按指定的标签 action.click_and_hold(span).perform() action.drag_and_drop_by_offset(span, 400, 0).perform() time.sleep(7) except: print('ok!') break |
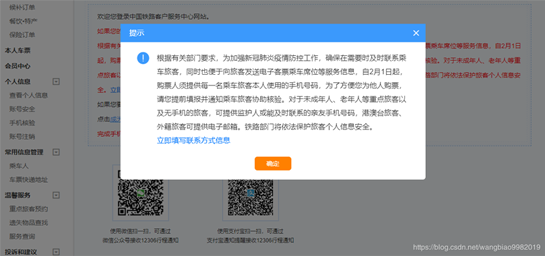
至此,我们便实现了铁路12306的登录,如下图所示

是不是觉得很简单啊。
5、完整代码
|
1
2
3
4
5
6
7
8
9
10
11
12
13
14
15
16
17
18
19
20
21
22
23
24
25
26
27
28
29
30
31
32
33
34
35
36
37
38
39
40
41
42
43
44
45
46
47
48
49
50
51
52
53
54
55
56
57
58
59
60
61
62
63
64
65
66
67
68
69
70
71
72
73
74
75
76
77
78
79
80
81
82
83
84
85
86
87
88
89
90
91
92
93
94
95
96
97
98
99
100
101
102
103
104
105
106
107
108
109
110
111
112
113
114
115
116
117
118
119
120
121
122
123
124
125
126
127
128
129
130
131
132
133
134
135
136
137
138
139
140
141
142
143
144
145
146
147
148
149
150
151
152
153
154
155
156
157
158
159
160
161
162
163
164
165
166
167
168
169
170
171
172
173
174
175
176
177
178
179
180
181
182
183
184
185
186
187
188
189
|
# -*- coding: utf-8 -*-#验证码识别示例import requestsfrom hashlib import md5class Chaojiying_Client(object): def __init__(self, username, password, soft_id): self.username = username password = password.encode('utf8') self.password = md5(password).hexdigest() self.soft_id = soft_id self.base_params = { 'user': self.username, 'pass2': self.password, 'softid': self.soft_id, } self.headers = { 'Connection': 'Keep-Alive', 'User-Agent': 'Mozilla/4.0 (compatible; MSIE 8.0; Windows NT 5.1; Trident/4.0)', } def PostPic(self, im, codetype): """ im: 图片字节 codetype: 题目类型 参考 http://www.chaojiying.com/price.html """ params = { 'codetype': codetype, } params.update(self.base_params) files = {'userfile': ('ccc.jpg', im)} r = requests.post('http://upload.chaojiying.net/Upload/Processing.php', data=params, files=files, headers=self.headers) return r.json() def ReportError(self, im_id): """ im_id:报错题目的图片ID """ params = { 'id': im_id, } params.update(self.base_params) r = requests.post('http://upload.chaojiying.net/Upload/ReportError.php', data=params, headers=self.headers) return r.json()#使用selenium打开登录页面from selenium import webdriverimport timefrom PIL import Imagefrom selenium.webdriver import ActionChainsfrom selenium.webdriver.support import expected_conditions as EC, wait#创建对象#executable_path=path:下载好的驱动程序的路径bro = webdriver.Chrome(executable_path='chromedriver.exe')#12306的登录网址bro.get('https://kyfw.12306.cn/otn/resources/login.html')#窗口最大化bro.maximize_window()#点击账号登录bro.find_element_by_xpath('/html/body/div[2]/div[2]/ul/li[2]/a').click()time.sleep(1)while True: try: #save_screenshot就是将当前页面进行截图且保存 bro.save_screenshot('aa.png') #确定验证码图片对应的左上角和右下角的坐标(裁剪的区域就确定) code_img_ele = bro.find_element_by_xpath('//*[@id="J-loginImg"]') location = code_img_ele.location # 验证码图片左上角的坐标 x,y #print('location:',location) size = code_img_ele.size #验证码标签对应的长和宽 #print('size:',size) #左上角和右下角坐标 rangle = ( int(location['x']), int(location['y']), int(location['x'] + size['width']), int(location['y'] + size['height'])) #至此验证码图片区域就确定下来了 i = Image.open('./aa.png') code_img_name = './code.png' #crop根据指定区域进行图片裁剪 frame = i.crop(rangle) frame.save(code_img_name) #将验证码图片提交给超级鹰进行识别 chaojiying = Chaojiying_Client('#####', '#######', '######') #用户账号>>密码>>软件ID im = open('code.png', 'rb').read() #本地图片文件路径 来替换 a.jpg 有时WIN系统须要// id=chaojiying.PostPic(im, 9004)['pic_id'] #截取的验证码照片以及验证码的类别代号 result = chaojiying.PostPic(im, 9004)['pic_str'] #识别结果 all_list = [] #要存储即将被点击的点的坐标 [[x1,y1],[x2,y2]] #识别错误后,会返回题分,官网给的demo并没有这一句,哈哈哈,坑吧,就是让你多花钱 chaojiying.ReportError(id) if '|' in result: list_1 = result.split('|') print(list_1) count_1 = len(list_1) for i in range(count_1): xy_list = [] x = int(list_1[i].split(',')[0]) y = int(list_1[i].split(',')[1]) xy_list.append(x) xy_list.append(y) all_list.append(xy_list) else: x = int(result.split(',')[0]) y = int(result.split(',')[1]) xy_list = [] xy_list.append(x) xy_list.append(y) all_list.append(xy_list) #遍历列表,使用动作链对每一个列表元素对应的x,y指定的位置进行点击操作 for l in all_list: x = l[0] y = l[1] ActionChains(bro).move_to_element_with_offset(code_img_ele, x, y).click().perform() time.sleep(0.5) #输入账号和密码 put1=bro.find_element_by_id('J-userName') #当验证码识别错误后,需要清空账号重新输入 put1.clear() put1.send_keys('username') #你的账号 time.sleep(1) put2=bro.find_element_by_id('J-password') put2.clear() put2.send_keys('password') #你的密码 time.sleep(1) bro.find_element_by_id('J-login').click() #处理提示框 time.sleep(3) span=bro.find_element_by_xpath('//*[@id="nc_1_n1z"]') action = ActionChains(bro) #点击长按指定的标签 action.click_and_hold(span).perform() action.drag_and_drop_by_offset(span,400,0).perform() time.sleep(8) while True: try: info=bro.find_element_by_xpath('//*[@id="J-slide-passcode"]/div/span').text print(info) if info=='哎呀,出错了,点击刷新再来一次': bro.find_element_by_xpath('//*[@id="J-slide-passcode"]/div/span/a').click() time.sleep(0.2) span = bro.find_element_by_xpath('//*[@id="nc_1_n1z"]') action = ActionChains(bro) # 点击长按指定的标签 action.click_and_hold(span).perform() action.drag_and_drop_by_offset(span, 400, 0).perform() time.sleep(7) except: print('ok!') break #释放动作链 action.release() break except: time.sleep(3)time.sleep(12)#登录成功bro.find_element_by_link_text('确定').click()time.sleep(0.5)bro.find_element_by_link_text('首页').click()#输入起点、终点以及时间,查询车票start_city='北京'end_city='上海'date='2020-08-05'#选择起点bro.find_element_by_xpath('//*[@id="fromStationText"]').click()time.sleep(2)#这只遍历了热门城市,要是想遍历其他城市,自己写一个循环就行city_list=bro.find_elements_by_xpath('//*[@id="ul_list1"]/li')for city in city_list: if city.text==start_city: city.click() breaktime.sleep(2)#选择终点bro.find_element_by_xpath('//*[@id="toStationText"]').click()for city in city_list: if city.text==end_city: city.click() breaktime.sleep(2)js = "$('input[id=train_date]').removeAttr('readonly')"bro.execute_script(js)dt=bro.find_element_by_id('train_date')dt.clear()dt.send_keys(date)time.sleep(2)bro.find_element_by_xpath('/html/body/div[3]/div[2]/div/div[1]/div/div[1]/ul/li[1]/a').click()time.sleep(0.5)bro.find_element_by_xpath('//*[@id="isStudentDan"]/i').click()time.sleep(2)bro.find_element_by_id('search_one').click()time.sleep(2) |
到此这篇关于Selenium之模拟登录铁路12306的示例代码的文章就介绍到这了,更多相关Selenium 模拟登录12306内容请搜索服务器之家以前的文章或继续浏览下面的相关文章希望大家以后多多支持服务器之家!
原文链接:https://blog.csdn.net/wangbiao9982019/article/details/107634479


