人工智能时代,最需要学习的编程语言是:python 。
笔者是个 python 小白,昨天花了两个小时,第一次成功运行起来 python 项目 。
 图片
图片
项目是 powerpoint-extractor ,可以将 ppt 文件中的图片提取出来,并输出到固定的目录。
1 安装 python 环境
首先打开终端,打开后输入 python3 。确定电脑上是否已安装 python3,如果输入 python 是查看 mac 上的自带版本。
命令:python3【直接回车】
出现下面是页面,表示已经安装python3 【退出时可输入:exit()然后点回车】
 图片
图片
若没有安装,安装 python3 如下两种方式:
- 第一种方法 brew 安装 python3 :brew install python3
- 第二种方法 官网 Python Releases for macOS ,根据自己的需求下载自己需要的版本下载 。
 图片
图片
2 项目 powerpoint-extractor
通过 git 命令 clone 该项目 :
git clone git@github.com:2TallTyler/powerpoint-extractor.git
因为项目依赖 python-pptx 组件,通过清华的镜像执行如下的命令:
pip3 install -i https://pypi.tuna.tsinghua.edu.cn/simple python-pptx
 图片
图片
执行完成之后,可以通过 pip3 list 命令查看已安装包列表 :
 图片
图片
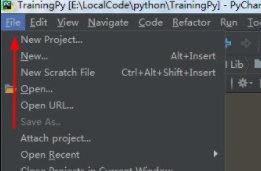
3 PyCharm 配置
通过 PyCharm 打开该项目 :
 图片
图片
上图,我们发现 python 解释器并没有配置好 ,py 脚本显示 import 包失败 。
 图片
图片
点击添加 python 解释器按钮,勾选继承全局包,并确认好 python3 的执行目录是否正确,点击 OK 即可完成配置。
点开 extract.py ,核心代码非常容易理解:
for eachfile in glob.glob(self.input_dir + os.sep + "*.pptx"):
    ppt = Presentation(eachfile)
    print("* " + eachfile)
    presentation_count += 1
    self.cur_image_index = 1

    name = self.generate_image_name_part(eachfile)

    # 遍历每张幻灯片
    for page, slide in enumerate(ppt.slides):
        # 将幻灯片上的所有文本收集到一个字符串中,以换行符分隔
        text = ''
        for shape in slide.shapes:
            if shape.has_text_frame and shape.text.strip():
                text += os.linesep
                text += shape.text

        # 收集每张幻灯片中的图像
        self.cur_slide_images = []

        # 保存幻灯片中的图像
        for shape in slide.shapes:
            self.drill_for_images(shape, page + 1, name)

        # 将页码、收集到的文本和演讲者备注作为新行写入CSV文件
        image_list = ''
        if len(self.cur_slide_images) > 0:
            image_list = ','.join(self.cur_slide_images)  # 将图像列表转换为逗号分隔的字符串

        # 将信息写入CSV文件
        writer.writerow([eachfile, page + 1, text, slide.notes_slide.notes_text_frame.text, image_list])
这段代码执行了以下操作:
- 对于每个 PowerPoint 文件,它加载演示文稿并逐一遍历每张幻灯片。
- 对于每张幻灯片,它收集文本和图像信息,并将其格式化为 CSV 文件的一行。
- CSV 文件的每一行包括文件名、页码、幻灯片文本、幻灯片的演讲者备注以及图像列表。
4 运行项目
将测试 ppt 拷贝到 input 目录,点击 run 。
 图片
图片
当执行完成后,ppt 中有的图片拷贝到 images 目录,同时生成了一个 text.csv 。
 图片
图片
当然,我们也可以通过如下的命令直接执行:
 图片
图片
原文地址:https://mp.weixin.qq.com/s/vyhbeorH9eKTGwQpkVSIaA


")


")