文字区域Text 的基本概念
Entry控件主要是处理单行的文字,Text控件可以视为Entry的扩充,因为它可以处理多行的输入,另外也可以在文字中嵌入图像或是提供格式化功能,因此实际上我们将使Text当做简单的文字处理软件,甚至也可以当做网页浏览器使用
它的构造方法如下:
|
1
|
Text(父对象, options, ...) |
参数:
- 第一个参数:父对象,表示这个文字区域将建立在哪一个窗口内
-
第二个参数:
options,参数如下
| 参数 | 含义 |
|---|---|
| bg 或 background | 背景色彩 |
| bd 或 borderwidth | 边界宽度默认是2像素 |
| cursor | 当鼠标光标在文字区域上时光标形状 |
| exportselection | 如果执行选择操作时,所选择的字符串会自动输出至剪贴板,如果想要避免可以设置exportselection=0 |
| fg 或 foreground | 字形色彩 |
| font | 字形 |
| height | 高,单位是字符高,实际高度会是字符高度而定 |
| highlightbackground | 当文本框取得焦点时的背景颜色 |
| highlightcolor | 当文本框取得焦点时的颜色 |
| highlightthickness | 取得焦点时的厚度默认值是1 |
| insertbackground | 插入光标的颜色默认是黑色 |
| insertborderwidth | 围绕插入游标的3D厚度默认是0 |
| padx | Text 左/右框与文字最左/最右的间距 |
| pady | Text 上/下框与文字最上/最下的间距 |
| relief | 可由此控制文字外框默认是relief=SUNKEN |
| selectbackground | 被选取字符串的背景色彩 |
| selectborderwidth | 选取字符串时边界厚度默认值是1 |
| selectforeground | 被选取字符串的前景色彩 |
| state | 输入状态默认是NORMAL,表示可以输入,DISABLED则表示无法编辑 |
| tab | 可设置按Tab键,如何定位插入点 |
| width | Text的宽,单位是字符宽 |
| wrap | 可控制某行文字太长时的处理,当某行文字太长时,可从字符做断行默认是wrap=CHAR当wrap=WORD时,只能从字做断行 |
| xscrollcommand | 在X轴使用滚动条 |
| yscrollcommand | 在Y轴使用滚动条 |
文字区域Text 的基本应用
例子:
|
1
2
3
4
5
|
import tkinterroot = tkinter.Tk()text = tkinter.Text(root, height=2, width=15)text.pack()root.mainloop() |
运行结果:

若是输入文字超过两行将导致第一行数据被隐藏,若是输入更多行将造成更多文字被隐藏,虽然可以用移动光标的方式重新看到第1行文字,但是对于不了解程序结构的人而言,还是比较容易误会文字区域的内容,最后要注意的是放大窗口并不会放大文字区域
插入文字insert()
insert() 可以将字符串插入指定的索引位置,它的使用格式如下:
|
1
|
insert(index, string) |
index若是END或者是INSERT,表示将字符串插入文件末端位置
例子:
|
1
2
3
4
5
6
7
|
import tkinterroot = tkinter.Tk()text = tkinter.Text(root, height=2, width=15)text.pack()text.insert(tkinter.END, 'Python\n')text.insert(tkinter.INSERT, 'Tkinter')root.mainloop() |
运行结果:

Text 加上滚动条 Scrollbar 设计
如果内容过多,我们可以加入滚动条的设计
例子:
|
1
2
3
4
5
6
7
8
9
10
11
12
13
14
15
16
17
18
19
|
import tkinterroot = tkinter.Tk()text = tkinter.Text(root, height=4, width=30)text.pack(side=tkinter.LEFT)yscrollbar = tkinter.Scrollbar(root)yscrollbar.pack(side=tkinter.RIGHT, fill=tkinter.Y)# 滚动条与text联动yscrollbar.config(command=text.yview)# text与滚动条联动text.config(yscrollcommand=yscrollbar.set)str = """很多人都喜欢房子清扫过后焕然一新的感觉。同样,理完发的感觉也十分美好,因为多余的东西去除了。儿童是快乐的,因为他没有过多的心事,也没有不必要的忧虑。而成人则不同,我们的生命中有太多的积压物和太多想像出来的复杂以及一些扩大了的悲痛。而生命的难度也正在于此,你要不断清扫和放弃一些东西,因为“生命里填塞的东西愈少,就愈能发挥潜能”。记得一部戏里,一个人对主人公说:“走吧,不要回头,做不好不要回来。”他的意思是让他离开这里,是希望不要让过去拖累他。"""text.insert(tkinter.END, str)root.mainloop() |
运行结果:

加上X轴滚动条
例子:
|
1
2
3
4
5
6
7
8
9
10
11
12
13
14
15
16
17
18
19
20
21
22
23
24
25
26
27
28
29
|
import tkinterroot = tkinter.Tk()# wrap="none" 让文字不自动换行text = tkinter.Text(root, height=4, width=30, wrap="none")# X轴滚动条xscrollbar = tkinter.Scrollbar(root, orient=tkinter.HORIZONTAL)xscrollbar.pack(side=tkinter.BOTTOM, fill=tkinter.X)# Y轴滚动条yscrollbar = tkinter.Scrollbar(root)yscrollbar.pack(side=tkinter.RIGHT, fill=tkinter.Y)# 因为Python是按顺序解析的,所以如果这个放在前面的话,就优选放置text了text.pack()# Y轴滚动条与text联动yscrollbar.config(command=text.yview)# Y轴text与滚动条联动text.config(yscrollcommand=yscrollbar.set)# X轴滚动条与text联动xscrollbar.config(command=text.xview)# X轴text与滚动条联动text.config(xscrollcommand=xscrollbar.set)str = """很多人都喜欢房子清扫过后焕然一新的感觉。同样,理完发的感觉也十分美好,因为多余的东西去除了。儿童是快乐的,因为他没有过多的心事,也没有不必要的忧虑。而成人则不同,我们的生命中有太多的积压物和太多想像出来的复杂以及一些扩大了的悲痛。而生命的难度也正在于此,你要不断清扫和放弃一些东西,因为“生命里填塞的东西愈少,就愈能发挥潜能”。记得一部戏里,一个人对主人公说:“走吧,不要回头,做不好不要回来。”他的意思是让他离开这里,是希望不要让过去拖累他。"""text.insert(tkinter.END, str)root.mainloop() |
运行结果:
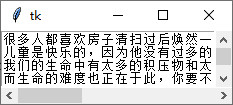
现在即使放大text也不会有所变化,但是我们可以通过fill和expand来设置
例子:
|
1
|
text.pack(fill=tkinter.BOTH, expand=True) |
运行结果:

字形
在tkinter.font模块中有Font方法,可以由此方法设定Font的相关参数,例如,family、size、weight、slant、underline、overstrike
family
family 用于设置Text 文字区域的字形
例子:
|
1
2
3
4
5
6
7
8
9
10
11
12
13
14
15
16
17
|
import tkinterfrom tkinter.font import Font# 改变字体def familyChange(event): f = Font(family=famliyVar.get()) text.configure(font=f)root = tkinter.Tk()# 建立family下拉列表famliyVar = tkinter.StringVar()familyFamily = ('Arial', 'Times', 'Courier')famliyVar.set(familyFamily[0])optionMenu = tkinter.OptionMenu(root, famliyVar, *familyFamily, command=familyChange)optionMenu.pack(pady=2)# 建立texttext = tkinter.Text(root, height=4, width=30)text.pack(fill=tkinter.BOTH, expand=True, padx=3, pady=2)root.mainloop() |
运行结果:
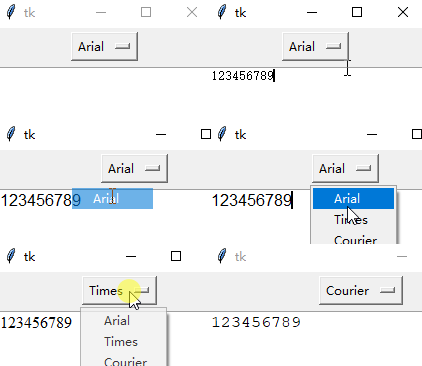
下拉框的下拉外观很丑,我们可以进行优化
|
1
2
|
import tkinter.ttkoptionMenu = tkinter.ttk.OptionMenu(root, famliyVar, *familyFamily, command=familyChange) |
其他的都可以不需要改变
运行结果:
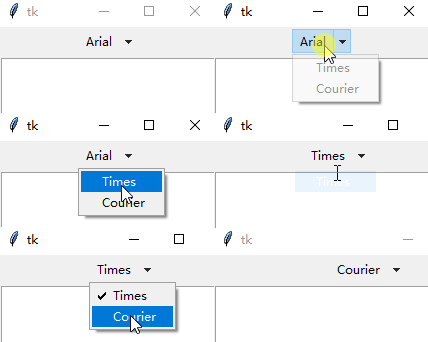
现在看上方的GIF图,就会发现一个bug,笔者不清楚这是因为不兼容还是本身就是这样的,但是可以进行修改
例子:
修复ttk.OptionMenu组件在选择后第一个选项消失的问题
|
1
2
|
familyFamily = ('', 'Arial', 'Times', 'Courier')famliyVar.set(familyFamily[1]) |
运行结果:
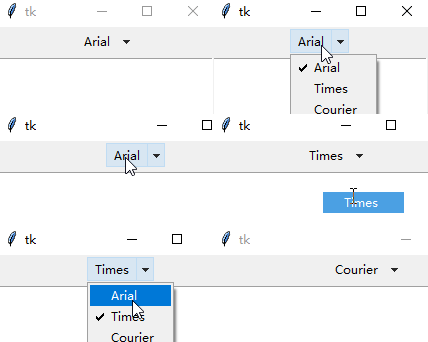
只要把前面索引为0的选项为空字符串,就可以了,然后设置默认索引为1
weight
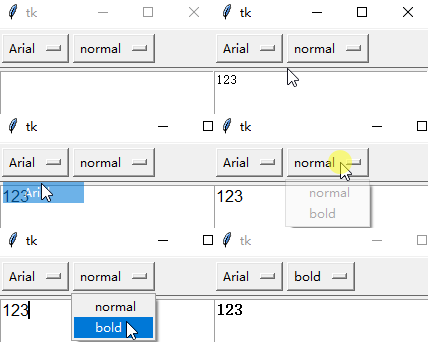
weight用于设置text文字区域的字是否是粗体
例子:
|
1
2
3
4
5
6
7
8
9
10
11
12
13
14
15
16
17
18
19
20
21
22
23
24
25
26
27
28
29
30
|
import tkinterfrom tkinter.font import Font# 改变字体def familyChange(event): f = Font(family=famliyVar.get()) text.configure(font=f)# 改变粗细def weightChange(event): f = Font(weight=weightVar.get()) text.configure(font=f)root = tkinter.Tk()# 建立工具栏toolbar = tkinter.Frame(root, relief=tkinter.RAISED, borderwidth=1)toolbar.pack(side=tkinter.TOP, fill=tkinter.X, padx=2, pady=1)# 建立family下拉列表famliyVar = tkinter.StringVar()familyFamily = ('Arial', 'Times', 'Courier')famliyVar.set(familyFamily[0])optionFont = tkinter.OptionMenu(toolbar, famliyVar, *familyFamily, command=familyChange)optionFont.pack(side=tkinter.LEFT, pady=2)# 建立weight下拉列表weightVar = tkinter.StringVar()weightFamily = ('normal', 'bold')weightVar.set(weightFamily[0])optionWeight = tkinter.OptionMenu(toolbar, weightVar, *weightFamily, command=weightChange)optionWeight.pack(side=tkinter.LEFT, pady=2)# 建立texttext = tkinter.Text(root, height=4, width=30)text.pack(fill=tkinter.BOTH, expand=True, padx=3, pady=2)root.mainloop() |
运行结果:
size
size用于设置Text文字区域的字号
例子:
|
1
2
3
4
5
6
7
8
9
10
11
12
13
14
15
16
17
18
19
20
21
22
23
24
25
26
27
28
29
30
31
32
33
34
35
36
37
38
39
40
41
42
43
|
import tkinterfrom tkinter.font import Fontfrom tkinter import ttk# 改变字体def familyChange(event): f = Font(family=famliyVar.get()) text.configure(font=f)# 改变粗细def weightChange(event): f = Font(weight=weightVar.get()) text.configure(font=f)# 改变大小def sizeChange(event): f = Font(size=sizeVar.get()) text.configure(font=f)root = tkinter.Tk()# 建立工具栏toolbar = tkinter.Frame(root, relief=tkinter.RAISED, borderwidth=1)toolbar.pack(side=tkinter.TOP, fill=tkinter.X, padx=2, pady=1)# 建立family下拉列表famliyVar = tkinter.StringVar()familyFamily = ('', 'Arial', 'Times', 'Courier')famliyVar.set(familyFamily[1])optionFont = ttk.OptionMenu(toolbar, famliyVar, *familyFamily, command=familyChange)optionFont.pack(side=tkinter.LEFT, pady=2)# 建立weight下拉列表weightVar = tkinter.StringVar()weightFamily = ('', 'normal', 'bold')weightVar.set(weightFamily[1])optionWeight = ttk.OptionMenu(toolbar, weightVar, *weightFamily, command=weightChange)optionWeight.pack(side=tkinter.LEFT, pady=2)# 建立size组合框sizeVar = tkinter.IntVar()size = ttk.Combobox(toolbar, textvariable=sizeVar)sizeFamily = [x for x in range(8, 30)]size['value'] = sizeFamilysize.current(4)size.bind('<<ComboboxSelected>>', sizeChange)size.pack(side=tkinter.LEFT, pady=2)# 建立texttext = tkinter.Text(root, height=4, width=30)text.pack(fill=tkinter.BOTH, expand=True, padx=3, pady=2)root.mainloop() |
运行结果:

选取文字
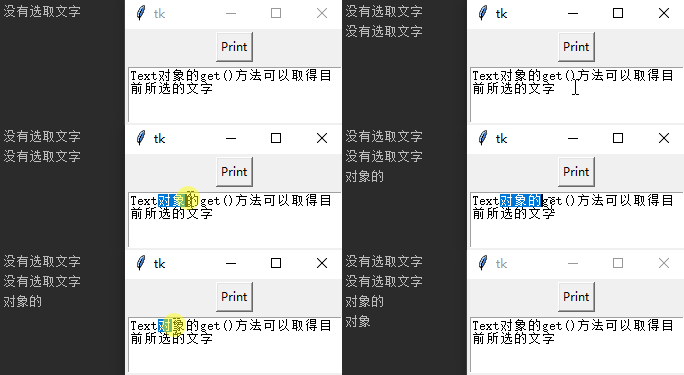
Text对象的get()方法可以取得目前所选的文字,在使用Text文字区域时,如果有选取文字操作发生时,Text的对象会将所选文字的起始索引放在SEL_FIRST,结束索引放在SEL_LAST,将SEL_FIRST和SEL_LAST当做get方法的参数,就可以获得目前所选的文字了
例子:
|
1
2
3
4
5
6
7
8
9
10
11
12
13
14
15
16
|
import tkinterdef show(): try: textInfo = text.get(tkinter.SEL_FIRST, tkinter.SEL_LAST) print(textInfo) except tkinter.TclError: print('没有选取文字')root = tkinter.Tk()# 建立Buttonbutton = tkinter.Button(root, text="Print", command=show)button.pack(pady=3)# 建立texttext = tkinter.Text(root, height=4, width=30)text.pack(fill=tkinter.BOTH, expand=True, padx=3, pady=2)text.insert(tkinter.END, 'Text对象的get()方法可以取得目前所选的文字')root.mainloop() |
运行结果:
认识Text 的索引
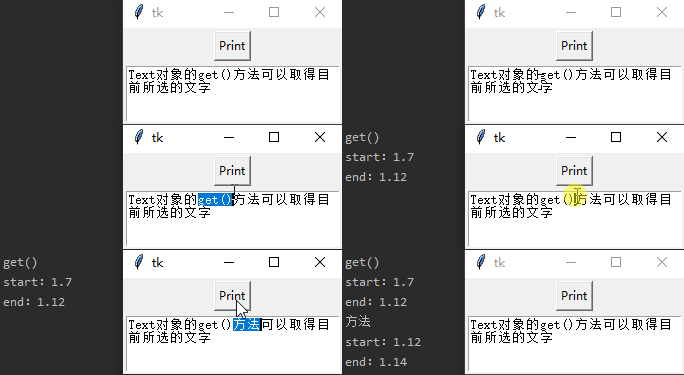
Text对象的索引并不是单一数字,而是一个字符串,索引的目的是让Text控件处理更进一步的文件操作,下列是常见的索引形式
-
line/column('line.column'):计数方式line是从1开始,column从0开始计数,中间用句点分割 -
INSERT:目前插入点的位置 -
CURRENT:光标目前位置相对于字符的位置 -
END:缓冲区最后一个字符后的位置
表达式Expression:索引使用表达式
-
+count chars:count 是数字,例如,"+2c" 索引往后移动两个字符 -
-count chars:count 是数字,例如,"-2c" 索引往前移动两个字符
例子:
|
1
2
3
4
5
6
7
|
try: textInfo = text.get(tkinter.SEL_FIRST, tkinter.SEL_LAST) print(textInfo) print('start:' + text.index(tkinter.SEL_FIRST)) print('end:' + text.index(tkinter.SEL_LAST))except tkinter.TclError: print('没有选取文字') |
运行结果:
例子:
列出INSERT、CURRENT、END的位置
|
1
2
3
4
5
6
7
8
9
10
11
12
13
14
|
import tkinterdef show(): print('INSERT :', text.index(tkinter.INSERT)) print('CURRENT :', text.index(tkinter.CURRENT)) print('END :', text.index(tkinter.END))root = tkinter.Tk()# 建立Buttonbutton = tkinter.Button(root, text="Print", command=show)button.pack(pady=3)# 建立texttext = tkinter.Text(root, height=4, width=30)text.pack(fill=tkinter.BOTH, expand=True, padx=3, pady=2)text.insert(tkinter.END, 'Text对象的get()方法\n可以取得目前所选的文字')root.mainloop() |
运行结果:
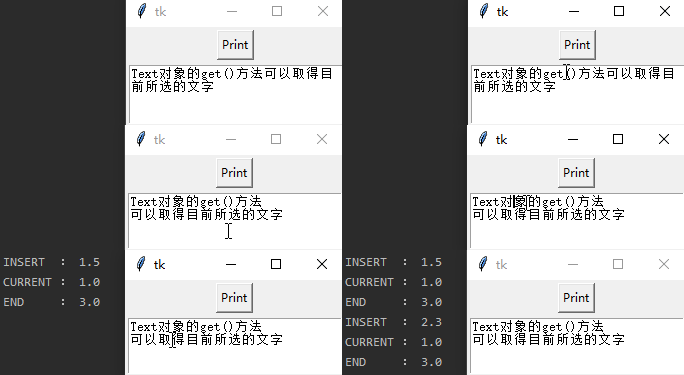
由于鼠标光标一直在Print按钮上,所以列出的CURRENT是在1.0索引位置,其实如果我们在文件位置单击时,CURRENT的索引位置会变动,此时INSERT的索引位置会随着CURRENT更改
例子:
在指定索引位置插入文字
|
1
2
3
4
5
6
7
8
|
import tkinterroot = tkinter.Tk()# 建立texttext = tkinter.Text(root, height=4, width=30)text.pack(fill=tkinter.BOTH, expand=True, padx=3, pady=2)text.insert(tkinter.END, 'Text对象的get()方法\n')text.insert(1.2, '可以取得目前所选的文字')root.mainloop() |
运行结果:

建立书签 Marks
在编辑文件时,可以在文件特殊位置建立书签(Marks),方便查阅,书签是无法显示的,但会在编辑系统内被记录,如果书签内容被删除,则此书签也将自动被删除,其实在tkinter内默认有两个书签,INSERT和CURRENT
书签的相关方法
-
index(mark):传回指定书签的line和column -
mark_names():传回这个Text对象所有的书签 -
mark_set(mark, index):在指定的index位置设置书签 -
mark_unset:取消指定书签设置
例子:
|
1
2
3
4
5
6
7
8
9
10
11
12
13
|
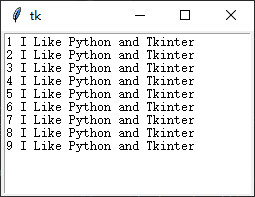
import tkinterroot = tkinter.Tk()# 建立texttext = tkinter.Text(root)# 插入内容for i in range(1, 10): text.insert(tkinter.END, str(i) + ' I Like Python and Tkinter\n')# 设置书签text.mark_set('markOne', 3.0)text.mark_set('markTwo', 5.0)print(text.get('markOne', 'markTwo'))text.pack(fill=tkinter.BOTH, expand=True, padx=3, pady=2)root.mainloop() |
运行结果:
|
1
2
|
3 I Like Python and Tkinter4 I Like Python and Tkinter |
建立标签
标签(Tags)是指一个区域文字,然后我们可以为这个区域取一个名字,这个名字称为标签,可以使用此标签名字代表这个区域名字。
有了标签后,我们可以针对此标签做进一步的工作,例如,将字形、色彩等的应用在此标签上。
下列是常见的标签方法
-
tag_add(tagname, startindex[, endindex] ···):将startindex和endindex间的文字命名为tagname标签 -
tag_conig(tagname, options, ···):可以为标签执行特定的编辑,或动作绑定 -
tag_delete(tagname):删除此标签,同时移除此标签特殊的编辑或绑定 -
tag_remove(tagname[, startindex[, endindex]] ···):删除标签,但是不移除此标签特殊的编辑或绑定
tag_conig的参数:
| 参数 | 含义 |
|---|---|
| background | 背景颜色 |
| borderwidth | 文字外围厚度默认是0 |
| font | 字形 |
| foreground | 前景颜色 |
| justify | 对齐方式默认是LEFT,也可以是RIGHT或CENTER |
| oversticky | 如果是True,加上删除线 |
| underline | 如果是True,加上下划线 |
| wrap | 当使用wrap模式时,可以使用NONE、CHAR或WORD |
例子:
|
1
2
3
4
5
6
7
8
9
10
11
12
13
14
15
16
17
|
import tkinterroot = tkinter.Tk()# 建立texttext = tkinter.Text(root)# 插入内容for i in range(1, 10): text.insert(tkinter.END, str(i) + ' I Like Python and Tkinter\n')# 设置书签text.mark_set('markOne', 3.0)text.mark_set('markTwo', 5.0)# 设置标签# 在区间markOne 与 markTwo之间设置标签tag1text.tag_add('tag1', 'markOne', 'markTwo')# 为标签添加属性text.tag_config('tag1', foreground='blue', background='lightyellow')text.pack(fill=tkinter.BOTH, expand=True)root.mainloop() |
运行结果:
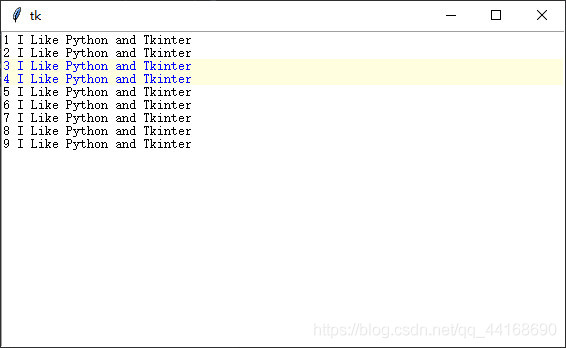
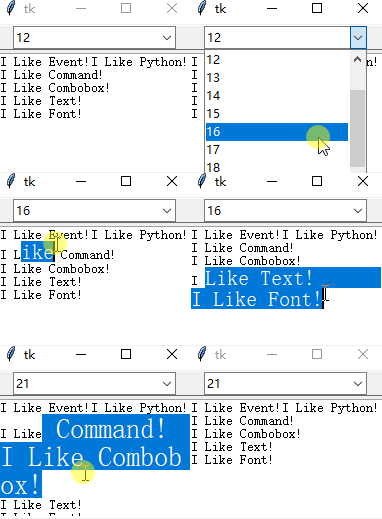
除了可以使用tag_add()自行定义标签外,系统还有一个内建标签SEL,代表所选取的区间
例子:
选取文字时,可以依所选的文字大小显示所选文字
|
1
2
3
4
5
6
7
8
9
10
11
12
13
14
15
16
17
18
19
20
21
22
23
24
25
26
27
28
29
30
31
32
33
34
35
36
37
|
import tkinterfrom tkinter.font import Fontfrom tkinter.ttk import *def sizeSelected(event): # 把当前Combobox的值,传递给Font f = Font(size=sizeVar.get()) # 添加标签,SEL是选取的区间,然后选取的区间的font就是Combobox的值 text.tag_config(tkinter.SEL, font=f)root = tkinter.Tk()root.geometry('200x150')# 建立工具栏toolbar = tkinter.Frame(root, relief=tkinter.RAISED, borderwidth=1)# 放在顶端,填充X轴toolbar.pack(side=tkinter.TOP, fill=tkinter.X, padx=2, pady=1)# 在工具栏上创建字体选择combobox组合框sizeVar = tkinter.IntVar()size = Combobox(toolbar, textvariable=sizeVar)# 列表推导式,选取Combobox的value范围sizeFamily = [x for x in range(8, 30)]size['value'] = sizeFamily# 设置默认选项,索引为4size.current(4)# 绑定Combobox事件,size.bind('<<ComboboxSelected>>', sizeSelected)size.pack()# 建立texttext = tkinter.Text(root)text.pack(fill=tkinter.BOTH, expand=True, padx=3, pady=2)text.insert(tkinter.END, 'I Like Event!')text.insert(tkinter.END, 'I Like Python!\n')text.insert(tkinter.END, 'I Like Command!\n')text.insert(tkinter.END, 'I Like Combobox!\n')text.insert(tkinter.END, 'I Like Text!\n')text.insert(tkinter.END, 'I Like Font!\n')# 设置焦点text.focus_set()root.mainloop() |
运行结果:
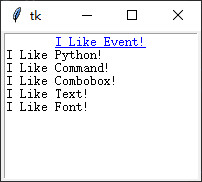
我们也可以在insert()方法的第三个参数增加标签tag
例子:
|
1
2
3
4
5
6
7
8
9
10
11
12
13
14
15
16
17
|
import tkinterroot = tkinter.Tk()root.geometry('200x150')# 建立texttext = tkinter.Text(root)text.pack(fill=tkinter.BOTH, expand=True, padx=3, pady=2)text.insert(tkinter.END, 'I Like Event!\n', 'a')text.insert(tkinter.END, 'I Like Python!\n')text.insert(tkinter.END, 'I Like Command!\n')text.insert(tkinter.END, 'I Like Combobox!\n')text.insert(tkinter.END, 'I Like Text!\n')text.insert(tkinter.END, 'I Like Font!\n')# 设置焦点text.focus_set()# 将Tag a设为居中,蓝色,含有下划线text.tag_config('a', foreground='blue', justify=tkinter.CENTER, underline=True)root.mainloop() |
运行结果:
Cut/Copy/Paste 功能
编辑文件时剪贴/复制/粘贴(Cut/Copy/Paste)是很常见的功能,这些功能其实已经被内建在tkinter中,但是为了学习,我们还是得掌握基本的方法
删除插入点字符:
|
1
|
delete(INSERT) # 删除插入点字符 |
删除所选的文本块,可以使用两个参数:起始索引与结束索引
|
1
2
|
delete(SEL_FIRST, SEL_LAST) # 删除所选文本块delete(startindex, endindex) # 删除指定区间文本块 |
删除整份文件
|
1
|
delete(1.0, END) |
例子:
|
1
2
3
4
5
6
7
8
9
10
11
12
13
14
15
16
17
18
19
20
21
22
23
24
25
26
27
28
29
30
31
32
33
34
35
36
37
38
39
40
41
42
43
44
45
46
47
48
49
|
import tkinterdef show(event): popupment.post(event.x_root, event.y_root)# 剪贴def cutJob(): # 调用下面的copyJoy方法 copyJob() # 删除所选取的文字 text.delete(tkinter.SEL_FIRST, tkinter.SEL_LAST)# 复制def copyJob(): try: # 清除剪贴板 text.clipboard_clear() # 复制选取内容 copyText = text.get(tkinter.SEL_FIRST, tkinter.SEL_LAST) # 写入剪贴板 text.clipboard_append(copyText) except tkinter.TclError: print('没有选取')# 粘贴def pasteJob(): try: # 读取剪贴板内容 copyText = text.selection_get(selection='CLIPBOARD') # 插入内容 text.insert(tkinter.INSERT, copyText) except tkinter.TclError: print('剪贴板没有内容')root = tkinter.Tk()root.geometry('200x150')# 名字可以随便取,tearoff是取消分割线,分割线很丑popupment = tkinter.Menu(root, tearoff=False)# 在弹出菜单内建立三个命令列表popupment.add_command(label='Cut', command=cutJob)popupment.add_command(label='Copy', command=copyJob)popupment.add_command(label='Paste', command=pasteJob)# 单击鼠标右键绑定显示弹出菜单root.bind('<3>', show)# 建立texttext = tkinter.Text(root)text.pack(fill=tkinter.BOTH, expand=True, padx=3, pady=2)text.insert(tkinter.END, 'I Like Event!\n')text.insert(tkinter.END, 'I Like Python!\n')text.insert(tkinter.END, 'I Like Command!\n')text.insert(tkinter.END, 'I Like Combobox!\n')text.insert(tkinter.END, 'I Like Text!\n')text.insert(tkinter.END, 'I Like Font!\n')root.mainloop() |
运行结果:
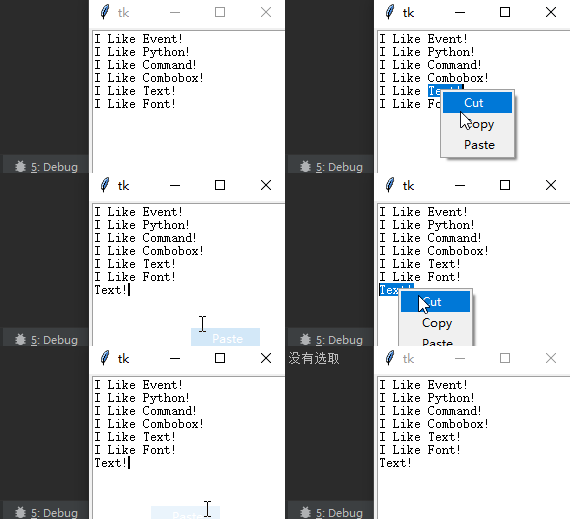
使用内建的虚拟方法重新设计复制粘贴剪贴
|
1
2
3
4
5
6
7
8
9
|
# 剪贴def cutJob(): text.event_generate('<<Cut>>')# 复制def copyJob(): text.event_generate('<<Copy>>')# 粘贴def pasteJob(): text.event_generate('<<Paste>>') |
只需要小改一下即可,就是辣么简单,但是简单归简单,还是得掌握基本的方法与思路
撤销与恢复
Text控件有一个简单撤销(undo)和恢复(redo)的机制, 这个机制可以应用于文字删除(delete)和文字插入(insert)。
Text控件默认环境下没有开启这个机制的,如果要使用此功能,可以在Text()方法内增加undo=True参数
例子:
|
1
2
3
4
5
6
7
8
9
10
11
12
13
14
15
16
17
18
19
20
21
22
23
24
25
26
27
28
29
30
31
32
33
34
35
36
37
38
39
40
41
42
43
44
45
46
47
48
49
50
51
52
|
import tkinterdef show(event): popupment.post(event.x_root, event.y_root)# 剪贴def cutJob(): text.event_generate('<<Cut>>')# 复制def copyJob(): text.event_generate('<<Copy>>')# 粘贴def pasteJob(): text.event_generate('<<Paste>>')# 撤销def undoJob(): try: text.edit_undo() except tkinter.TclError: print('先前没有动作')# 恢复def redoJob(): try: text.edit_redo() except tkinter.TclError: print('先前没有动作')root = tkinter.Tk()root.geometry('200x150')# 名字可以随便取,tearoff是取消分割线,分割线很丑popupment = tkinter.Menu(root, tearoff=False)# 在弹出菜单内建立三个命令列表popupment.add_command(label='Cut', command=cutJob)popupment.add_command(label='Copy', command=copyJob)popupment.add_command(label='Paste', command=pasteJob)# 单击鼠标右键绑定显示弹出菜单root.bind('<3>', show)# 建立工具栏toolbar = tkinter.Frame(root, relief=tkinter.RAISED, borderwidth=1)toolbar.pack(side=tkinter.TOP, fill=tkinter.X, padx=2, pady=1)# 在工具栏上建立undo与redo按钮undoButton = tkinter.Button(toolbar, text='Undo', command=undoJob)undoButton.pack(side=tkinter.LEFT, padx=2, pady=1)redoButton = tkinter.Button(toolbar, text='Redo', command=redoJob)redoButton.pack(side=tkinter.LEFT, padx=2, pady=1)# 建立text, undo一定要开text = tkinter.Text(root, undo=True)text.pack(fill=tkinter.BOTH, expand=True, padx=3, pady=2)text.insert(tkinter.END, 'I Like Event!\n')text.insert(tkinter.END, 'I Like Python!\n')text.insert(tkinter.END, 'I Like Command!\n')text.insert(tkinter.END, 'I Like Combobox!\n')text.insert(tkinter.END, 'I Like Text!\n')text.insert(tkinter.END, 'I Like Font!\n')root.mainloop() |
运行结果:
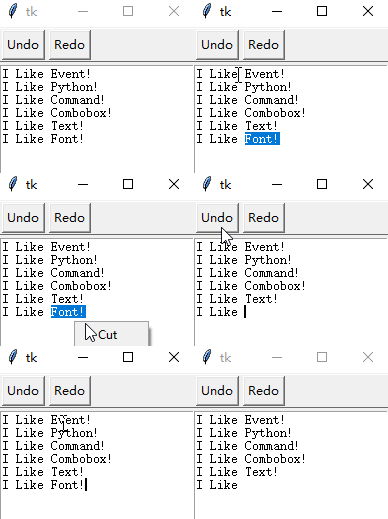
有点类似上一步和复原
第63行的undo=True一定要开,增加了这个参数后,程序的第26行就可以用text对象调用edit_undo()方法,这个方法会自动执行Undo动作。程序的34行就可以用text对象调用edit_redo()方法,这个方法会自动执行Redo动作
查找文字
在Text控件内可以使用search()方法茶轴指定的字符串,这个方法会传回找到的第一个指定字符串的索引。假设Text控件的对象是text,语法如下:
|
1
|
pos = text.search(key, startindex, endindex) |
-
pos:传回所找到的字符串的索引位置,如果查找sibai失败则传回空字符串 -
key:所查找的字符串 -
startindex:查找起始位置 -
endindex:查找结束位置,如果查找到文档最后可以使用END
例子:
|
1
2
3
4
5
6
7
8
9
10
11
12
13
14
15
16
17
18
19
20
21
22
23
24
25
26
27
28
29
30
31
32
33
34
35
36
37
38
39
40
41
42
43
44
45
46
|
import tkinterdef search(): # 删除标签但不删除标签定义 text.tag_remove('found', '1.0', tkinter.END) # 设置起始值为1.0,也就是第一排第0个字符 start = 1.0 # 获取输入框的值 key = entry.get() # 没有输入时 if len(key.strip()) == 0: # 就当什么都没有发生 return -1 # 死循环,因为我们查找的可能不止一个值,可能文本框中有多个 while True: # 执行查找,key是我们需要查询的,start是起始值,END是从头查到尾 pos = text.search(key, start, tkinter.END) # 查不到就结束,break是退出死循环 if pos == '': break # 进行到这一步说明查到了数据 # 添加标签名,pos是查询到的索引位置,后面这个我下面详讲 text.tag_add('found', pos, '%s+%dc' % (pos, len(key))) # 这里是更新查找起始位置 start = '%s+%dc' % (pos, len(key))root = tkinter.Tk()root.geometry('200x150')root.rowconfigure(1, weight=1)root.columnconfigure(0, weight=1)# 输入的文本框entry = tkinter.Entry()entry.grid(row=0, column=0, padx=5, pady=5, sticky=tkinter.W + tkinter.E)# 查找按钮btu = tkinter.Button(root, text='find', command=search)btu.grid(row=0, column=1, padx=5, pady=5)# 建立texttext = tkinter.Text(root, undo=True)text.grid(row=1, column=0, columnspan=2, padx=3, pady=5, sticky=tkinter.W + tkinter.E + tkinter.N + tkinter.S)text.insert(tkinter.END, 'I Like Event!\n')text.insert(tkinter.END, 'I Like Python!\n')text.insert(tkinter.END, 'I Like Command!\n')text.insert(tkinter.END, 'I Like Combobox!\n')text.insert(tkinter.END, 'I Like Text!\n')text.insert(tkinter.END, 'I Like Font!\n')# 定义找到的标签text.tag_configure('found', background='yellow')root.mainloop() |
运行结果:
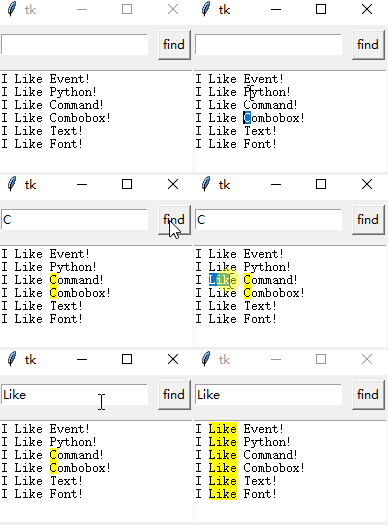
第19行:
-
pos = text.search(key, start, tkinter.END) - key:查找关键字
- start:查找起始值
- END:查找终止值
第25行:
- text.tag_add('found', pos, '%s+%dc' % (pos, len(key)))
- 我们之前删除了标签但没有删除属性,也就是背景颜色,这里重新添加一下found标签,可以自动得到它的属性,然后后面的pos是我们查找到的字符串的起始值
- %s+%dc’ % (pos, len(key))):索引使用表达式,假设pos是1.2,key是like,len(key)就是4,然后这个就是1.2+4c,+4c就是索引往后移动两个字符,这里要注意%dc是分开的,表达式值就是1.6了,也就是查找字符的终止值,不要想复杂了
第27行:
- 更新查找起始位置,将光标定位在已查找字符的终止值,让它继续往后查找~~
存储Text 控件内容
当使用编辑程序完成文件的编排后,下一步就是将所编排的文件存储
例子
|
1
2
3
4
5
6
7
8
9
10
11
12
13
14
15
16
17
18
19
20
21
22
23
24
25
26
27
28
29
30
31
|
import tkinterdef save(): # 获取全部内容 textContext = text.get('1.0', tkinter.END) filename = 'new name.txt' with open(filename, 'w') as output: output.write(textContext) root.title(filename)root = tkinter.Tk()root.title('Untitled')root.geometry('200x150')# 建立菜单栏menubar = tkinter.Menu(root)# 建立菜单类别对象,命名为filefilemenu = tkinter.Menu(menubar, tearoff=False)menubar.add_cascade(label='File', menu=filemenu)# 在file里面建立子菜单列表filemenu.add_command(label='Save', command=save)filemenu.add_command(label='Exit', command=root.destroy)# 显示菜单对象root.config(menu=menubar)# 建立texttext = tkinter.Text(root, undo=True)text.pack(fill=tkinter.BOTH, expand=True)text.insert(tkinter.END, 'I Like Event!\n')text.insert(tkinter.END, 'I Like Python!\n')text.insert(tkinter.END, 'I Like Command!\n')text.insert(tkinter.END, 'I Like Combobox!\n')text.insert(tkinter.END, 'I Like Text!\n')text.insert(tkinter.END, 'I Like Font!\n')root.mainloop() |
运行结果:
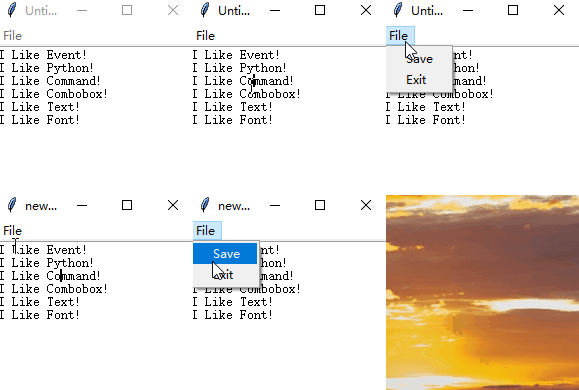
他会直接存在当前文件位置

但是这样不太美观,不是GUI设计方式,在GUI的设计中应该是启动’另存为’,然后可以选择将文档存储的文档夹再输入文件名。
在tkinter.filedialog模式中有asksaveasfilename()方法,我们可以使用此方法,让窗口出现对话框,再执行存储工作
例子
|
1
2
3
4
5
6
7
8
9
10
11
12
13
14
15
16
17
18
19
20
21
22
23
24
25
26
27
28
29
30
31
32
33
34
35
36
|
import tkinterfrom tkinter.filedialog import asksaveasfilenamedef saveAs(): # 获取全部内容 global filename textContext = text.get('1.0', tkinter.END) filename = asksaveasfilename() if filename == '': return with open(filename, 'w') as output: output.write(textContext) root.title(filename)filename = 'Untitled'root = tkinter.Tk()root.title(filename)root.geometry('200x150')# 建立菜单栏menubar = tkinter.Menu(root)# 建立菜单类别对象,命名为filefilemenu = tkinter.Menu(menubar, tearoff=False)menubar.add_cascade(label='File', menu=filemenu)# 在file里面建立子菜单列表filemenu.add_command(label='Save As', command=saveAs)filemenu.add_command(label='Exit', command=root.destroy)# 显示菜单对象root.config(menu=menubar)# 建立texttext = tkinter.Text(root, undo=True)text.pack(fill=tkinter.BOTH, expand=True)text.insert(tkinter.END, 'I Like Event!\n')text.insert(tkinter.END, 'I Like Python!\n')text.insert(tkinter.END, 'I Like Command!\n')text.insert(tkinter.END, 'I Like Combobox!\n')text.insert(tkinter.END, 'I Like Text!\n')text.insert(tkinter.END, 'I Like Font!\n')root.mainloop() |
运行结果:
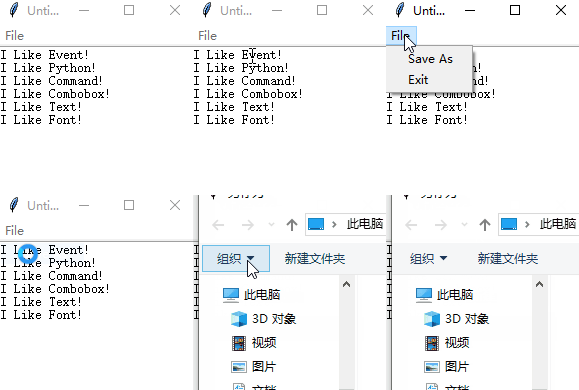
运行结果:正规的文字编辑程序中,需要考虑的事项太多了,有Save命令,可以直接使用目前文件名存储文件,如果尚未存盘才出现另存为对话框,还有可以使用快捷键方式快捷保存
上述的方式,如果我们在输入文件名的时候没有加后缀.txt的话,会直接帮我们保存一个无格式的文件,所以一定要加后缀,下面的一种方式可以帮我们默认加后缀
例子:
|
1
|
filename = asksaveasfilename(defaultextension='.txt') |
这样我们就不要刻意去输入后缀,前提是文件就应该是txt文件格式~
新建文档
在设计编辑程序时,有时候想要新建文档,这时编辑程序会将编辑去清空,以供编辑新的文档,设计方式如下:
- 删除Text控件内容,参考第5行
-
将窗口标题改为
'Untitled',参考第6行
例子:
|
1
2
3
4
5
6
7
8
9
10
11
12
13
14
15
16
17
18
19
20
21
22
23
24
25
26
27
28
29
30
31
32
33
34
35
36
37
38
39
40
41
42
|
import tkinterfrom tkinter.filedialog import asksaveasfilenamedef newFile(): text.delete('1.0', tkinter.END) root.title('Untitled')def saveAs(): # 获取全部内容 global filename textContext = text.get('1.0', tkinter.END) # 开启另存为对话框,默认所存的文件格式是txt filename = asksaveasfilename(defaultextension='.txt') if filename == '': return with open(filename, 'w') as output: output.write(textContext) root.title(filename)filename = 'Untitled'root = tkinter.Tk()root.title(filename)root.geometry('200x150')# 建立菜单栏menubar = tkinter.Menu(root)# 建立菜单类别对象,命名为filefilemenu = tkinter.Menu(menubar, tearoff=False)menubar.add_cascade(label='File', menu=filemenu)# 在file里面建立子菜单列表filemenu.add_command(label='New File', command=newFile)filemenu.add_command(label='Save As', command=saveAs)filemenu.add_separator()filemenu.add_command(label='Exit', command=root.destroy)# 显示菜单对象root.config(menu=menubar)# 建立texttext = tkinter.Text(root, undo=True)text.pack(fill=tkinter.BOTH, expand=True)text.insert(tkinter.END, 'I Like Event!\n')text.insert(tkinter.END, 'I Like Python!\n')text.insert(tkinter.END, 'I Like Command!\n')text.insert(tkinter.END, 'I Like Combobox!\n')text.insert(tkinter.END, 'I Like Text!\n')text.insert(tkinter.END, 'I Like Font!\n')root.mainloop() |
运行结果:
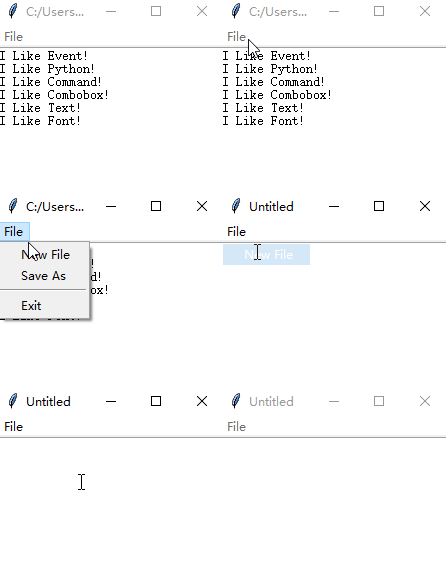
打开文档
在tkinter.filedialog模块中有askopenfilename()方法,可以使用此方法,让窗口出现对话框,再执行选择所要打开的文档
|
1
|
filename = askopenfilename() |
上述程序可以传回所存盘文档的路径(含文件夹),然后可以使用open方法打开文档,最后将所打开的文档插入Text控件。步骤如下
- 在打开对话框中选择欲打开的文档,参考第13行
- 使用open File()方法打开文档,参考第21行
- 使用read()方法读取文档内容,参考第23行
- 删除Text控件内容,参考第25行
- 将所读取的文档内容插入Text控件,参考第27行
- 更改窗口标题名称,参考第29行
例子:
|
1
2
3
4
5
6
7
8
9
10
11
12
13
14
15
16
17
18
19
20
21
22
23
24
25
26
27
28
29
30
31
32
33
34
35
36
37
38
39
40
41
42
43
44
45
46
47
48
49
50
51
52
53
54
55
56
57
58
59
60
61
62
63
|
import tkinterfrom tkinter.filedialog import asksaveasfilenamefrom tkinter.filedialog import askopenfilenamedef newFile(): text.delete('1.0', tkinter.END) root.title('Untitled')def openFile(): # 改变变量属性 global filename # 读取打开的文档 filename = askopenfilename() # 如果没有选择文档 if filename == '': # 就当什么都没有发生 return # 打开文档 with open(filename, 'r') as file: # 读取文档的内容 context = file.read() # 删除text控件的内容 text.delete('1.0', tkinter.END) # 插入所读取的内容 text.insert(tkinter.END, context) # 改标题 root.title(filename)def saveAs(): # 获取全部内容 global filename textContext = text.get('1.0', tkinter.END) # 开启另存为对话框,默认所存的文件格式是txt filename = asksaveasfilename(defaultextension='.txt') if filename == '': return with open(filename, 'w') as output: output.write(textContext) root.title(filename)filename = 'Untitled'root = tkinter.Tk()root.title(filename)root.geometry('200x150')# 建立菜单栏menubar = tkinter.Menu(root)# 建立菜单类别对象,命名为filefilemenu = tkinter.Menu(menubar, tearoff=False)menubar.add_cascade(label='File', menu=filemenu)# 在file里面建立子菜单列表filemenu.add_command(label='New File', command=newFile)filemenu.add_command(label='Open File', command=openFile)filemenu.add_command(label='Save As', command=saveAs)filemenu.add_separator()filemenu.add_command(label='Exit', command=root.destroy)# 显示菜单对象root.config(menu=menubar)# 建立texttext = tkinter.Text(root, undo=True)text.pack(fill=tkinter.BOTH, expand=True)text.insert(tkinter.END, 'I Like Event!\n')text.insert(tkinter.END, 'I Like Python!\n')text.insert(tkinter.END, 'I Like Command!\n')text.insert(tkinter.END, 'I Like Combobox!\n')text.insert(tkinter.END, 'I Like Text!\n')text.insert(tkinter.END, 'I Like Font!\n')root.mainloop() |
运行结果:

默认含滚动条的ScrolledText 控件
正式的文本编辑程序应该要设计滚动条,我们可以采用之前的设计方式来设计滚动条。在tkinter.scrolledtext模块内有ScrolledText控件,这是一个默认含有滚动条的Text控件,使用时可以先导入此模块,执行时就可以看到滚动条
例子:
|
1
2
3
4
5
6
7
8
9
10
11
12
13
14
15
16
17
18
19
20
21
22
23
24
25
26
27
28
29
30
31
32
33
34
35
36
37
38
39
40
41
42
43
44
45
46
47
48
49
50
51
52
53
54
55
56
57
58
59
60
61
62
63
|
import tkinterfrom tkinter.filedialog import asksaveasfilenamefrom tkinter.filedialog import askopenfilenamedef newFile(): text.delete('1.0', tkinter.END) root.title('Untitled')def openFile(): # 改变变量属性 global filename # 读取打开的文档 filename = askopenfilename() # 如果没有选择文档 if filename == '': # 就当什么都没有发生 return # 打开文档 with open(filename, 'r') as file: # 读取文档的内容 context = file.read() # 删除text控件的内容 text.delete('1.0', tkinter.END) # 插入所读取的内容 text.insert(tkinter.END, context) # 改标题 root.title(filename)def saveAs(): # 获取全部内容 global filename textContext = text.get('1.0', tkinter.END) # 开启另存为对话框,默认所存的文件格式是txt filename = asksaveasfilename(defaultextension='.txt') if filename == '': return with open(filename, 'w') as output: output.write(textContext) root.title(filename)filename = 'Untitled'root = tkinter.Tk()root.title(filename)root.geometry('200x150')# 建立菜单栏menubar = tkinter.Menu(root)# 建立菜单类别对象,命名为filefilemenu = tkinter.Menu(menubar, tearoff=False)menubar.add_cascade(label='File', menu=filemenu)# 在file里面建立子菜单列表filemenu.add_command(label='New File', command=newFile)filemenu.add_command(label='Open File', command=openFile)filemenu.add_command(label='Save As', command=saveAs)filemenu.add_separator()filemenu.add_command(label='Exit', command=root.destroy)# 显示菜单对象root.config(menu=menubar)# 建立texttext = tkinter.Text(root, undo=True)text.pack(fill=tkinter.BOTH, expand=True)text.insert(tkinter.END, 'I Like Event!\n')text.insert(tkinter.END, 'I Like Python!\n')text.insert(tkinter.END, 'I Like Command!\n')text.insert(tkinter.END, 'I Like Combobox!\n')text.insert(tkinter.END, 'I Like Text!\n')text.insert(tkinter.END, 'I Like Font!\n')root.mainloop() |
运行结果:
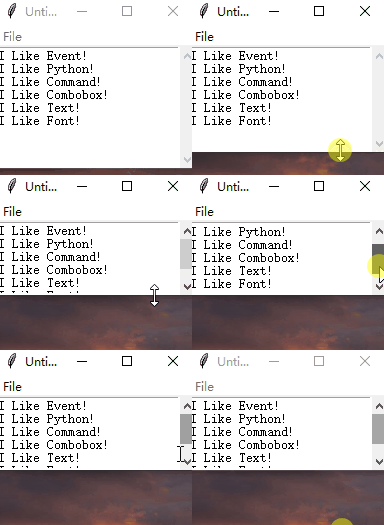
插入图像
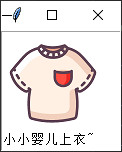
Text控件时允许插入图像文件的,所插入的图像文件会被视为一个字符方式进行处理,所程璇的大小是实际图像的大小
例子:
|
1
2
3
4
5
6
7
8
9
10
11
|
import tkinterfrom PIL import Image, ImageTkroot = tkinter.Tk()img = Image.open('coat.png')myPng = ImageTk.PhotoImage(img)text = tkinter.Text(root)text.image_create(tkinter.END, image=myPng)text.insert(tkinter.END, '\n')text.insert(tkinter.END, '小小婴儿上衣~')text.pack(fill=tkinter.BOTH, expand=True)root.mainloop() |
运行结果:
总结
以上为个人经验,希望能给大家一个参考,也希望大家多多支持服务器之家。
原文链接:https://blog.csdn.net/qq_44168690/article/details/105118672


