引言
本系统支持,自动播放,左右拖动切换,点击列表切换,点击按钮切换;是一个标准的图像浏览软件。
Windows 图片浏览器,可以查看当前文件夹下的图片,往上翻、往下翻并且自动播放;
此系统增加一个列表;
实现功能
1.浏览电脑里的文件夹,将当前文件夹下的图片列表罗列出来;
2.鼠标点击列表上的某一张图片,图片将显示出来;
3.可以控制浏览当前图片的上一张和下一张;
4.实现鼠标拖动图片,左划,右划切换图片;
5.实现自动播放的开始和停止控制。
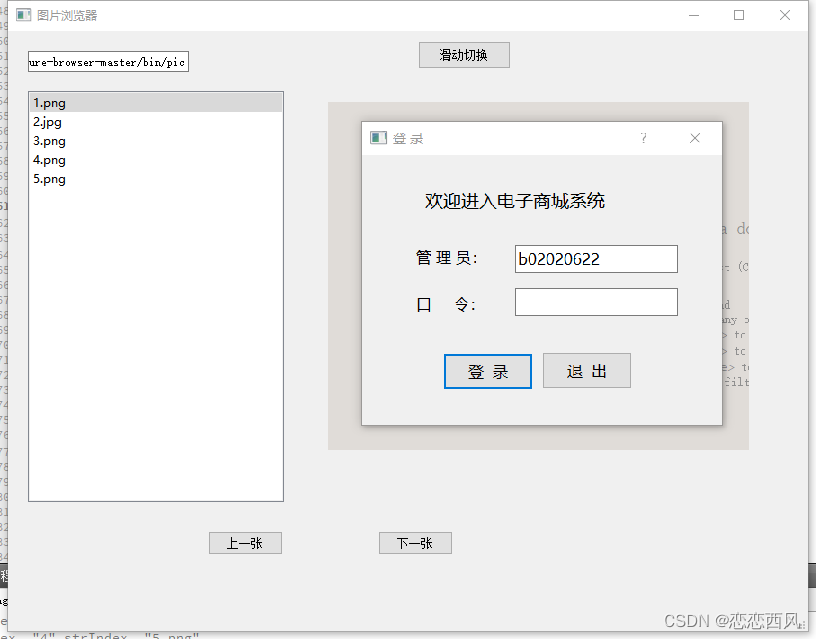
效果

实现图片浏览所用知识
包括窗口部件、布局、事件、对象模型与容器类、图形视图、模型/视图编程以及多线程等。
实现流程
1.定义一个图片类,该类包含图片的路径、文件名、文件id以及获取这些变量的函数。
2. 主要包含添加图像以及获取所有图像以及新加入图像的函数。
3.最后通过将图片名字加入到界面左侧QDockWidget部件中的QTreeView中,
4.通过双击可查看完整图片,以及通过滚轮和鼠标等事件来对图片进行一些操作。
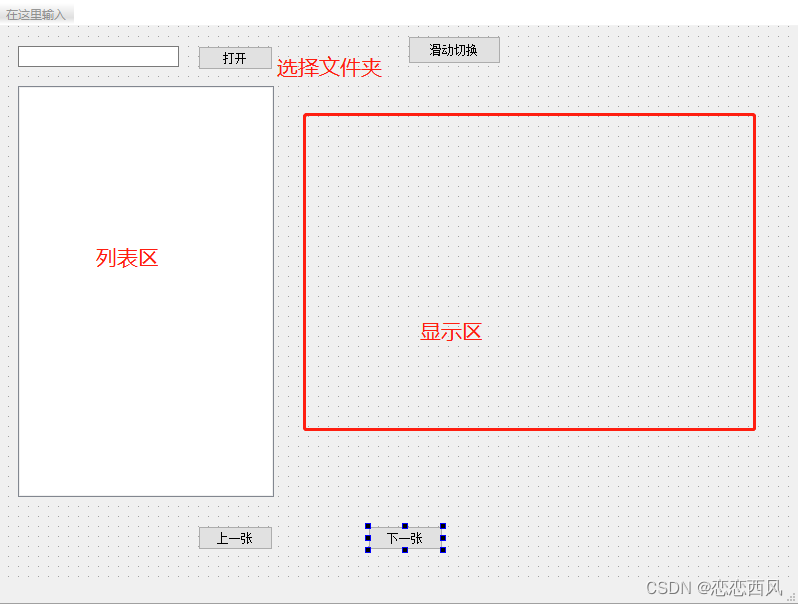
实现环境和UI设计
环境:VS2017 + Qt5.12.4

具体实现
mainwindow.h
|
1
2
3
4
5
6
7
8
9
10
11
12
13
14
15
16
17
18
19
20
21
22
23
24
25
26
27
28
29
30
31
32
33
34
35
36
37
38
39
40
41
42
|
#ifndef MAINWINDOW_H#define MAINWINDOW_H #include <QListWidget>#include <QMainWindow>#include <QTimer>QT_BEGIN_NAMESPACEnamespace Ui { class MainWindow; }QT_END_NAMESPACE class MainWindow : public QMainWindow{ Q_OBJECT public: MainWindow(QWidget *parent = nullptr); ~MainWindow(); private slots: void on_btnOpen_clicked(); void on_listWidget_itemClicked(QListWidgetItem *item); void MyFunction(); void on_pushButton_clicked(); void on_btnLast_clicked(); void on_btnNext_clicked(); protected: bool eventFilter(QObject *watch, QEvent *evn); QStringList getFileNames(const QString &path);private: Ui::MainWindow *ui; QVector<QString> mListPath; QTimer mTimer; int index ;};#endif // MAINWINDOW_H |
mainwindow.cpp
|
1
2
3
4
5
6
7
8
9
10
11
12
13
14
15
16
17
18
19
20
21
22
23
24
25
26
27
28
29
30
31
32
33
34
35
36
37
38
39
40
41
42
43
44
45
46
47
48
49
50
51
52
53
54
55
56
57
58
59
60
61
62
63
64
65
66
67
68
69
70
71
72
73
74
75
76
77
78
79
80
81
82
83
84
85
86
87
88
89
90
91
92
93
94
95
96
97
98
99
100
101
102
103
104
105
106
107
108
109
110
111
112
113
114
115
116
117
118
119
120
121
122
123
124
125
126
127
128
129
130
131
132
133
134
135
136
137
138
139
140
141
142
143
144
145
146
147
148
149
150
151
152
153
154
155
156
157
158
159
160
161
162
163
164
165
166
167
168
169
170
171
172
173
174
175
176
177
178
179
180
181
182
183
184
185
186
187
188
189
190
191
192
193
194
195
196
197
198
199
200
201
202
203
204
205
206
207
|
#include "mainwindow.h"#include "ui_mainwindow.h" #include <QFileInfoList>#include <QString>#include <QDir>#include <QMessageBox>#include <QImage>#include "qevent.h"#include <QDebug>#pragma execution_character_set("utf-8")MainWindow::MainWindow(QWidget *parent) : QMainWindow(parent) , ui(new Ui::MainWindow){ ui->setupUi(this); index =0; mTimer.setInterval(1000); connect(&mTimer,SIGNAL(timeout()),this,SLOT(MyFunction())); on_btnOpen_clicked(); mTimer.start(1000); ui->btnOpen->setVisible(false); // ui->pushButton->setVisible(false); this->installEventFilter(this); this->setWindowTitle("图片浏览器");} MainWindow::~MainWindow(){ delete ui;} void MainWindow::MyFunction(){ if (index == 5) { index = 0; } else { index++; } if (index == 5) { index = 0; } // this->setStyleSheet(QString("background-image: url(:/%1.png);").arg(index)); QString strIndex = mListPath.at(index); qDebug()<<"index "<<QString::number(index)<<"strIndex "<<strIndex; QDir filePath(ui->inputDirPath->text()); QString fullName = filePath.absoluteFilePath(strIndex); QImage img(fullName); QImage thumb = img.scaled(ui->label->width(),ui->label->height(),Qt::KeepAspectRatio); ui->label->setPixmap(QPixmap::fromImage(thumb));}void MainWindow::on_btnOpen_clicked(){ QString filePath = QCoreApplication::applicationDirPath()+"/pic"; ui->inputDirPath->setText(filePath); // QMessageBox::information(this,"提示!",filePath); QDir dir(filePath); // 判断文件夹是否存在 if(dir.exists()){ ui->listWidget->clear(); QFileInfoList info_list = dir.entryInfoList(QDir::Files | QDir::Dirs | QDir::NoDotAndDotDot); for(int i =0;i<info_list.count();i++){ ui->listWidget->addItem(info_list.at(i).fileName()); mListPath.push_back(info_list.at(i).fileName()); } } else{ QMessageBox::information(this,"提示!","文件夹不存在"); } }QStringList MainWindow::getFileNames(const QString &path){ QDir dir(path); QStringList nameFilters; nameFilters << "*.jpg" << "*.png"; QStringList files = dir.entryList(nameFilters, QDir::Files|QDir::Readable, QDir::Name); return files;}void MainWindow::on_listWidget_itemClicked(QListWidgetItem *item){ if(mTimer.isActive()) mTimer.stop(); QDir filePath(ui->inputDirPath->text()); QString fullName = filePath.absoluteFilePath(item->text()); QImage img(fullName); QImage thumb = img.scaled(ui->label->width(),ui->label->height(),Qt::KeepAspectRatio); ui->label->setPixmap(QPixmap::fromImage(thumb)); }//点击事件函数bool MainWindow::eventFilter(QObject *watch, QEvent *evn){ static int press_x; //点击鼠标时获取的横坐标x static int press_y; //点击鼠标时获取的纵坐标y static int relea_x; //松开鼠标时获取的横坐标x static int relea_y; //松开鼠标时获取的纵坐标y QMouseEvent *event = static_cast<QMouseEvent *>(evn); //将图片QT QEvent 转换为 QMouseEvent ,QKeyEvent....等子类 //获取点击鼠标(手指)时的坐标 if (event->type() == QEvent::MouseButtonPress) { press_x = event->globalX(); press_y = event->globalY(); } //获取松开鼠标(手指)时的坐标 if(event->type() == QEvent::MouseButtonRelease) { relea_x = event->globalX(); relea_y = event->globalY(); } //对鼠标(手指)滑动的方向进行判断(右滑) if((relea_x - press_x) > 5 && event->type() == QEvent::MouseButtonRelease && qAbs(relea_y - press_y) < 50) { on_btnNext_clicked(); }if( event->type() == QEvent::MouseButtonRelease) qDebug()<<"releax "<<QString::number(press_x - relea_x)<<"releay "<<QString::number(relea_y - press_y); //对鼠标(手指)滑动的方向进行判断(左滑) if((press_x - relea_x) > 5 && event->type() == QEvent::MouseButtonRelease && qAbs(relea_y - press_y) < 50) { on_btnLast_clicked(); } return QWidget::eventFilter(watch, evn);} void MainWindow::on_pushButton_clicked(){ if(ui->pushButton->text()=="滑动切换") { ui->pushButton->setText("自动播放"); if(mTimer.isActive()) mTimer.stop(); } else { ui->pushButton->setText("滑动切换"); if(!mTimer.isActive()) mTimer.start(); }} void MainWindow::on_btnLast_clicked(){ if(index == -1) { index = 4; } else { index--; } if(index == -1) { index = 4; } // this->setStyleSheet(QString("background-image: url(:/%1.png);").arg(index)); QString strIndex = mListPath.at(index); qDebug()<<"index 111"<<QString::number(index)<<"strIndex "<<strIndex; QDir filePath(ui->inputDirPath->text()); QString fullName = filePath.absoluteFilePath(strIndex); QImage img(fullName); QImage thumb = img.scaled(ui->label->width(),ui->label->height(),Qt::KeepAspectRatio); ui->label->setPixmap(QPixmap::fromImage(thumb));} void MainWindow::on_btnNext_clicked(){ if (index == 5) { index = 0; } else { index++; } if (index == 5) { index = 0; } // this->setStyleSheet(QString("background-image: url(:/%1.png);").arg(index)); //切换图片 QString strIndex = mListPath.at(index); qDebug()<<"index "<<QString::number(index)<<"strIndex "<<strIndex; QDir filePath(ui->inputDirPath->text()); QString fullName = filePath.absoluteFilePath(strIndex); QImage img(fullName); QImage thumb = img.scaled(ui->label->width(),ui->label->height(),Qt::KeepAspectRatio); ui->label->setPixmap(QPixmap::fromImage(thumb));} |
到此这篇关于QT实战之实现图片浏览系统的文章就介绍到这了,更多相关QT图片浏览系统内容请搜索服务器之家以前的文章或继续浏览下面的相关文章希望大家以后多多支持服务器之家!
原文链接:https://blog.csdn.net/q610098308/article/details/129235311


