前言
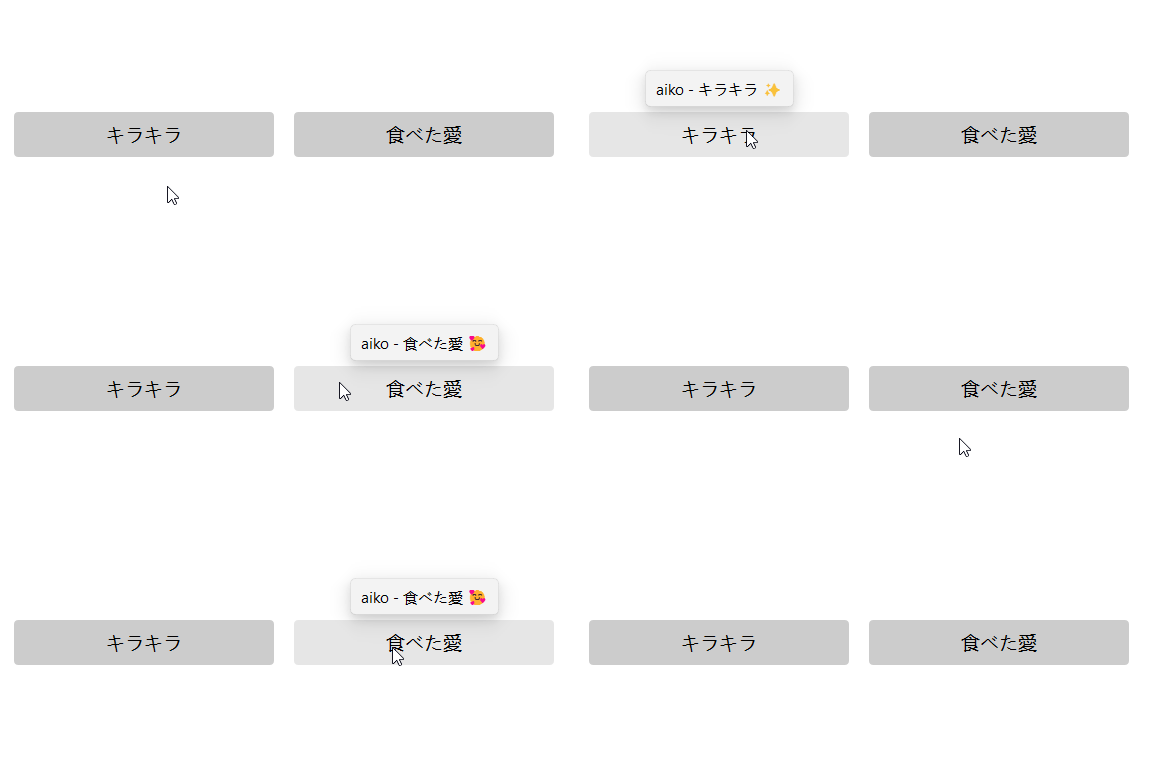
Qt 自带的工具提示样式不太好看,就算加了样式表也时不时会失效,同时工具提示没有阴影,看起来就更难受了。所以本篇博客将会介绍自定义工具提示的方法,效果如下图所示:

实现过程
工具提示其实就是一个带了标签的窗口,为了给工具提示加上阴影,只要给窗口设置 QGraphicsShadowEffect 即可。同时 QToolTip 弹出之后不会一直卡在界面上,一段时间后就会消失,所以我们应该给自定义的工具提示加上一个 QTimer,时间溢出之后就隐藏工具提示。
|
1
2
3
4
5
6
7
8
9
10
11
12
13
14
15
16
17
18
19
20
21
22
23
24
25
26
27
28
29
30
31
32
33
34
35
36
37
38
39
40
41
42
43
44
45
46
47
48
49
50
51
52
53
54
55
56
57
58
59
60
61
62
63
64
65
66
67
68
69
70
71
72
73
74
75
76
77
78
79
|
# coding:utf-8from PyQt5.QtCore import QFile, QPropertyAnimation, QTimer, Qtfrom PyQt5.QtGui import QColorfrom PyQt5.QtWidgets import (QApplication, QFrame, QGraphicsDropShadowEffect, QHBoxLayout, QLabel)class ToolTip(QFrame): def __init__(self, text='', parent=None): super().__init__(parent=parent) self.__text = text self.__duration = 1000 self.timer = QTimer(self) self.hBox = QHBoxLayout(self) self.label = QLabel(text, self) self.ani = QPropertyAnimation(self, b'windowOpacity', self) # set layout self.hBox.addWidget(self.label) self.hBox.setContentsMargins(10, 7, 10, 7) # add shadow self.shadowEffect = QGraphicsDropShadowEffect(self) self.shadowEffect.setBlurRadius(32) self.shadowEffect.setColor(QColor(0, 0, 0, 60)) self.shadowEffect.setOffset(0, 5) self.setGraphicsEffect(self.shadowEffect) self.timer.setSingleShot(True) self.timer.timeout.connect(self.hide) # set style self.setAttribute(Qt.WA_StyledBackground) self.setDarkTheme(False) self.__setQss() def text(self): return self.__text def setText(self, text: str): """ set text on tooltip """ self.__text = text self.label.setText(text) self.label.adjustSize() self.adjustSize() def duration(self): return self.__duration def setDuration(self, duration: int): """ set tooltip duration in milliseconds """ self.__duration = abs(duration) def __setQss(self): """ set style sheet """ f = QFile("resource/tooltip.qss") f.open(QFile.ReadOnly) self.setStyleSheet(str(f.readAll(), encoding='utf-8')) f.close() self.label.adjustSize() self.adjustSize() def setDarkTheme(self, dark=False): """ set dark theme """ dark = 'true' if dark else 'false' self.setProperty('dark', dark) self.label.setProperty('dark', dark) self.setStyle(QApplication.style()) def showEvent(self, e): self.timer.stop() self.timer.start(self.__duration) super().showEvent(e) def hideEvent(self, e): self.timer.stop() super().hideEvent(e) |
工具提示继承自 QFrame 的原因是我们需要设置边框样式,样式表如下所示,支持亮暗两种主题:
|
1
2
3
4
5
6
7
8
9
10
11
12
13
14
15
16
17
18
19
20
21
22
23
24
|
ToolTip[dark="false"] { border: 1px solid rgba(0, 0, 0, 0.06); border-radius: 5px; background-color: rgb(243, 243, 243);}ToolTip[dark="true"] { border: 1px solid rgb(28, 28, 28); border-radius: 5px; background-color: rgb(43, 43, 43);}QLabel { background-color: transparent; font: 15px 'Segoe UI', 'Microsoft YaHei';}QLabel[dark="false"] { color: black;}QLabel[dark="true"] { color: white;} |
测试
下述代码的运行效果就是动图中所示的样子,只要给想要设置工具提示的部件安装上事件过滤器,就能将 QToolTip 替换成自定义的工具提示:
|
1
2
3
4
5
6
7
8
9
10
11
12
13
14
15
16
17
18
19
20
21
22
23
24
25
26
27
28
29
30
31
32
33
34
35
36
37
38
39
40
41
42
43
44
45
46
47
48
49
50
51
52
53
54
55
56
57
58
59
60
61
62
63
64
65
66
67
68
69
|
# coding:utf-8import sysfrom PyQt5.QtCore import QEvent, QPointfrom PyQt5.QtWidgets import QApplication, QWidget, QPushButton, QHBoxLayoutfrom tool_tip import ToolTipclass Demo(QWidget): def __init__(self): super().__init__() self.hBox = QHBoxLayout(self) self.button1 = QPushButton('キラキラ', self) self.button2 = QPushButton('食べた愛', self) self._toolTip = ToolTip(parent=self) # self._tooltip.setDarkTheme(True) self.button1.setToolTip('aiko - キラキラ ') self.button2.setToolTip('aiko - 食べた愛 ') self.button1.setToolTipDuration(1000) self.button2.setToolTipDuration(5000) self.button1.installEventFilter(self) self.button2.installEventFilter(self) self.hBox.setContentsMargins(30, 30, 30, 30) self.hBox.setSpacing(20) self.hBox.addWidget(self.button1) self.hBox.addWidget(self.button2) self.resize(600, 300) self._toolTip.hide() with open('resource/demo.qss', encoding='utf-8') as f: self.setStyleSheet(f.read()) def eventFilter(self, obj, e: QEvent): if obj is self: return super().eventFilter(obj, e) tip = self._toolTip if e.type() == QEvent.Enter: tip.setText(obj.toolTip()) tip.setDuration(obj.toolTipDuration()) pos = obj.mapTo(self, QPoint(0, 0)) x = pos.x() + obj.width()//2 - tip.width()//2 y = pos.y() - 5 - tip.height() # adjust postion to prevent tooltips from appearing outside the window x = min(max(5, x), self.width() - tip.width() - 5) y = min(max(5, y), self.height() - tip.height() - 5) tip.move(x, y) tip.show() elif e.type() == QEvent.Leave: tip.hide() elif e.type() == QEvent.ToolTip: return True return super().eventFilter(obj, e)if __name__ == '__main__': app = QApplication(sys.argv) w = Demo() w.show() app.exec_() |
用到的样式文件如下:
|
1
2
3
4
5
6
7
8
9
10
11
12
13
14
15
16
17
18
19
20
21
22
23
24
|
QWidget{ background-color: white;}QPushButton { background-color: rgb(204, 204, 204); padding: 10px 64px 10px 64px; font: 19px 'Microsoft YaHei'; border: transparent; border-radius: 4px;}QPushButton:pressed:hover { background-color: rgb(153, 153, 153);}QPushButton:hover { background-color: rgb(230, 230, 230);}QPushButton:disabled { background-color: rgb(204, 204, 204); color: rgb(122, 122, 122);} |
后记
自定义工具提示的方法已经介绍完了,更多好康的自定义小部件参见 GitHub 仓库 https://github.com/zhiyiYo/PyQt-Fluent-Widgets
到此这篇关于PyQt中实现自定义工具提示ToolTip的方法详解的文章就介绍到这了,更多相关PyQt自定义工具提示ToolTip内容请搜索服务器之家以前的文章或继续浏览下面的相关文章希望大家以后多多支持服务器之家!
原文链接:https://www.cnblogs.com/zhiyiYo/p/16303940.html


