最近,Google开源了一个流式排版库“FlexboxLayout”,功能强大,支持多种排版方式,如各种方向的自动换行等,具体资料各位可搜索学习^_^。
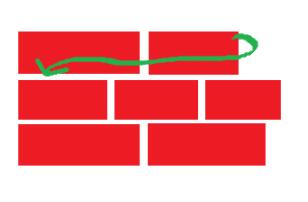
由于我的项目中,只需要从左到右S型的自动换行,需求效果图如下:

使用FlexboxLayout这个框架未免显得有些臃肿,所以自己动手写了一个流式ViewGroup。
安卓中自定义ViewGroup的步骤是:
1. 新建一个类,继承ViewGroup
2. 重写构造方法
3. 重写onMeasure、onLayout方法
onMeasuer方法里一般写测量子View宽高、确定此控件宽高的代码;onLayout方法则是确定子View如何摆放(排版)。
代码如下:
|
1
2
3
4
5
6
7
8
9
10
11
12
13
14
15
16
17
18
19
20
21
22
23
24
25
26
27
28
29
30
31
32
33
34
35
36
37
38
39
40
41
42
43
44
45
46
47
48
49
50
51
52
53
54
55
56
57
58
59
60
61
62
63
64
65
66
67
68
69
70
71
72
73
74
75
76
77
78
79
80
81
82
83
84
85
86
87
88
89
90
91
92
93
94
95
96
97
98
99
100
101
102
103
104
105
106
107
108
109
110
111
112
113
114
115
116
117
118
119
120
121
122
123
124
125
126
127
128
129
130
131
132
133
134
135
136
|
import android.content.Context;import android.util.AttributeSet;import android.view.View;import android.view.ViewGroup;public class FlexBoxLayout extends ViewGroup { private int mScreenWidth; private int horizontalSpace, verticalSpace; private float mDensity;//设备密度,用于将dp转为px public FlexBoxLayout(Context context) { this(context, null); } public FlexBoxLayout(Context context, AttributeSet attrs) { super(context, attrs); //获取屏幕宽高、设备密度 mScreenWidth = context.getResources().getDisplayMetrics().widthPixels; mDensity = context.getResources().getDisplayMetrics().density; } @Override protected void onMeasure(int widthMeasureSpec, int heightMeasureSpec) { super.onMeasure(widthMeasureSpec, heightMeasureSpec); //确定此容器的宽高 int widthMode = MeasureSpec.getMode(widthMeasureSpec); int widthSize = MeasureSpec.getSize(widthMeasureSpec); int heightMode = MeasureSpec.getMode(heightMeasureSpec); int heightSize = MeasureSpec.getSize(heightMeasureSpec); //测量子View的宽高 int childCount = getChildCount(); View child = null; //子view摆放的起始位置 int left = getPaddingLeft(); //一行view中将最大的高度存于此变量,用于子view进行换行时高度的计算 int maxHeightInLine = 0; //存储所有行的高度相加,用于确定此容器的高度 int allHeight = 0; for (int i = 0; i < childCount; i++) { child = getChildAt(i); //测量子View宽高 measureChild(child, widthMeasureSpec, heightMeasureSpec); //两两对比,取得一行中最大的高度 if (child.getMeasuredHeight() + child.getPaddingTop() + child.getPaddingBottom() > maxHeightInLine) { maxHeightInLine = child.getMeasuredHeight() + child.getPaddingTop() + child.getPaddingBottom(); } left += child.getMeasuredWidth() + dip2px(horizontalSpace) + child.getPaddingLeft() + child.getPaddingRight(); if (left >= widthSize - getPaddingRight() - getPaddingLeft()) {//换行 left = getPaddingLeft(); //累积行的总高度 allHeight += maxHeightInLine + dip2px(verticalSpace); //因为换行了,所以每行的最大高度置0 maxHeightInLine = 0; } } //再加上最后一行的高度,因为之前的高度累积条件是换行 //最后一行没有换行操作,所以高度应该再加上 allHeight += maxHeightInLine; if (widthMode != MeasureSpec.EXACTLY) { widthSize = mScreenWidth;//如果没有指定宽,则默认为屏幕宽 } if (heightMode != MeasureSpec.EXACTLY) {//如果没有指定高度 heightSize = allHeight + getPaddingBottom() + getPaddingTop(); } setMeasuredDimension(widthSize, heightSize); } @Override protected void onLayout(boolean changed, int l, int t, int r, int b) { if (changed) { //摆放子view View child = null; //初始子view摆放的左上位置 int left = getPaddingLeft(); int top = getPaddingTop(); //一行view中将最大的高度存于此变量,用于子view进行换行时高度的计算 int maxHeightInLine = 0; for (int i = 0, len = getChildCount(); i < len; i++) { child = getChildAt(i); //从第二个子view开始算起 //因为第一个子view默认从头开始摆放 if (i > 0) { //两两对比,取得一行中最大的高度 if (getChildAt(i - 1).getMeasuredHeight() > maxHeightInLine) { maxHeightInLine = getChildAt(i - 1).getMeasuredHeight(); } //当前子view的起始left为 上一个子view的宽度+水平间距 left += getChildAt(i - 1).getMeasuredWidth() + dip2px(horizontalSpace); if (left + child.getMeasuredWidth() >= getWidth() - getPaddingRight() - getPaddingLeft()) {//这一行所有子view相加的宽度大于容器的宽度,需要换行 //换行的首个子view,起始left应该为0+容器的paddingLeft left = getPaddingLeft(); //top的位置为上一行中拥有最大高度的某个View的高度+垂直间距 top += maxHeightInLine + dip2px(verticalSpace); //将上一行View的最大高度置0 maxHeightInLine = 0; } } //摆放子view child.layout(left, top, left + child.getMeasuredWidth(), top + child.getMeasuredHeight()); } } } /** * dp转为px * * @param dpValue * @return */ private int dip2px(float dpValue) { return (int) (dpValue * mDensity + 0.5f); } /** * 设置子view间的水平间距 单位dp * * @param horizontalSpace */ public void setHorizontalSpace(int horizontalSpace) { this.horizontalSpace = horizontalSpace; } /** * 设置子view间的垂直间距 单位dp * * @param verticalSpace */ public void setVerticalSpace(int verticalSpace) { this.verticalSpace = verticalSpace; }} |
使用如下:
xml文件:
|
1
2
3
4
5
6
7
8
|
<com.zengd.FlexBoxLayout android:id="@+id/flexBoxLayout" android:layout_width="match_parent" android:layout_height="match_parent"> <!--这里写子View,也可代码动态添加--> ……</com.zengd.FlexBoxLayout> |
Activity里的代码:
|
1
2
3
|
FlexBoxLayout flexBoxLayout = (FlexBoxLayout) findViewById(R.id.flex_box_layout);flexBoxLayout.setHorizontalSpace(10);//不设置默认为0flexBoxLayout.setVerticalSpace(10);//不设置默认为0 |
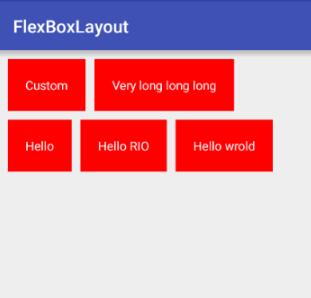
运行效果如图:

本项目Demo地址:
https://github.com/zengd0/FlexBoxLayout
补充知识:Android 流式布局(修改版) 当达到两行,隐藏多余的
我就废话不多说了,还是直接看代码吧!
|
1
2
3
4
5
6
7
8
9
10
11
12
13
14
15
16
17
18
19
20
21
22
23
24
25
26
27
28
29
30
31
32
33
34
35
36
37
38
39
40
41
42
43
44
45
46
47
48
49
50
51
52
53
54
55
56
57
58
59
60
61
62
63
64
65
66
67
68
69
70
71
72
73
74
75
76
77
78
79
80
81
82
83
84
85
86
87
88
89
90
91
92
93
94
95
96
97
98
99
100
101
102
103
104
105
106
107
108
109
110
111
112
113
114
115
116
117
118
119
120
121
122
123
124
125
126
127
128
129
130
131
132
133
134
135
136
137
138
139
140
141
142
143
144
145
146
147
148
149
150
151
152
153
154
155
156
157
158
159
160
161
162
163
164
165
166
167
168
169
170
171
172
173
174
175
176
177
178
179
180
181
182
183
184
185
186
187
188
189
190
191
192
193
194
195
196
197
198
199
200
201
202
203
204
205
206
207
208
209
210
211
212
213
214
215
216
217
218
219
220
221
222
223
224
225
226
227
228
229
230
231
232
233
234
235
236
237
238
239
240
241
242
243
244
245
246
247
248
249
250
251
252
253
254
255
256
257
258
259
260
261
262
263
|
public class SearchLayout extends LinearLayout { private final int mParentWidth; private float textSize; private boolean textColor; private boolean background; private boolean isHide = true; public void setHide(boolean hide) { isHide = hide; } public SearchLayout(Context context, AttributeSet attrs) { super(context, attrs); //获取屏幕的宽度 DisplayMetrics metrics = context.getResources().getDisplayMetrics(); mParentWidth = metrics.widthPixels - dip2px(16f); //自定义属性 TypedArray array = context.obtainStyledAttributes(attrs, R.styleable.SearchLayout); background = array.getBoolean(R.styleable.SearchLayout_Sear_background,false); textColor = array.getBoolean(R.styleable.SearchLayout_Sear_textColor, false); textSize = array.getDimension(R.styleable.SearchLayout_Sear_textSize, 0); //方向为纵向 setOrientation(VERTICAL); } //移除子控件 public void removeView() { removeAllViews(); } //流式布局 public void setData(List<String> data) { if (data.isEmpty()){ return; } //获取一个子布局 LinearLayout linearLayout = getLinearLayout(); for (int i = 0; i < data.size(); i++) { //标题 final String name = data.get(i); //已存在的宽度 int numBar = 0; //子控件的个数 int count = linearLayout.getChildCount(); for (int j = 0; j < count; j++) { //一个一个获取 ThemeTextView textView = (ThemeTextView) linearLayout.getChildAt(j); //获取左外边距 LayoutParams params = (LayoutParams) textView.getLayoutParams(); int leftWidth = params.leftMargin; int rightWidth = params.rightMargin; //获取宽高 textView.measure(getMeasuredWidth(), getMeasuredHeight()); //计算已存在的宽度 numBar += textView.getMeasuredWidth()+leftWidth+rightWidth; } //获取一个子控件 ThemeTextView text = getText(); //给每一个控件设置点击事件 text.setOnClickListener(new OnClickListener() { @Override public void onClick(View view) { if (onItemTitleClickListener != null){ onItemTitleClickListener.onItemTitle(name); } } }); //赋值 text.setText(name); //获取宽高 text.measure(getMeasuredWidth(), getMeasuredHeight()); //当前控件的宽度 int textWidth = text.getMeasuredWidth() + text.getPaddingLeft() + text.getPaddingRight(); //判断是否超过屏幕 if (isHide && getChildCount() == 2){ ImageView imageView = getMore(false); LayoutParams layoutParams = (LayoutParams) imageView.getLayoutParams(); int leftM = layoutParams.leftMargin; int rightM = layoutParams.rightMargin; imageView.measure(getMeasuredWidth(), getMeasuredHeight()); int width = imageView.getMeasuredWidth() + imageView.getPaddingLeft() + imageView.getPaddingRight(); int imageWidth = leftM + rightM + width; if (numBar + textWidth + imageWidth >= mParentWidth){ if (numBar + textWidth + imageWidth > mParentWidth){ imageView.setOnClickListener(new OnClickListener() { @Override public void onClick(View v) { if (onMoreClickListener != null){ onMoreClickListener.onShowMore(isHide); } } }); linearLayout.addView(imageView); return; } else { imageView.setOnClickListener(new OnClickListener() { @Override public void onClick(View v) { if (onMoreClickListener != null){ onMoreClickListener.onShowMore(isHide); } } }); linearLayout.addView(text); linearLayout.addView(imageView); return; } }else { if (i + 1 <= data.size()-1) { String id="codetool">
attrs文件:
以上这篇Android自定义流式布局/自动换行布局实例就是小编分享给大家的全部内容了,希望能给大家一个参考,也希望大家多多支持服务器之家。 原文链接:https://blog.csdn.net/zengd0/article/details/52207251 延伸 · 阅读
精彩推荐
|


