前言
ImageNet 是一个著名的公共图像数据库,用于训练对象分类、检测和分割等任务的模型,它包含超过 1400 万张图像。
在 Python 中处理图像数据的时候,例如应用卷积神经网络(也称CNN)等算法可以处理大量图像数据集,这里就需要学习如何用最简单的方式存储、读取数据。
对于图像数据处理应该有有个定量的比较方式,读取和写入文件需要多长时间,以及将使用多少磁盘内存。
分别用不同的方式去处理、解决图像的存储、性能优化的问题。
数据准备
一个可以玩的数据集
我们熟知的图像数据集 CIFAR-10,由 60000 个 32x32 像素的彩色图像组成,这些图像属于不同的对象类别,例如狗、猫和飞机。相对而言 CIFAR 不是一个非常大的数据集,但如使用完整的 TinyImages 数据集,那么将需要大约 400GB 的可用磁盘空间。
文中的代码应用的数据集下载地址 CIFAR-10 数据集 。
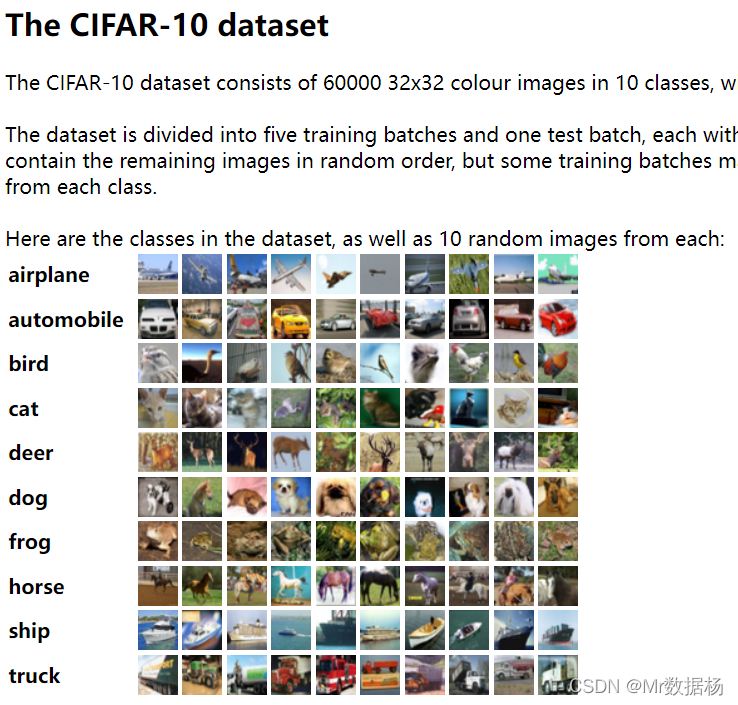
这份数据是使用cPickle进行了序列化和批量保存。pickle模块可以序列化任何 Python 对象,而无需进行任何额外的代码或转换。但是有一个潜在的严重缺点,即在处理大量数据时会带来安全风险无法评估。
图像加载到 NumPy 数组中
import numpy as np
import pickle
from pathlib import Path

# 文件路径
data_dir = Path("data/cifar-10-batches-py/")

# 解码功能
def unpickle(file):
  with open(file, "rb") as fo:
      dict = pickle.load(fo, encoding="bytes")
  return dict

images, labels = [], []
for batch in data_dir.glob("data_batch_*"):
  batch_data = unpickle(batch)
  for i, flat_im in enumerate(batch_data[b"data"]):
      im_channels = []
      # 每个图像都是扁平化的,通道按 R, G, B 的顺序排列
      for j in range(3):
          im_channels.append(
              flat_im[j * 1024 : (j + 1) * 1024].reshape((32, 32))
          )
      # 重建原始图像
      images.append(np.dstack((im_channels)))
      # 保存标签
      labels.append(batch_data[b"labels"][i])

print("加载 CIFAR-10 训练集:")
print(f" - np.shape(images)     {np.shape(images)}")
print(f" - np.shape(labels)     {np.shape(labels)}")
图像存储的设置
安装三方库 Pillow 用于图像处理 。
pip install Pillow
LMDB
LMDB 也称为“闪电数据库”,代表闪电内存映射数据库,因为速度快并且使用内存映射文件。它是键值存储,而不是关系数据库。
安装三方库 lmdb 用于图像处理 。
pip install lmdb
HDF5
HDF5 代表 Hierarchical Data Format,一种称为 HDF4 或 HDF5 的文件格式。起源于美国国家超级计算应用中心,是一种可移植、紧凑的科学数据格式。
安装三方库 h5py 用于图像处理 。
pip install h5py
单一图像的存储
3种不同的方式进行数据读取操作
from pathlib import Path

disk_dir = Path("data/disk/")
lmdb_dir = Path("data/lmdb/")
hdf5_dir = Path("data/hdf5/")
同时加载的数据可以创建文件夹分开保存
disk_dir.mkdir(parents=True, exist_ok=True)
lmdb_dir.mkdir(parents=True, exist_ok=True)
hdf5_dir.mkdir(parents=True, exist_ok=True)
存储到 磁盘
使用 Pillow 完成输入是一个单一的图像 image,在内存中作为一个 NumPy 数组,并且使用唯一的图像 ID 对其进行命名image_id。
单个图像保存到磁盘
from PIL import Image
import csv

def store_single_disk(image, image_id, label):
  """ 将单个图像作为 .png 文件存储在磁盘上。
      参数:
      ---------------
      image       图像数组, (32, 32, 3) 格式
      image_id    图像的整数唯一 ID
      label       图像标签
  """
  Image.fromarray(image).save(disk_dir / f"{image_id}.png")

  with open(disk_dir / f"{image_id}.csv", "wt") as csvfile:
      writer = csv.writer(
          csvfile, delimiter=" ", quotechar="|", quoting=csv.QUOTE_MINIMAL
      )
      writer.writerow([label])
存储到 LMDB
LMDB 是一个键值对存储系统,其中每个条目都保存为一个字节数组,键将是每个图像的唯一标识符,值将是图像本身。
键和值都应该是字符串。 常见的用法是将值序列化为字符串,然后在读回时将其反序列化。
用于重建的图像尺寸,某些数据集可能包含不同大小的图像会使用到这个方法。
class CIFAR_Image:
  def __init__(self, image, label):
      self.channels = image.shape[2]
      self.size = image.shape[:2]

      self.image = image.tobytes()
      self.label = label

  def get_image(self):
      """ 将图像作为 numpy 数组返回 """
      image = np.frombuffer(self.image, dtype=np.uint8)
      return image.reshape(*self.size, self.channels)
单个图像保存到 LMDB
import lmdb
import pickle

def store_single_lmdb(image, image_id, label):
  """ 将单个图像存储到 LMDB
      参数:
      ---------------
      image       图像数组, (32, 32, 3) 格式
      image_id    图像的整数唯一 ID
      label       图像标签
  """
  map_size = image.nbytes * 10

  # Create a new LMDB environment
  env = lmdb.open(str(lmdb_dir / f"single_lmdb"), map_size=map_size)

  # Start a new write transaction
  with env.begin(write=True) as txn:
      # All key-value pairs need to be strings
      value = CIFAR_Image(image, label)
      key = f"{image_id:08}"
      txn.put(key.encode("ascii"), pickle.dumps(value))
  env.close()
存储 HDF5
一个 HDF5 文件可以包含多个数据集。可以创建两个数据集,一个用于图像,一个用于元数据。
import h5py

def store_single_hdf5(image, image_id, label):
  """ 将单个图像存储到 HDF5 文件
      参数:
      ---------------
      image       图像数组, (32, 32, 3) 格式
      image_id    图像的整数唯一 ID
      label       图像标签
  """
  # 创建一个新的 HDF5 文件
  file = h5py.File(hdf5_dir / f"{image_id}.h5", "w")

  # 在文件中创建数据集
  dataset = file.create_dataset(
      "image", np.shape(image), h5py.h5t.STD_U8BE, data=image
  )
  meta_set = file.create_dataset(
      "meta", np.shape(label), h5py.h5t.STD_U8BE, data=label
  )
  file.close()
存储方式对比
将保存单个图像的所有三个函数放入字典中。
_store_single_funcs = dict(
  disk=store_single_disk,
  lmdb=store_single_lmdb,
  hdf5=store_single_hdf5
)
以三种不同的方式存储保存 CIFAR 中的第一张图像及其对应的标签。
from timeit import timeit

store_single_timings = dict()

for method in ("disk", "lmdb", "hdf5"):
  t = timeit(
      "_store_single_funcs[method](image, 0, label)",
      setup="image=images[0]; label=labels[0]",
      number=1,
      globals=globals(),
  )
  store_single_timings[method] = t
  print(f"存储方法: {method}, 使用耗时: {t}")
来一个表格看看对比。
| 存储方法 | 存储耗时 | 使用内存 |
|---|---|---|
| Disk | 2.1 ms | 8 K |
| LMDB | 1.7 ms | 32 K |
| HDF5 | 8.1 ms | 8 K |
多个图像的存储
同单个图像存储方法类似,修改代码进行多个图像数据的存储。
多图像调整代码
将多个图像保存为.png文件就可以理解为多次调用 store_single_method() 这样。但这不适用于 LMDB 或 HDF5,因为每个图像都有不同的数据库文件。
将一组图像存储到磁盘
 store_many_disk(images, labels):
  """ 参数:
      ---------------
      images       图像数组 (N, 32, 32, 3) 格式
      labels       标签数组 (N,1) 格式
  """
  num_images = len(images)

  # 一张一张保存所有图片
  for i, image in enumerate(images):
      Image.fromarray(image).save(disk_dir / f"{i}.png")

  # 将所有标签保存到 csv 文件
  with open(disk_dir / f"{num_images}.csv", "w") as csvfile:
      writer = csv.writer(
          csvfile, delimiter=" ", quotechar="|", quoting=csv.QUOTE_MINIMAL
      )
      for label in labels:
          writer.writerow([label])
将一组图像存储到 LMDB
def store_many_lmdb(images, labels):
  """ 参数:
      ---------------
      images       图像数组 (N, 32, 32, 3) 格式
      labels       标签数组 (N,1) 格式
  """
  num_images = len(images)

  map_size = num_images * images[0].nbytes * 10

  # 为所有图像创建一个新的 LMDB 数据库
  env = lmdb.open(str(lmdb_dir / f"{num_images}_lmdb"), map_size=map_size)

  # 在一个事务中写入所有图像
  with env.begin(write=True) as txn:
      for i in range(num_images):
          # 所有键值对都必须是字符串
          value = CIFAR_Image(images[i], labels[i])
          key = f"{i:08}"
          txn.put(key.encode("ascii"), pickle.dumps(value))
  env.close()
将一组图像存储到 HDF5
def store_many_hdf5(images, labels):
  """ 参数:
      ---------------
      images       图像数组 (N, 32, 32, 3) 格式
      labels       标签数组 (N,1) 格式
  """
  num_images = len(images)

  # 创建一个新的 HDF5 文件
  file = h5py.File(hdf5_dir / f"{num_images}_many.h5", "w")

  # 在文件中创建数据集
  dataset = file.create_dataset(
      "images", np.shape(images), h5py.h5t.STD_U8BE, data=images
  )
  meta_set = file.create_dataset(
      "meta", np.shape(labels), h5py.h5t.STD_U8BE, data=labels
  )
  file.close()
准备数据集对比
使用 100000 个图像进行测试
cutoffs = [10, 100, 1000, 10000, 100000]

images = np.concatenate((images, images), axis=0)
labels = np.concatenate((labels, labels), axis=0)

# 确保有 100,000 个图像和标签
print(np.shape(images))
print(np.shape(labels))
创建一个计算方式进行对比
_store_many_funcs = dict(
  disk=store_many_disk, lmdb=store_many_lmdb, hdf5=store_many_hdf5
)

from timeit import timeit

store_many_timings = {"disk": [], "lmdb": [], "hdf5": []}

for cutoff in cutoffs:
  for method in ("disk", "lmdb", "hdf5"):
      t = timeit(
          "_store_many_funcs[method](images_, labels_)",
          setup="images_=images[:cutoff]; labels_=labels[:cutoff]",
          number=1,
          globals=globals(),
      )
      store_many_timings[method].append(t)

      # 打印出方法、截止时间和使用时间
      print(f"Method: {method}, Time usage: {t}")
PLOT 显示具有多个数据集和匹配图例的单个图
import matplotlib.pyplot as plt

def plot_with_legend(
  x_range, y_data, legend_labels, x_label, y_label, title, log=False
):
  """ 参数:
      --------------
      x_range         包含 x 数据的列表
      y_data          包含 y 值的列表
      legend_labels   字符串图例标签列表
      x_label         x 轴标签
      y_label         y 轴标签
  """
  plt.style.use("seaborn-whitegrid")
  plt.figure(figsize=(10, 7))

  if len(y_data) != len(legend_labels):
      raise TypeError(
          "数据集的数量与标签的数量不匹配"
      )

  all_plots = []
  for data, label in zip(y_data, legend_labels):
      if log:
          temp, = plt.loglog(x_range, data, label=label)
      else:
          temp, = plt.plot(x_range, data, label=label)
      all_plots.append(temp)

  plt.title(title)
  plt.xlabel(x_label)
  plt.ylabel(y_label)
  plt.legend(handles=all_plots)
  plt.show()

# Getting the store timings data to display
disk_x = store_many_timings["disk"]
lmdb_x = store_many_timings["lmdb"]
hdf5_x = store_many_timings["hdf5"]

plot_with_legend(
  cutoffs,
  [disk_x, lmdb_x, hdf5_x],
  ["PNG files", "LMDB", "HDF5"],
  "Number of images",
  "Seconds to store",
  "Storage time",
  log=False,
)

plot_with_legend(
  cutoffs,
  [disk_x, lmdb_x, hdf5_x],
  ["PNG files", "LMDB", "HDF5"],
  "Number of images",
  "Seconds to store",
  "Log storage time",
  log=True,
)
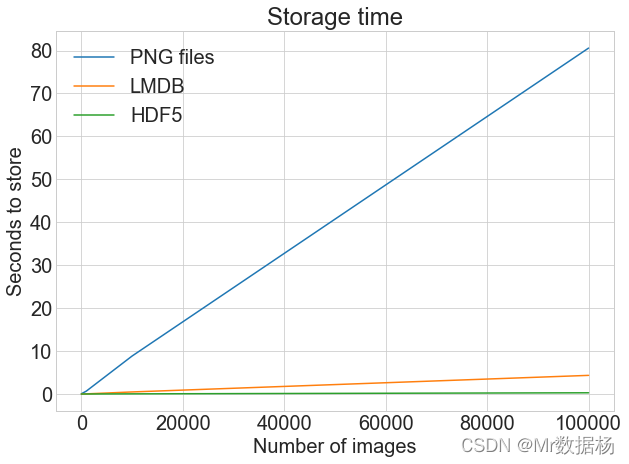
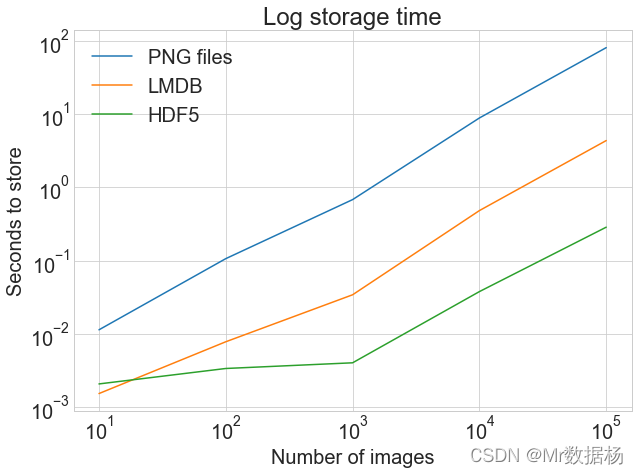
单一图像的读取
从 磁盘 读取
def read_single_disk(image_id):
  """ 参数:
      ---------------
      image_id    图像的整数唯一 ID

      返回结果:
      ---------------
      images       图像数组 (N, 32, 32, 3) 格式
      labels       标签数组 (N,1) 格式
  """
  image = np.array(Image.open(disk_dir / f"{image_id}.png"))

  with open(disk_dir / f"{image_id}.csv", "r") as csvfile:
      reader = csv.reader(
          csvfile, delimiter=" ", quotechar="|", quoting=csv.QUOTE_MINIMAL
      )
      label = int(next(reader)[0])

  return image, label
从 LMDB 读取
def read_single_lmdb(image_id):
  """ 参数:
      ---------------
      image_id    图像的整数唯一 ID

      返回结果:
      ---------------
      images       图像数组 (N, 32, 32, 3) 格式
      labels       标签数组 (N,1) 格式
  """
  # 打开 LMDB 环境
  env = lmdb.open(str(lmdb_dir / f"single_lmdb"), readonly=True)

  # 开始一个新的事务
  with env.begin() as txn:
      # 进行编码
      data = txn.get(f"{image_id:08}".encode("ascii"))
      # 加载的 CIFAR_Image 对象
      cifar_image = pickle.loads(data)
      # 检索相关位
      image = cifar_image.get_image()
      label = cifar_image.label
  env.close()

  return image, label
从 HDF5 读取
def read_single_hdf5(image_id):
  """ 参数:
      ---------------
      image_id    图像的整数唯一 ID

      返回结果:
      ---------------
      images       图像数组 (N, 32, 32, 3) 格式
      labels       标签数组 (N,1) 格式
  """
  # 打开 HDF5 文件
  file = h5py.File(hdf5_dir / f"{image_id}.h5", "r+")

  image = np.array(file["/image"]).astype("uint8")
  label = int(np.array(file["/meta"]).astype("uint8"))

  return image, label
读取方式对比
from timeit import timeit

read_single_timings = dict()

for method in ("disk", "lmdb", "hdf5"):
  t = timeit(
      "_read_single_funcs[method](0)",
      setup="image=images[0]; label=labels[0]",
      number=1,
      globals=globals(),
  )
  read_single_timings[method] = t
	print(f"读取方法: {method}, 使用耗时: {t}")
| 存储方法 | 存储耗时 |
|---|---|
| Disk | 1.7 ms |
| LMDB | 4.4 ms |
| HDF5 | 2.3 ms |
多个图像的读取
将多个图像保存为.png文件就可以理解为多次调用 read_single_method() 这样。但这不适用于 LMDB 或 HDF5,因为每个图像都有不同的数据库文件。
多图像调整代码
从磁盘中读取多个都图像
def read_many_disk(num_images):
  """ 参数:
      ---------------
      num_images   要读取的图像数量

      返回结果:
      ---------------
      images       图像数组 (N, 32, 32, 3) 格式
      labels       标签数组 (N,1) 格式
  """
  images, labels = [], []

  # 循环遍历所有ID,一张一张地读取每张图片
  for image_id in range(num_images):
      images.append(np.array(Image.open(disk_dir / f"{image_id}.png")))

  with open(disk_dir / f"{num_images}.csv", "r") as csvfile:
      reader = csv.reader(
          csvfile, delimiter=" ", quotechar="|", quoting=csv.QUOTE_MINIMAL
      )
      for row in reader:
          labels.append(int(row[0]))
  return images, labels
从LMDB中读取多个都图像
def read_many_lmdb(num_images):
  """ 参数:
      ---------------
      num_images   要读取的图像数量

      返回结果:
      ---------------
      images       图像数组 (N, 32, 32, 3) 格式
      labels       标签数组 (N,1) 格式
  """
  images, labels = [], []
  env = lmdb.open(str(lmdb_dir / f"{num_images}_lmdb"), readonly=True)

  # 开始一个新的事务
  with env.begin() as txn:
      # 在一个事务中读取,也可以拆分成多个事务分别读取
      for image_id in range(num_images):
          data = txn.get(f"{image_id:08}".encode("ascii"))
          # CIFAR_Image 对象,作为值存储
          cifar_image = pickle.loads(data)
          # 检索相关位
          images.append(cifar_image.get_image())
          labels.append(cifar_image.label)
  env.close()
  return images, labels
从HDF5中读取多个都图像
def read_many_hdf5(num_images):
  """ 参数:
      ---------------
      num_images   要读取的图像数量

      返回结果:
      ---------------
      images       图像数组 (N, 32, 32, 3) 格式
      labels       标签数组 (N,1) 格式
  """
  images, labels = [], []

  # 打开 HDF5 文件
  file = h5py.File(hdf5_dir / f"{num_images}_many.h5", "r+")

  images = np.array(file["/images"]).astype("uint8")
  labels = np.array(file["/meta"]).astype("uint8")

  return images, labels

_read_many_funcs = dict(
  disk=read_many_disk, lmdb=read_many_lmdb, hdf5=read_many_hdf5
)
准备数据集对比
创建一个计算方式进行对比
from timeit import timeit

read_many_timings = {"disk": [], "lmdb": [], "hdf5": []}

for cutoff in cutoffs:
  for method in ("disk", "lmdb", "hdf5"):
      t = timeit(
          "_read_many_funcs[method](num_images)",
          setup="num_images=cutoff",
          number=1,
          globals=globals(),
      )
      read_many_timings[method].append(t)

      # Print out the method, cutoff, and elapsed time
      print(f"读取方法: {method}, No. images: {cutoff}, 耗时: {t}")
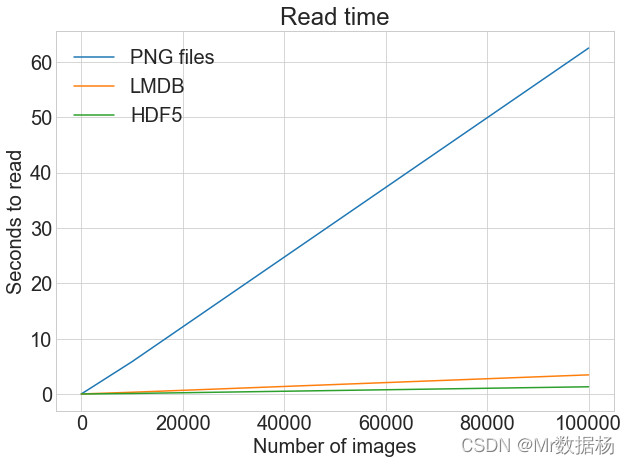
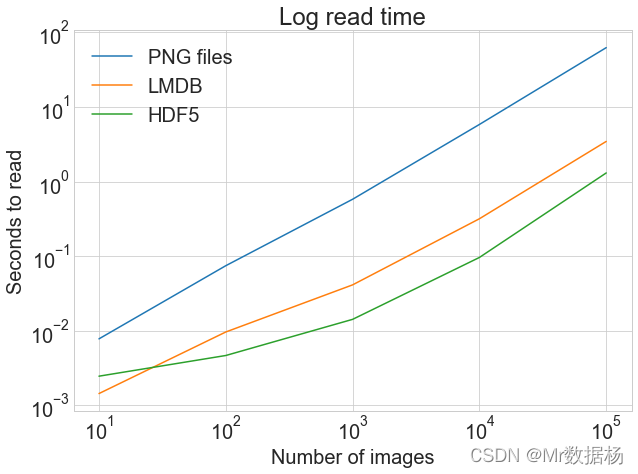
读写操作综合比较
数据对比
同一张图表上查看读取和写入时间
plot_with_legend(
  cutoffs,
  [disk_x_r, lmdb_x_r, hdf5_x_r, disk_x, lmdb_x, hdf5_x],
  [
      "Read PNG",
      "Read LMDB",
      "Read HDF5",
      "Write PNG",
      "Write LMDB",
      "Write HDF5",
  ],
  "Number of images",
  "Seconds",
  "Log Store and Read Times",
  log=False,
)
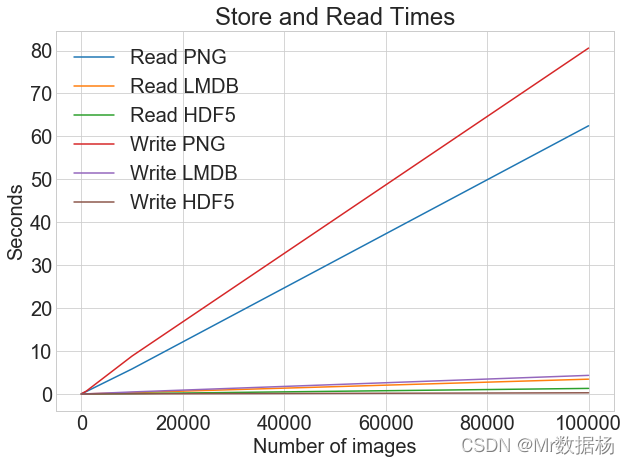
各种存储方式使用磁盘空间
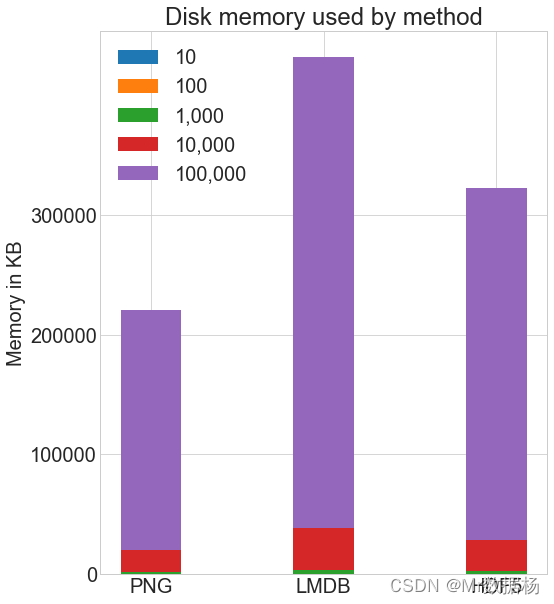
虽然 HDF5 和 LMDB 都占用更多的磁盘空间。需要注意的是 LMDB 和 HDF5 磁盘的使用和性能在很大程度上取决于各种因素,包括操作系统,更重要的是存储的数据大小。
并行操作
通常对于大的数据集,可以通过并行化来加速操作。 也就是我们经常说的并发处理。
作为.png 文件存储到磁盘实际上允许完全并发。只要图像名称不同就可以从不同的线程读取多个图像,或一次写入多个文件。
如果将所有 CIFAR 分成十组,那么可以为一组中的每个读取设置十个进程,并且相应的处理时间可以减少到原来的10%左右。
以上就是Python图片存储和访问的三种方式详解的详细内容,更多关于Python图片存储访问的资料请关注服务器之家其它相关文章!
原文链接:https://blog.csdn.net/qq_20288327/article/details/123970862



![python两个list[]相加的实现方法 python两个list[]相加的实现方法](/uploads/allimg/200924/1-200924000345-lp.png)


