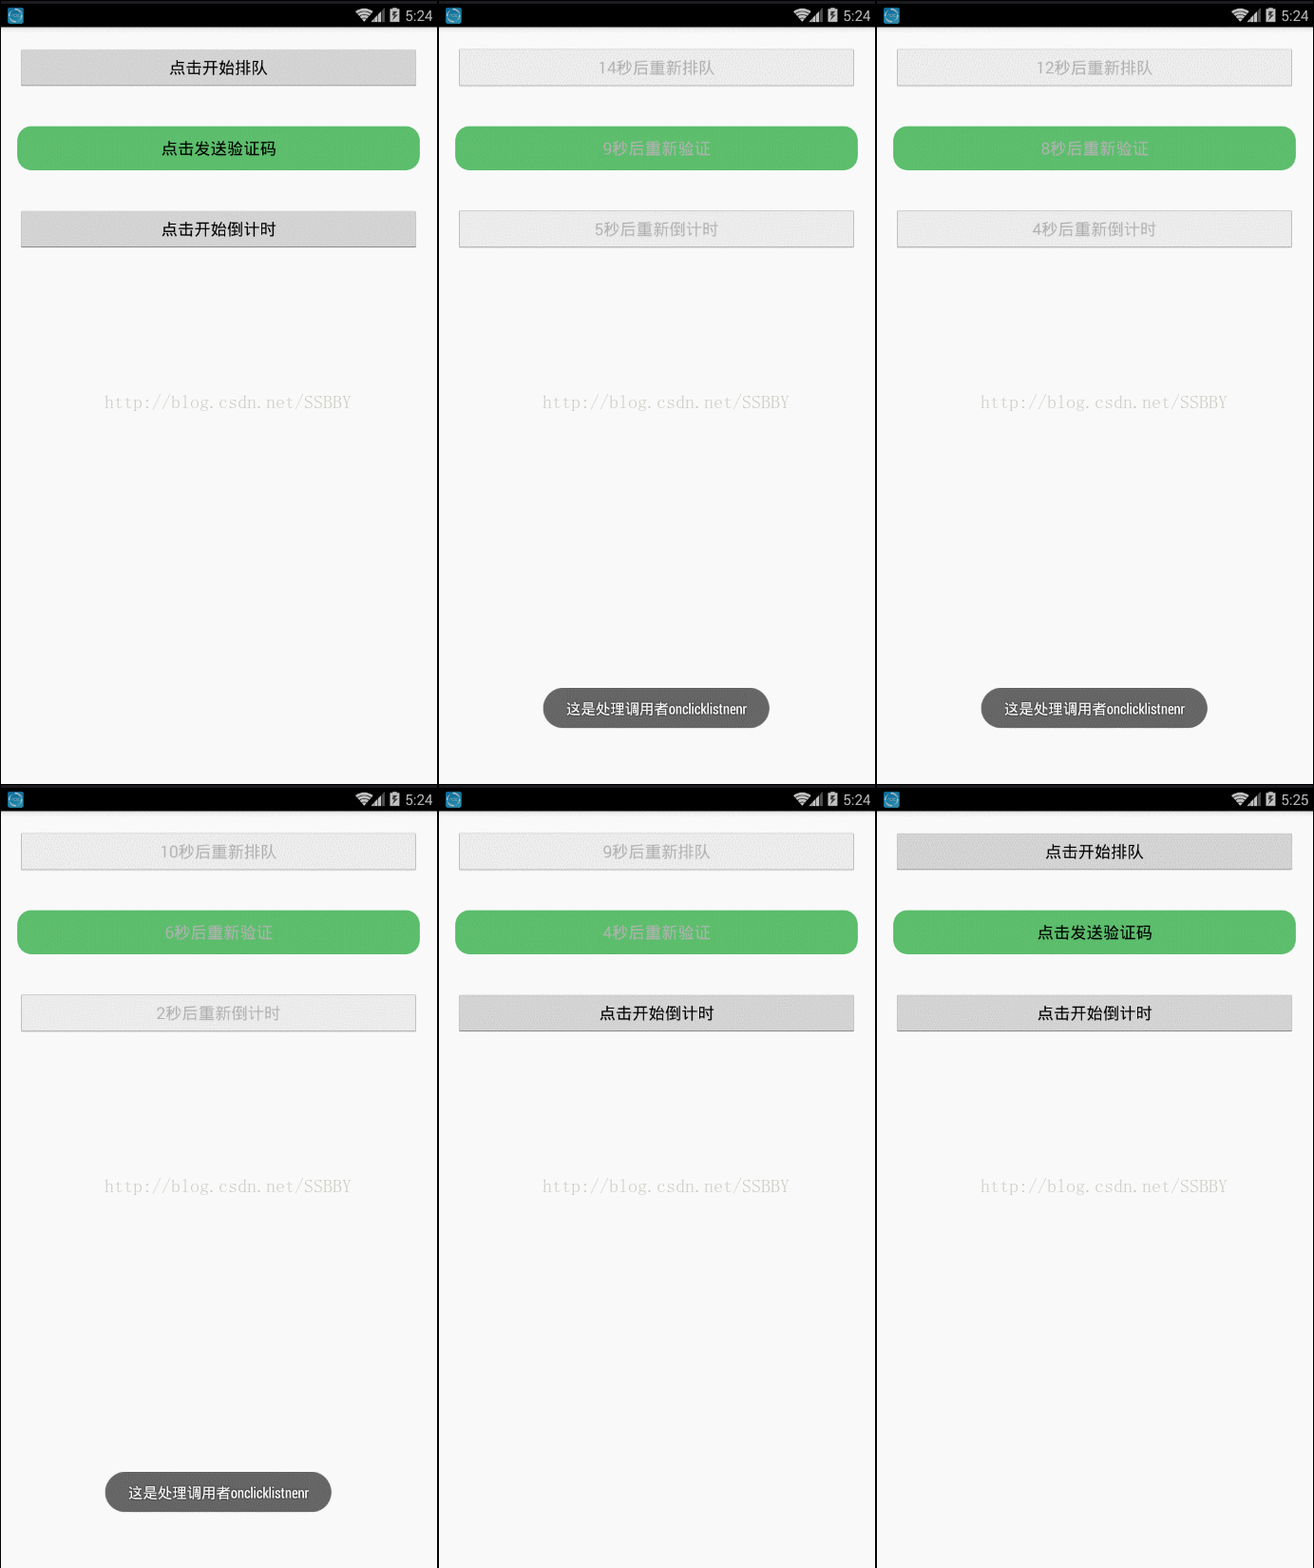
项目需要要实现一个带有倒计时功能的按钮,其效果类似发送验证码之后在按钮上显示倒计时并且将按钮设置为不可用的功能。
为了项目中其他地方能够调用到,便重写了一个继承于Button的TimeButton来实现倒计时功能,并方便调用。
老规矩,上效果图:

逻辑也不复杂,直接上代码:
首先新建一个App.class继承于Application
|
1
2
3
4
5
6
7
8
9
10
11
12
13
14
|
package com.example.xuboyu.myapplication; /** * 用于存放倒计时时间 * @author bnuzlbs-xuboyu 2017/4/5. */import java.util.Map; import android.app.Application; public class App extends Application { // 用于存放倒计时时间 public static Map<String, Long> map;} |
然后编写TimeButton.class继承于Button
|
1
2
3
4
5
6
7
8
9
10
11
12
13
14
15
16
17
18
19
20
21
22
23
24
25
26
27
28
29
30
31
32
33
34
35
36
37
38
39
40
41
42
43
44
45
46
47
48
49
50
51
52
53
54
55
56
57
58
59
60
61
62
63
64
65
66
67
68
69
70
71
72
73
74
75
76
77
78
79
80
81
82
83
84
85
86
87
88
89
90
91
92
93
94
95
96
97
98
99
100
101
102
103
104
105
106
107
108
109
110
111
112
113
114
115
116
117
118
119
120
121
122
123
124
125
126
127
128
129
130
131
132
133
134
135
136
137
138
139
140
141
142
143
144
145
146
147
148
149
150
151
152
153
154
155
156
157
158
159
160
161
162
|
package com.example.xuboyu.myapplication; import java.util.HashMap;import java.util.Map;import java.util.Timer;import java.util.TimerTask; import android.annotation.SuppressLint;import android.content.Context;import android.os.Bundle;import android.os.Handler;import android.util.AttributeSet;import android.util.Log;import android.view.View;import android.view.View.OnClickListener;import android.widget.Button; /** * 倒计时按钮 * @author bnuzlbs-xuboyu 2017/4/5. * 注意把该类的onCreate()onDestroy()和activity的onCreate()onDestroy()同步处理 */public class TimeButton extends Button implements OnClickListener { private long lenght = 60 * 1000;// 倒计时长度,这里给了默认60秒 private String textafter = "秒后重新获取~"; private String textbefore = "点击获取验证码~"; private int colorafter; private int colorbefore; private final String TIME = "time"; private final String CTIME = "ctime"; private OnClickListener mOnclickListener; private Timer t; private TimerTask tt; private long time; Map<String, Long> map = new HashMap<String, Long>(); public TimeButton(Context context) { super(context); setOnClickListener(this); } public TimeButton(Context context, AttributeSet attrs) { super(context, attrs); setOnClickListener(this); } @SuppressLint("HandlerLeak") Handler han = new Handler() { public void handleMessage(android.os.Message msg) { TimeButton.this.setText(time / 1000 + textafter); time -= 1000; if (time < 0) { TimeButton.this.setEnabled(true); TimeButton.this.setText(textbefore); clearTimer(); } }; }; private void initTimer() { time = lenght; t = new Timer(); tt = new TimerTask() { @Override public void run() { Log.e("xuboyu", time / 1000 + ""); han.sendEmptyMessage(0x01);//十六进制的数字1 } }; } private void clearTimer() { if (tt != null) { tt.cancel(); tt = null; } if (t != null) t.cancel(); t = null; } @Override public void setOnClickListener(OnClickListener l) { if (l instanceof TimeButton) { super.setOnClickListener(l); } else this.mOnclickListener = l; } @Override public void onClick(View v) { if (mOnclickListener != null) mOnclickListener.onClick(v); initTimer(); this.setText(time / 1000 + textafter); this.setEnabled(false); t.schedule(tt, 0, 1000); // t.scheduleAtFixedRate(task, delay, period); } /** * 和activity的onDestroy()方法同步 */ public void onDestroy() { if (App.map == null) App.map = new HashMap<String, Long>(); App.map.put(TIME, time); App.map.put(CTIME, System.currentTimeMillis()); clearTimer(); Log.e("xuboyu", "onDestroy"); } /** * 和activity的onCreate()方法同步 */ public void onCreate(Bundle bundle) { Log.e("xuboyu:倒计时相关", App.map + ""); if (App.map == null) return; if (App.map.size() <= 0)// 这里表示没有上次未完成的计时 return; long time = System.currentTimeMillis() - App.map.get(CTIME) - App.map.get(TIME); App.map.clear(); if (time > 0) return; else { initTimer(); this.time = Math.abs(time); t.schedule(tt, 0, 1000); this.setText(time + textafter); this.setEnabled(false); } } /** * 设置计时时候显示的文本 */ public TimeButton setTextAfter(String text1) { this.textafter = text1; return this; } /** * 设置点击之前的文本 */ public TimeButton setTextBefore(String text0) { this.textbefore = text0; this.setText(textbefore); return this; } /** * 设置到计时长度 * @param lenght * 时间 默认毫秒 * @return */ public TimeButton setLenght(long lenght) { this.lenght = lenght; return this; }} |
最后在MainActivity.class中调用
|
1
2
3
4
5
6
7
8
9
10
11
12
13
14
15
16
17
18
19
20
21
22
23
24
25
26
27
28
29
30
31
32
33
34
35
36
37
38
39
40
41
42
43
44
45
46
47
48
49
50
51
52
53
|
package com.example.xuboyu.myapplication; import android.app.Activity;import android.os.Bundle;import android.view.View;import android.view.View.OnClickListener;import android.widget.Toast; /** * 测试主界面 * @author bnuzlbs-xuboyu 2017/4/5. */public class MainActivity extends Activity implements OnClickListener { private TimeButton v; private TimeButton v2; private TimeButton v3; @Override protected void onCreate(Bundle savedInstanceState) { super.onCreate(savedInstanceState); setContentView(R.layout.activity_main); v = (TimeButton) findViewById(R.id.button1); v.onCreate(savedInstanceState); v.setTextAfter("秒后重新排队").setTextBefore("点击开始排队").setLenght(15 * 1000); v.setOnClickListener(this); v2 = (TimeButton) findViewById(R.id.button2); v2.onCreate(savedInstanceState); v2.setTextAfter("秒后重新验证").setTextBefore("点击发送验证码").setLenght(10 * 1000); v2.setOnClickListener(this); v3 = (TimeButton) findViewById(R.id.button3); v3.onCreate(savedInstanceState); v3.setTextAfter("秒后重新倒计时").setTextBefore("点击开始倒计时").setLenght(5 * 1000); v3.setOnClickListener(this); } @Override public void onClick(View v) { // TODO Auto-generated method stub Toast.makeText(MainActivity.this, "这是处理调用者onclicklistnenr", Toast.LENGTH_SHORT).show(); } @Override protected void onDestroy() { // TODO Auto-generated method stub v.onDestroy(); v2.onDestroy(); super.onDestroy(); }} |
其中绿色按钮是使用了自定义样式的Button,使用起来也很简单
首先在drawable中新建一个样式文件mybutton.xml
|
1
2
3
4
5
6
7
8
9
10
11
12
13
14
15
|
<?xml version="1.0" encoding="utf-8"?><shape xmlns:android="http://schemas.android.com/apk/res/android"> <solid android:color="#5cbe6c" /> <!-- 设置按钮的四个角为弧形 --> <!-- android:radius 弧形的半径 --> <corners android:radius="15dip" /> <!-- padding:Button里面的文字与Button边界的间隔 --> <padding android:bottom="10dp" android:left="10dp" android:right="10dp" android:top="10dp" /></shape> |
然后在定义TimeButton的时候如下:
|
1
|
android:background="@drawable/mybutton" |
|
1
2
3
4
5
6
7
|
<com.example.xuboyu.myapplication.TimeButton android:id="@+id/button2" android:layout_width="match_parent" android:layout_height="wrap_content" android:text="" android:background="@drawable/mybutton" android:layout_margin="20dp"/> |
那么定义出来的Button样式就为下图:

记得在AndroidManifest.xml中的Application添加:
|
1
|
android:name=".App" |
|
1
2
3
4
5
6
7
8
9
10
11
12
13
14
15
|
<application android:allowBackup="true" android:icon="@mipmap/ic_launcher" android:label="@string/app_name" android:supportsRtl="true" android:theme="@style/AppTheme" android:name=".App"> <activity android:name=".MainActivity" > <intent-filter> <action android:name="android.intent.action.MAIN" /> <category android:name="android.intent.category.LAUNCHER" /> </intent-filter> </activity></application> |
Ps.这个倒计时按钮存在一个问题,对于长时间计时而言,用户可能在计时后退出应用程序,如果用户把我们的APP置于后台,那么OK,我们的倒计时还是可以进行,但是假如用户在退出后把APP进程滑掉,或者使用了其他软件清理后台等等,就会执行OnDestory方法,再次进去APP的时候只能重新建立一个Timer。所以打算的是使用轻量级存储来储存每次退出后的倒计时数据,然后在重新OnCreate的时候为Timer赋值。当然对于短时间的计时,即在用户可接受的等待范围内是完全可以接受的!有Bug也欢迎指出,对于应用进程被销毁时Timer也销毁这个问题假如你有更好的解决方法,也请多指教!
以上就是本文的全部内容,希望对大家的学习有所帮助,也希望大家多多支持服务器之家。
原文链接:https://blog.csdn.net/SSBBY/article/details/69258672


