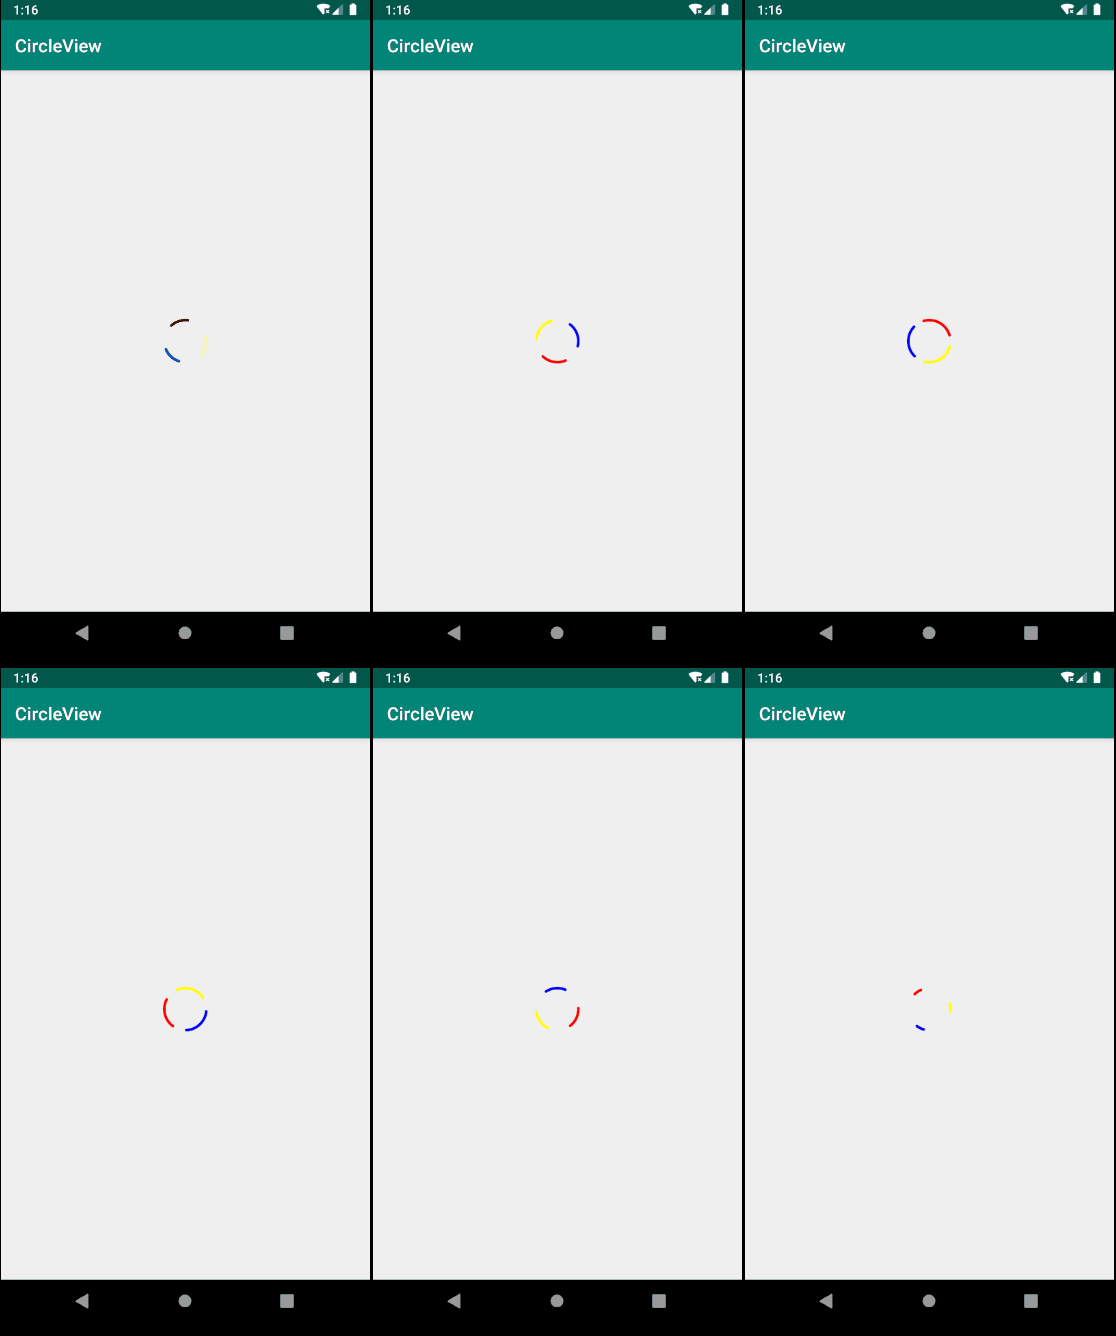
之前刷贴吧的时候看到的贴吧的刷新动画,就是一个圆弧旋转的动画,感觉挺好看的,就抽空实现了一下。
最终的结果是这样的:

从上图中可以看出,动画的效果是三段圆弧进行旋转,同时弧度也在逐渐增大缩小,这里采用的是在onDraw中绘制三段圆弧。
|
1
2
3
4
5
6
7
|
// 绘制圆弧mPaint.setColor(mTopColor);canvas.drawArc(left, top, right, bottom, startAngle, sweepAngle, false, mPaint);mPaint.setColor(mLeftColor);canvas.drawArc(left, top, right, bottom, startAngle - 120, sweepAngle, false, mPaint);mPaint.setColor(mRightColor);canvas.drawArc(left, top, right, bottom, startAngle + 120, sweepAngle, false, mPaint); |
动画的基础是在onDraw中,依次绘制三种不同颜色的圆弧。三段圆弧每每相隔120度,这样就可以刚好平分整个圆,比较美观。
注意这里的startAngle的初始值是 -90 ,刚好是圆的最上面一点。这里需要注意的是canvas的drawArc方法中,前四个参数是决定圆弧的位置的矩形的坐标,startAngle指的是圆弧开始的角度,0度是圆的最右侧的点,以顺时针为正、逆时针为负。所以-90度刚好是圆的最上面的点。
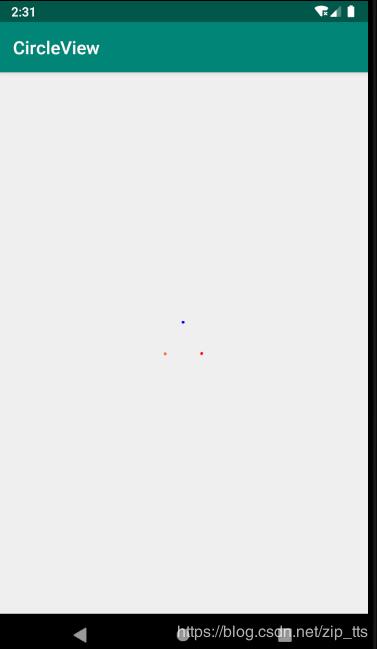
sweepAngle是指圆弧扫过的角度,同样顺时针为正,逆时针为负。这里sweepAngle的大小初始值是-1,这样在动画未开始之前也能够绘制出一个圆点(实际上是角度为1的圆弧,近似圆点)。
后面一个参数是useCenter,指的是是否使用圆心,为true时就会将圆弧的两个端点连向圆心构成一个扇形,为false时则不会连接圆心。
另外要注意paint的style要设置为stroke,默认情况下是fill模式,也就是会直接填充。对于这里的圆弧,会直接连接圆弧的两个端点构成闭合图形然后进行填充。

这样的话绘制出来的就是动画的初始状态:三个圆点(实际上是一段角度为1的圆弧)。
从上面也可以看出,要绘制圆弧必须要有四个坐标,这里的坐标是以这种方式得到的:以View的长宽中最短的一边作为组成圆的正方形的边长,然后居中显示。
|
1
2
3
4
5
6
7
8
9
|
int width = getMeasuredWidth();int height = getMeasuredHeight();int side = Math.min(width - getPaddingStart() - getPaddingEnd(), height - getPaddingTop() - getPaddingBottom()) - (int) (mStrokeWidth + 0.5F);// 确定动画位置float left = (width - side) / 2F;float top = (height - side) / 2F;float right = left + side;float bottom = top + side; |
上面的一段代码就是定位圆弧的正方形坐标的实现,这里可以看到在计算边长side的时候,去掉了view的padding和mStrokenWidth。其中mStrokenWidth是圆弧的弧线的宽度,由于圆弧的线较宽的时候(此时相当于圆环)会向内外均匀延伸,也就是内边距和外边距的中间到圆心的距离才是半径。因此在确定圆弧的位置时,要去除线宽,以防止在交界处圆弧无法完全绘制。
另外,我们自定义View时,默认的wrap_content模式下会与match_parent的效果一样,因此需要在onMeasure中进行处理。这里就简单的设置wrap_content模式下为20dp。
|
1
2
3
4
5
6
7
8
9
10
11
12
13
14
15
16
17
18
|
@Override protected void onMeasure(int widthMeasureSpec, int heightMeasureSpec) { super.onMeasure(widthMeasureSpec, heightMeasureSpec); int widthMode = MeasureSpec.getMode(widthMeasureSpec); int heightMode = MeasureSpec.getMode(heightMeasureSpec); int width = MeasureSpec.getSize(widthMeasureSpec); int height = MeasureSpec.getSize(heightMeasureSpec); // 对于wrap_content ,设置其为20dp。默认情况下wrap_content和match_parent是一样的效果 if (widthMode == MeasureSpec.AT_MOST) { width = (int) (TypedValue.applyDimension(TypedValue.COMPLEX_UNIT_DIP, 20, getContext().getResources().getDisplayMetrics()) + 0.5F); } if (heightMode == MeasureSpec.AT_MOST) { height = (int) (TypedValue.applyDimension(TypedValue.COMPLEX_UNIT_DIP, 20, getContext().getResources().getDisplayMetrics()) + 0.5F); } setMeasuredDimension(width, height); } |
以上的操作就是动画的整个基础,而让View动起来的操作就是不断地修改圆弧的startAngle和sweepAngle,然后触发View的重绘。这个过程使用ValueAnimator来生成一系列数字,然后根据这个来计算圆弧的开始角度和扫描角度。
|
1
2
3
4
5
6
7
8
9
10
11
12
13
14
15
16
17
18
19
20
21
22
23
24
25
|
// 最小角度为1度,是为了显示小圆点sweepAngle = -1;startAngle = -90;curStartAngle = startAngle;// 扩展动画mValueAnimator = ValueAnimator.ofFloat(0, 1).setDuration(mDuration);mValueAnimator.setRepeatMode(ValueAnimator.REVERSE);mValueAnimator.setRepeatCount(ValueAnimator.INFINITE);mValueAnimator.addUpdateListener(animation -> {float fraction = animation.getAnimatedFraction();float value = (float) animation.getAnimatedValue(); if (mReverse) fraction = 1 - fraction; startAngle = curStartAngle + fraction * 120; sweepAngle = -1 - mMaxSweepAngle * value; postInvalidate(); }); mValueAnimator.addListener(new AnimatorListenerAdapter() { @Override public void onAnimationRepeat(Animator animation) { curStartAngle = startAngle; mReverse = !mReverse; } }); |
上面就是计算的过程,该动画采用的是value值从0到1再到0,对应着其中一段圆弧从原点伸展到最大再缩小回原点。其中sweepAngle的计算是 sweepAngle = -1 - mMaxSweepAngle * value ,也就是在整个过程中,圆弧的角度逐渐增大到maxSweepAngle。这里采用的是负值,也就是从startAngle按逆时针方向进行绘制。-1是基础值,以防止缩小到最小时也能够显示出一个圆点。
startAngle的计算则是根据动画过程的fraction,而不是动画值,也就是从0到1,在整个动画过程中逐渐增加120度。由于整个View是由三段相同的圆弧形成的,也就是说每段圆弧最大只能占据120度,否则就会重叠。那么在0到1这个过程中,弧度增大到120度,startAngle则必须移动120度给圆弧腾出位置,这就是120度的由来。并且监听Reverse状态,因为在Reverse状态下,fraction是从1到0的,而我们需要的是startAngle一直逐渐增大,因此在Reverse下通过1-fraction使之与原动画一致。 并且每次reverse监听下,记录startAngle作为新的当前位置和记录reverse状态。
以上就是整个圆弧动画的实现细节了,整体比较简单,就是通过对弧度的startAngle和sweepAngle进行改变然后通知View重绘。 下面是实现的完整代码 ,这里抽取了一些基础变量放到属性中,用于简便控制动画的显示:
values/attrs.xml
|
1
2
3
4
5
6
7
8
9
10
11
12
13
14
15
16
17
|
<?xml version="1.0" encoding="utf-8"?><resources> <declare-styleable name="RefreshView"> <attr name="top_color" format="color"/> <attr name="left_color" format="color"/> <attr name="right_color" format="color"/> <!-- 圆弧的宽度 --> <attr name="border_width" format="dimension"/> <!-- 每个周期的时间,从点到最大弧为一个周期,ms --> <attr name="duration" format="integer"/> <!-- 圆弧扫过的最大角度 --> <attr name="max_sweep_angle" format="integer"/> <!-- 是否自动开启动画 --> <attr name="auto_start" format="boolean"/> </declare-styleable></resources> |
RefreshView.java
|
1
2
3
4
5
6
7
8
9
10
11
12
13
14
15
16
17
18
19
20
21
22
23
24
25
26
27
28
29
30
31
32
33
34
35
36
37
38
39
40
41
42
43
44
45
46
47
48
49
50
51
52
53
54
55
56
57
58
59
60
61
62
63
64
65
66
67
68
69
70
71
72
73
74
75
76
77
78
79
80
81
82
83
84
85
86
87
88
89
90
91
92
93
94
95
96
97
98
99
100
101
102
103
104
105
106
107
108
109
110
111
112
113
114
115
116
117
118
119
120
121
122
123
124
125
126
127
128
129
130
131
132
133
134
135
136
137
138
139
140
141
142
143
144
145
146
147
148
149
150
151
152
153
154
155
156
157
158
159
160
161
162
163
164
165
166
167
168
169
170
171
172
173
174
175
176
177
178
179
180
181
182
183
184
185
186
187
188
189
190
191
192
193
194
195
196
197
198
199
200
201
202
203
204
205
206
207
208
209
210
211
212
213
214
215
216
217
218
219
220
221
222
223
224
225
226
227
228
229
230
231
232
233
234
235
236
237
238
239
240
241
242
243
244
245
246
|
package com.pgaofeng.mytest.other;import android.animation.Animator;import android.animation.AnimatorListenerAdapter;import android.animation.ValueAnimator;import android.content.Context;import android.content.res.TypedArray;import android.graphics.Canvas;import android.graphics.Color;import android.graphics.Paint;import android.support.annotation.Nullable;import android.util.AttributeSet;import android.util.TypedValue;import android.view.View;import com.pgaofeng.mytest.R;/** * @author gaofengpeng * @date 2019/9/16 * @description : */public class RefreshView extends View { /** * 动画的三种颜色 */ private int mTopColor; private int mLeftColor; private int mRightColor; private Paint mPaint; /** * 扫描角度,用于控制圆弧的长度 */ private float sweepAngle; /** * 开始角度,用于控制圆弧的显示位置 */ private float startAngle; /** * 当前角度,记录圆弧旋转的角度 */ private float curStartAngle; /** * 用动画控制圆弧显示 */ private ValueAnimator mValueAnimator; /** * 每个周期的时长 */ private int mDuration; /** * 圆弧线宽 */ private float mStrokeWidth; /** * 动画过程中最大的圆弧角度 */ private int mMaxSweepAngle; /** * 是否自动开启动画 */ private boolean mAutoStart; /** * 用于判断当前动画是否处于Reverse状态 */ private boolean mReverse = false; public RefreshView(Context context) { this(context, null); } public RefreshView(Context context, @Nullable AttributeSet attrs) { this(context, attrs, 0); } public RefreshView(Context context, @Nullable AttributeSet attrs, int defStyleAttr) { super(context, attrs, defStyleAttr); initAttr(context, attrs); init(); } private void initAttr(Context context, AttributeSet attrs) { TypedArray array = context.obtainStyledAttributes(attrs, R.styleable.RefreshView); mTopColor = array.getColor(R.styleable.RefreshView_top_color, Color.BLUE); mLeftColor = array.getColor(R.styleable.RefreshView_left_color, Color.YELLOW); mRightColor = array.getColor(R.styleable.RefreshView_right_color, Color.RED); mDuration = array.getInt(R.styleable.RefreshView_duration, 600); if (mDuration <= 0) { mDuration = 600; } mStrokeWidth = array.getDimension(R.styleable.RefreshView_border_width, 8F); mMaxSweepAngle = array.getInt(R.styleable.RefreshView_max_sweep_angle, 90); if (mMaxSweepAngle <= 0 || mMaxSweepAngle > 120) { // 对于不规范值直接采用默认值 mMaxSweepAngle = 90; } mAutoStart = array.getBoolean(R.styleable.RefreshView_auto_start, true); array.recycle(); } private void init() { mPaint = new Paint(); mPaint.setAntiAlias(true); mPaint.setStyle(Paint.Style.STROKE); mPaint.setStrokeWidth(mStrokeWidth); mPaint.setStrokeCap(Paint.Cap.ROUND); // 最小角度为1度,是为了显示小圆点 sweepAngle = -1; startAngle = -90; curStartAngle = startAngle; // 扩展动画 mValueAnimator = ValueAnimator.ofFloat(0, 1).setDuration(mDuration); mValueAnimator.setRepeatMode(ValueAnimator.REVERSE); mValueAnimator.setRepeatCount(ValueAnimator.INFINITE); mValueAnimator.addUpdateListener(animation -> { float fraction = animation.getAnimatedFraction(); float value = (float) animation.getAnimatedValue(); if (mReverse) fraction = 1 - fraction; startAngle = curStartAngle + fraction * 120; sweepAngle = -1 - mMaxSweepAngle * value; postInvalidate(); }); mValueAnimator.addListener(new AnimatorListenerAdapter() { @Override public void onAnimationRepeat(Animator animation) { curStartAngle = startAngle; mReverse = !mReverse; } }); } @Override protected void onMeasure(int widthMeasureSpec, int heightMeasureSpec) { super.onMeasure(widthMeasureSpec, heightMeasureSpec); int widthMode = MeasureSpec.getMode(widthMeasureSpec); int heightMode = MeasureSpec.getMode(heightMeasureSpec); int width = MeasureSpec.getSize(widthMeasureSpec); int height = MeasureSpec.getSize(heightMeasureSpec); // 对于wrap_content ,设置其为20dp。默认情况下wrap_content和match_parent是一样的效果 if (widthMode == MeasureSpec.AT_MOST) { width = (int) (TypedValue.applyDimension(TypedValue.COMPLEX_UNIT_DIP, 20, getContext().getResources().getDisplayMetrics()) + 0.5F); } if (heightMode == MeasureSpec.AT_MOST) { height = (int) (TypedValue.applyDimension(TypedValue.COMPLEX_UNIT_DIP, 20, getContext().getResources().getDisplayMetrics()) + 0.5F); } setMeasuredDimension(width, height); } @Override protected void onDraw(Canvas canvas) { super.onDraw(canvas); int width = getMeasuredWidth(); int height = getMeasuredHeight(); int side = Math.min(width - getPaddingStart() - getPaddingEnd(), height - getPaddingTop() - getPaddingBottom()) - (int) (mStrokeWidth + 0.5F); // 确定动画位置 float left = (width - side) / 2F; float top = (height - side) / 2F; float right = left + side; float bottom = top + side; // 绘制圆弧 mPaint.setColor(mTopColor); canvas.drawArc(left, top, right, bottom, startAngle, sweepAngle, false, mPaint); mPaint.setColor(mLeftColor); canvas.drawArc(left, top, right, bottom, startAngle - 120, sweepAngle, false, mPaint); mPaint.setColor(mRightColor); canvas.drawArc(left, top, right, bottom, startAngle + 120, sweepAngle, false, mPaint); } @Override protected void onDetachedFromWindow() { if (mAutoStart && mValueAnimator.isRunning()) { mValueAnimator.cancel(); } super.onDetachedFromWindow(); } @Override protected void onAttachedToWindow() { if (mAutoStart && !mValueAnimator.isRunning()) { mValueAnimator.start(); } super.onAttachedToWindow(); } /** * 开始动画 */ public void start() { if (!mValueAnimator.isStarted()) { mValueAnimator.start(); } } /** * 暂停动画 */ public void pause() { if (mValueAnimator.isRunning()) { mValueAnimator.pause(); } } /** * 继续动画 */ public void resume() { if (mValueAnimator.isPaused()) { mValueAnimator.resume(); } } /** * 停止动画 */ public void stop() { if (mValueAnimator.isStarted()) { mReverse = false; mValueAnimator.end(); } }} |
以上就是本文的全部内容,希望对大家的学习有所帮助,也希望大家多多支持服务器之家。
原文链接:https://blog.csdn.net/zip_tts/article/details/100940922


