环境与效果
python3.9.6
pycharm 2021
库环境:
dlib
opencv-python
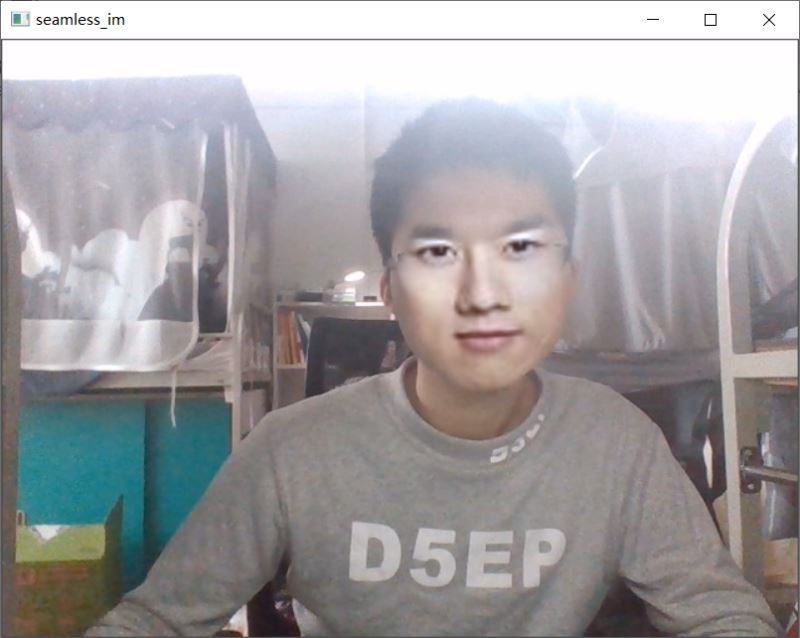
视频图片效果如下:
摄像头实时换脸,老师都不认识我了!!

基本原理
使用dlib的shape_predictor_68_face_landmarks.dat模型获取一张有正脸的图片(1.png)和摄像头的自己的68个人脸特征点。
根据人脸特征点获取分别获取人脸掩模
对第一个图片仿射变换使其脸部对准摄像头图片中的脸部得到新的图片
对人脸掩模执行相同的操作仿射
将两个性的得到图取并集(不能让别的地方空了)
用opencv对两上面操作,对仿射变换后的a图片和摄像头图片进行泊松融合
完整源码
|
1
2
3
4
5
6
7
8
9
10
11
12
13
14
15
16
17
18
19
20
21
22
23
24
25
26
27
28
29
30
31
32
33
34
35
36
37
38
39
40
41
42
43
44
45
46
47
48
49
50
51
52
53
54
55
56
57
58
59
60
61
62
63
64
65
66
67
68
69
70
71
72
73
74
75
76
77
78
79
80
81
82
83
84
85
86
87
88
89
90
91
92
93
94
95
96
97
98
99
100
101
102
103
104
105
106
107
108
109
110
111
112
113
114
115
116
117
118
119
120
121
122
123
124
125
126
127
128
129
130
131
132
133
134
135
136
137
138
139
140
141
142
143
144
145
146
147
148
149
150
151
|
# -*- coding: utf-8 -*-import cv2import dlibimport numpy as npdetector = dlib.get_frontal_face_detector() # dlib的正向人脸检测器predictor = dlib.shape_predictor(r'shape_predictor_68_face_landmarks.dat') # dlib的人脸形状检测器def get_image_size(image): """ 获取图片大小(高度,宽度) :param image: image :return: (高度,宽度) """ image_size = (image.shape[0], image.shape[1]) return image_sizedef get_face_landmarks(image, face_detector, shape_predictor): """ 获取人脸标志,68个特征点 :param image: image :param face_detector: dlib.get_frontal_face_detector :param shape_predictor: dlib.shape_predictor :return: np.array([[],[]]), 68个特征点 """ dets = face_detector(image, 1) shape = shape_predictor(image, dets[0]) face_landmarks = np.array([[p.x, p.y] for p in shape.parts()]) return face_landmarksdef get_face_mask(image_size, face_landmarks): """ 获取人脸掩模 :param image_size: 图片大小 :param face_landmarks: 68个特征点 :return: image_mask, 掩模图片 """ mask = np.zeros(image_size, dtype=np.uint8) points = np.concatenate([face_landmarks[0:16], face_landmarks[26:17:-1]]) cv2.fillPoly(img=mask, pts=[points], color=255) return maskdef get_affine_image(image1, image2, face_landmarks1, face_landmarks2): """ 获取图片1仿射变换后的图片 :param image1: 图片1, 要进行仿射变换的图片 :param image2: 图片2, 只要用来获取图片大小,生成与之大小相同的仿射变换图片 :param face_landmarks1: 图片1的人脸特征点 :param face_landmarks2: 图片2的人脸特征点 :return: 仿射变换后的图片 """ three_points_index = [18, 8, 25] M = cv2.getAffineTransform(face_landmarks1[three_points_index].astype(np.float32), face_landmarks2[three_points_index].astype(np.float32)) dsize = (image2.shape[1], image2.shape[0]) affine_image = cv2.warpAffine(image1, M, dsize) return affine_image.astype(np.uint8)def get_mask_center_point(image_mask): """ 获取掩模的中心点坐标 :param image_mask: 掩模图片 :return: 掩模中心 """ image_mask_index = np.argwhere(image_mask > 0) miny, minx = np.min(image_mask_index, axis=0) maxy, maxx = np.max(image_mask_index, axis=0) center_point = ((maxx + minx) // 2, (maxy + miny) // 2) return center_pointdef get_mask_union(mask1, mask2): """ 获取两个掩模掩盖部分的并集 :param mask1: mask_image, 掩模1 :param mask2: mask_image, 掩模2 :return: 两个掩模掩盖部分的并集 """ mask = np.min([mask1, mask2], axis=0) # 掩盖部分并集 mask = ((cv2.blur(mask, (5, 5)) == 255) * 255).astype(np.uint8) # 缩小掩模大小 mask = cv2.blur(mask, (3, 3)).astype(np.uint8) # 模糊掩模 return maskdef skin_color_adjustment(im1, im2, mask=None): """ 肤色调整 :param im1: 图片1 :param im2: 图片2 :param mask: 人脸 mask. 如果存在,使用人脸部分均值来求肤色变换系数;否则,使用高斯模糊来求肤色变换系数 :return: 根据图片2的颜色调整的图片1 """ if mask is None: im1_ksize = 55 im2_ksize = 55 im1_factor = cv2.GaussianBlur(im1, (im1_ksize, im1_ksize), 0).astype(np.float) im2_factor = cv2.GaussianBlur(im2, (im2_ksize, im2_ksize), 0).astype(np.float) else: im1_face_image = cv2.bitwise_and(im1, im1, mask=mask) im2_face_image = cv2.bitwise_and(im2, im2, mask=mask) im1_factor = np.mean(im1_face_image, axis=(0, 1)) im2_factor = np.mean(im2_face_image, axis=(0, 1)) im1 = np.clip((im1.astype(np.float) * im2_factor / np.clip(im1_factor, 1e-6, None)), 0, 255).astype(np.uint8) return im1def main(): im1 = cv2.imread('1.png') # face_image im1 = cv2.resize(im1, (600, im1.shape[0] * 600 // im1.shape[1])) landmarks1 = get_face_landmarks(im1, detector, predictor) # 68_face_landmarks if landmarks1 is None: print('{}:检测不到人脸'.format(image_face_path)) exit(1) im1_size = get_image_size(im1) # 脸图大小 im1_mask = get_face_mask(im1_size, landmarks1) # 脸图人脸掩模 cam = cv2.VideoCapture(0) while True: ret_val, im2 = cam.read() # camera_image landmarks2 = get_face_landmarks(im2, detector, predictor) # 68_face_landmarks if landmarks2 is not None: im2_size = get_image_size(im2) # 摄像头图片大小 im2_mask = get_face_mask(im2_size, landmarks2) # 摄像头图片人脸掩模 affine_im1 = get_affine_image(im1, im2, landmarks1, landmarks2) # im1(脸图)仿射变换后的图片 affine_im1_mask = get_affine_image(im1_mask, im2, landmarks1, landmarks2) # im1(脸图)仿射变换后的图片的人脸掩模 union_mask = get_mask_union(im2_mask, affine_im1_mask) # 掩模合并 affine_im1 = skin_color_adjustment(affine_im1, im2, mask=union_mask) # 肤色调整 point = get_mask_center_point(affine_im1_mask) # im1(脸图)仿射变换后的图片的人脸掩模的中心点 seamless_im = cv2.seamlessClone(affine_im1, im2, mask=union_mask, p=point, flags=cv2.NORMAL_CLONE) # 进行泊松融合 cv2.imshow('seamless_im', seamless_im) else: cv2.imshow('seamless_im', im2) if cv2.waitKey(1) == 27: # 按Esc退出 break cv2.destroyAllWindows()if __name__ == '__main__': main() |
到此这篇关于Python实现摄像头实时换脸详解的文章就介绍到这了,更多相关Python实时换脸内容请搜索服务器之家以前的文章或继续浏览下面的相关文章希望大家以后多多支持服务器之家!
原文链接:https://blog.csdn.net/weixin_46211269/article/details/123471039


