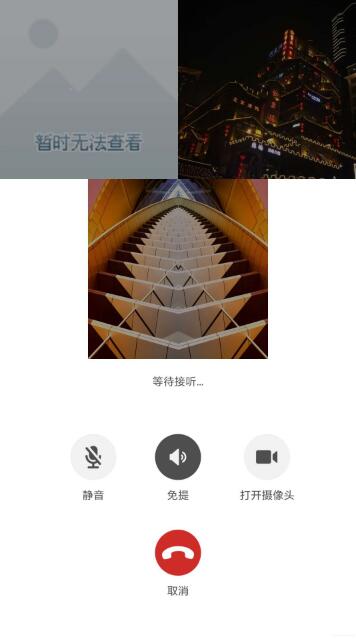
工作中需要实现一个类似微信多人视频通话功能的界面,分别使用自定义viewgroup和自定义layoutManager的方式进行了实现。最终工作中采用了layoutManager,因为可以使用payload更新单个布局控件,效率更好。下面放出两种具体的实现效果代码。
1、使用自定义ViewGroup方式实现
下面是三个人通话时候的效果,其他的可以参考微信多人音视频通话界面。

|
1
2
3
4
5
6
7
8
9
10
11
12
13
14
15
16
17
18
19
20
21
22
23
24
25
26
27
28
29
30
31
32
33
34
35
36
37
38
39
40
41
42
43
44
45
46
47
48
49
50
51
52
53
54
55
56
57
58
59
60
61
62
63
64
65
66
67
68
69
70
71
72
73
74
75
76
77
78
79
80
81
82
83
84
85
86
87
88
89
90
91
92
93
94
95
96
97
98
99
100
101
102
103
104
105
106
107
108
109
110
111
112
113
114
115
116
117
118
119
120
121
122
123
124
125
126
127
128
129
130
131
132
133
134
135
136
137
138
139
140
141
142
143
144
145
146
147
148
149
150
151
|
package com.dnaer.android.telephone.widgets;import android.content.Context;import android.os.Build;import android.support.annotation.RequiresApi;import android.util.AttributeSet;import android.util.DisplayMetrics;import android.view.View;import android.view.ViewGroup;import android.view.WindowManager;import com.anbetter.log.MLog;public class MultiVideoChatLayout extends ViewGroup implements CommLayoutAdapter.OnDataChangedListener { private CommLayoutAdapter mCommLayoutAdapter; private int mScreenWidth; //人数为2,3,4状态下的宽高度 private int mSizeModel1; //人数为5,6,7,8,9状态下的宽高度 private int mSizeModel2; public MultiVideoChatLayout(Context context) { this(context, null); } public MultiVideoChatLayout(Context context, AttributeSet attrs) { this(context, attrs, 0); } public MultiVideoChatLayout(Context context, AttributeSet attrs, int defStyleAttr) { super(context, attrs, defStyleAttr); initialize(context); } @RequiresApi(api = Build.VERSION_CODES.LOLLIPOP) public MultiVideoChatLayout(Context context, AttributeSet attrs, int defStyleAttr, int defStyleRes) { super(context, attrs, defStyleAttr, defStyleRes); initialize(context); } private void initialize(Context context) { WindowManager wm = (WindowManager) context.getSystemService(Context.WINDOW_SERVICE); DisplayMetrics metrics = new DisplayMetrics(); wm.getDefaultDisplay().getMetrics(metrics); mScreenWidth = metrics.widthPixels; mSizeModel1 = mScreenWidth / 2; mSizeModel2 = mScreenWidth / 3; } @Override protected void onMeasure(int widthMeasureSpec, int heightMeasureSpec) { //宽度默认给屏幕的宽度,高度直接取宽度,形成一个正方形 final int width = MeasureSpec.makeMeasureSpec(mScreenWidth, MeasureSpec.EXACTLY); final int height = MeasureSpec.makeMeasureSpec(mScreenWidth, MeasureSpec.EXACTLY); setMeasuredDimension(width, height); MLog.d("width: " + width + ", height:" + height); final int childWidth = MeasureSpec.makeMeasureSpec(mScreenWidth / 3, MeasureSpec.EXACTLY); final int childHeight = MeasureSpec.makeMeasureSpec(mScreenWidth / 3, MeasureSpec.EXACTLY); final int childWidth2 = MeasureSpec.makeMeasureSpec(mScreenWidth / 2, MeasureSpec.EXACTLY); final int childHeight2 = MeasureSpec.makeMeasureSpec(mScreenWidth / 2, MeasureSpec.EXACTLY); if (getChildCount() > 4) { for (int i = 0; i < getChildCount(); i++) { View child = getChildAt(i); child.measure(childWidth, childHeight); } } else { for (int i = 0; i < getChildCount(); i++) { View child = getChildAt(i); child.measure(childWidth2, childHeight2); } } } @Override protected void onLayout(boolean changed, int l, int t, int r, int b) { if (getChildCount() <= 4) { layoutModel1(); } else { layoutModel2(); } } private void layoutModel2() { int currentWidth = 0; for (int i = 0; i < getChildCount(); i++) { View item = getChildAt(i); if (i % 3 == 0) { currentWidth = 0; item.layout(0, i / 3 * mSizeModel2, mSizeModel2, i / 3 * mSizeModel2 + mSizeModel2); } else { item.layout(currentWidth + mSizeModel2, i / 3 * mSizeModel2, currentWidth + 2 * mSizeModel2, i / 3 * mSizeModel2 + mSizeModel2); currentWidth = currentWidth + mSizeModel2; } } } private void layoutModel1() { if (getChildCount() == 3) { for (int i = 0; i < getChildCount(); i++) { View item = getChildAt(i); MLog.d("width: " + item.getMeasuredWidth() + ", height: " + item.getMeasuredHeight() + ", mSizeModel1: " + mSizeModel1); if (i == 0) { item.layout(0, 0, mSizeModel1, mSizeModel1); } else if (i == 1) { item.layout(mSizeModel1, 0, mSizeModel1 * 2, mSizeModel1); } else if (i == 2) { item.layout(mSizeModel1 / 2, mSizeModel1, mSizeModel1 + mSizeModel1 / 2, mSizeModel1 * 2); } } } else { for (int i = 0; i < getChildCount(); i++) { View item = getChildAt(i); if (i % 2 == 0) { item.layout(0, i / 2 * mSizeModel1, mSizeModel1, i / 2 * mSizeModel1 + mSizeModel1); } else { item.layout(mSizeModel1, i / 2 * mSizeModel1, 2 * mSizeModel1, i / 2 * mSizeModel1 + mSizeModel1); } } } } public void setAdapter(CommLayoutAdapter adapter) { mCommLayoutAdapter = adapter; mCommLayoutAdapter.setOnDataChangedListener(this); changedAdapter(); } @Override public void onChanged() { changedAdapter(); } private void changedAdapter() { removeAllViews(); CommLayoutAdapter layoutAdapter = mCommLayoutAdapter; for (int i = 0; i < layoutAdapter.getCount(); i++) { View view = layoutAdapter.getView(this, i, layoutAdapter.getItem(i)); view.setDuplicateParentStateEnabled(true); addView(view); } }} |
2、使用自定义LayoutManager方式实现
|
1
2
3
4
5
6
7
8
9
10
11
12
13
14
15
16
17
18
19
20
21
22
23
24
25
26
27
28
29
30
31
32
33
34
35
36
37
38
39
40
41
42
43
44
45
46
47
48
49
50
51
52
53
54
55
56
57
58
59
60
61
62
63
64
65
66
67
68
69
70
71
72
73
74
75
76
77
78
79
80
81
82
83
84
85
86
87
88
89
90
91
92
93
94
95
96
97
98
99
100
101
102
103
104
105
106
107
108
109
110
111
112
113
114
|
package org.fireking.customgridlayoutmanagerimport android.content.res.Resourcesimport android.support.v7.widget.RecyclerViewimport java.lang.IllegalArgumentExceptionclass MultiChatLayoutManager : RecyclerView.LayoutManager() { private var leftMargin = 0 private var rightMargin = 0 private var mScreenWidth = 0 override fun generateDefaultLayoutParams(): RecyclerView.LayoutParams { return RecyclerView.LayoutParams(RecyclerView.LayoutParams.WRAP_CONTENT, RecyclerView.LayoutParams.WRAP_CONTENT) } override fun onLayoutChildren(recycler: RecyclerView.Recycler?, state: RecyclerView.State?) { super.onLayoutChildren(recycler, state) if (itemCount == 0) { detachAndScrapAttachedViews(recycler!!) return } if (childCount == 0 && state!!.isPreLayout) { return } val params = recycler!!.getViewForPosition(0).layoutParams as RecyclerView.LayoutParams leftMargin = params.leftMargin rightMargin = params.rightMargin detachAndScrapAttachedViews(recycler) layoutItem(recycler) } private fun layoutItem(recycler: RecyclerView.Recycler) { if (itemCount > 9) { throw IllegalArgumentException("${javaClass.simpleName}最多支持9个item布局, 请检查你的item个数是否正确") } mScreenWidth = Resources.getSystem().displayMetrics.widthPixels val itemSize = if (itemCount > 4) { mScreenWidth / 3 } else { mScreenWidth / 2 } if (itemCount <= 4) { if (itemCount == 3) { for (i in 0 until itemCount) { val view = recycler.getViewForPosition(i) addView(view) // 因为detach过所以重新添加 measureChildWithMargins(view, 0, 0) when (i) { 0 -> layoutDecoratedWithMargins(view, 0, 0, itemSize, itemSize) 1 -> layoutDecoratedWithMargins(view, itemSize, 0, itemSize * 2, itemSize) else -> layoutDecoratedWithMargins( view, itemSize / 2, itemSize, itemSize + itemSize / 2, itemSize * 2 ) } } } else { for (i in 0 until itemCount) { val view = recycler.getViewForPosition(i) addView(view) // 因为detach过所以重新添加 measureChildWithMargins(view, 0, 0) if (i % 2 == 0) { layoutDecoratedWithMargins(view, 0, i / 2 * itemSize, itemSize, i / 2 * itemSize + itemSize) } else { layoutDecoratedWithMargins( view, itemSize, i / 2 * itemSize, 2 * itemSize, i / 2 * itemSize + itemSize ) } } } } else { var currentWidth = 0 for (i in 0 until itemCount) { val view = recycler.getViewForPosition(i) addView(view) // 因为detach过所以重新添加 measureChildWithMargins(view, 0, 0) if (i % 3 == 0) { currentWidth = 0 layoutDecoratedWithMargins(view, 0, i / 3 * itemSize, itemSize, i / 3 * itemSize + itemSize) } else { layoutDecoratedWithMargins( view, currentWidth + itemSize, i / 3 * itemSize, currentWidth + 2 * itemSize, i / 3 * itemSize + itemSize ) currentWidth += itemSize } } } } //因为这个布局不需要有滚动,所以直接将横竖两个方向的滚动全部取消了 override fun canScrollHorizontally(): Boolean { return false } override fun canScrollVertically(): Boolean { return false }} |
以上就是本文的全部内容,希望对大家的学习有所帮助,也希望大家多多支持服务器之家。
原文链接:https://blog.csdn.net/wanggang514260663/article/details/93167902


