想象一下。你正在参加在线会议,出于某种原因,你并不想打开摄像头。但是如果你看到其他人都打开了,你觉得你也得打开,所以迅速整理自己的头发,确保衣着整洁,然后不情愿地打开相机。我们都经历过这种情况。
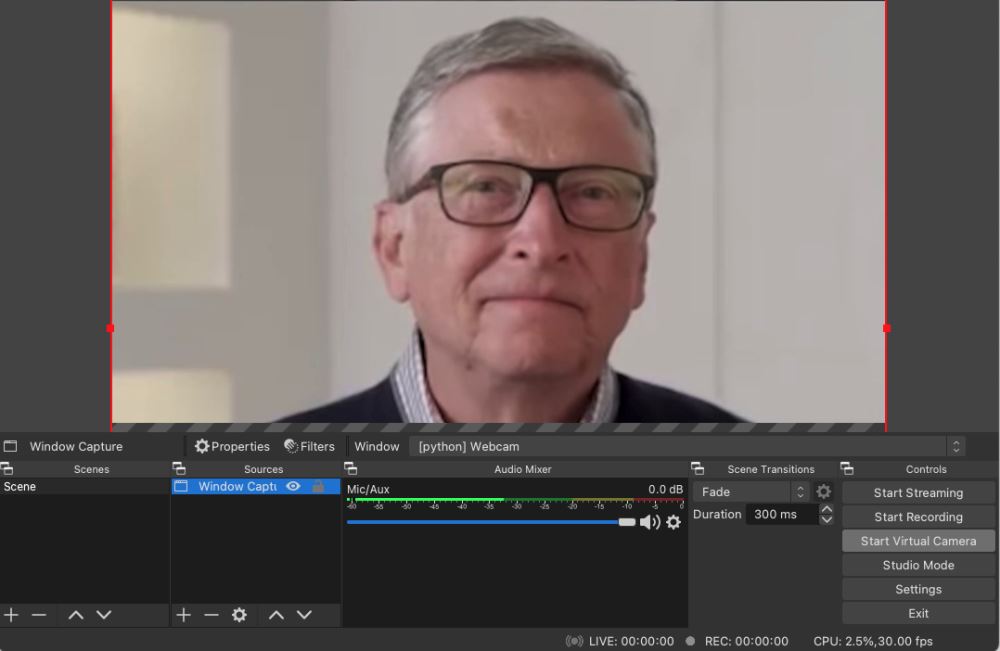
有一个好消息。在 Python 的帮助下,不再强制开启摄像头。将向你展示如何为你的在线会议创建一个假的摄像头,如下所示:


当然,这张脸不一定是比尔盖茨的,它也可以是你自己。
现在将向你展示如何在 Python 中编写代码。在文章的最后,将解释如何为自己使用这个假的摄像头。
创建一个简单的假网络摄像头
首先,我们将导入一些模块,尤其是 openCV。
import cv2
import numpy as np
import pickle
import pyaudio
import struct
import math
import argparse
import os
接下来我们将创建一个函数来从视频中提取所有帧:
def read_frames(file, video_folder):
    frames = []
    cap = cv2.VideoCapture(os.path.join("videos", video_folder, file))
    frame_rate = cap.get(cv2.CAP_PROP_FPS)
    if not cap.isOpened():
        print("Error opening video file")
    while cap.isOpened():
        ret, frame = cap.read()
        if ret:
            frames.append(frame)
        else:
            break
    cap.release()
    return frames, frame_rate
现在我们有了框架,我们可以创建一个循环,一个接一个地显示它们。当到达最后一帧时,我们向后播放视频,然后当我们到达第一帧时,我们将向前播放,我们将永远重复这个过程。这样就不会出现从最后一帧到第一帧的突然过渡。我们也会这样做,以便我们可以按“q”停止网络摄像头。
frames, frame_rate = read_frames("normal.mov", "bill_gates")

def next_frame_index(i, reverse):
    if i == len(frames) - 1:
        reverse = True
    if i == 0:
        reverse = False
    if not reverse:
        i += 1
    else:
        i -= 1
    return i, reverse
rev = False
i = 0
while True:
    frame = frames[i]
    cv2.imshow("Webcam", frame)
    pressed_key = cv2.waitKey(int(1000/frame_rate)) & 0xFF
    if pressed_key == ord("q"):
        break
    i, rev = next_frame_index(i, mode, rev)
有了这个,我们就有了一个可以无缝播放的简单网络摄像头。

但我们并不止步于此。
添加不同的模式
如果我们的假网络摄像头头像可以做的不仅仅是被动地凝视,那将更有说服力。例如,有时在开会时,你需要点头表示同意、微笑、交谈或做其他事情。
所以我们希望我们的网络摄像头有多种“模式”,我们可以随时通过按下键盘上的一个键来切换。
为此,你需要为每种模式录制一个简短的录音,例如你只是微笑的录音。然后我们可以从每个视频中读取帧,并将它们存储在字典中。当我们检测到按键(例如,“s”切换到“微笑模式”)时,我们将活动模式更改为新模式并开始播放相应视频中的帧。
video_files = [file for file in os.listdir(os.path.join("videos", folder))
               if file not in ["transitions_dict.p", ".DS_Store"]]
frames, frame_rates = {}, {}

for file in video_files:
    mode_name = file.split(".")[0]
    frames[mode_name], frame_rates[mode_name] = read_frames(file, folder)
modes = list(frames.keys())
commands = {mode[0]: mode for mode in modes if mode != "normal"}

mode = "normal"
frame_rate = frame_rates[mode]
rev = False
i = 0
while True:
    frame = frames[mode][i]
    cv2.imshow("Webcam", frame)
    pressed_key = cv2.waitKey(int(1000/frame_rate)) & 0xFF
    if pressed_key == ord("q"):
        break
    for command, new_mode in commands.items():
        if pressed_key == ord(command):
            i, mode, frame_rate = change_mode(mode, new_mode, i)
    i, rev = next_frame_index(i, mode, rev)
默认情况下,这样做是为了切换到指定模式,键盘命令是模式名称的第一个字母。现在我把这个'change_mode'函数作为一个黑盒子,稍后会解释它。

优化过渡
所以我们想从一个视频切换到另一个,比如说从正常模式到点头模式。如何以最佳方式从一个模式过渡到另一个模式(即过渡尽可能平滑)?
当我们进行过渡时,我们希望转到与我们当前所处的最相似的新模式的框架。
为此,我们可以首先定义图像之间的距离度量。这里使用一个简单的欧几里得距离,它查看两个图像的每个像素之间的差异。
有了这个距离,我们现在可以找到最接近我们当前的图像,并切换到这个。例如,如果我们想从普通模式过渡到点头模式,并且我们在普通视频的第 132 帧,我们将知道我们必须转到点头视频的第 86 帧才能获得最平滑的过渡。
我们可以为每一帧以及从每种模式到所有其他模式预先计算所有这些最佳转换。这样我们就不必在每次想要切换模式时都重新计算。还压缩了图像,以便计算执行时间更短。我们还将存储图像之间的最佳距离。
video_files = [file for file in os.listdir(os.path.join("videos", video_folder))
                       if file not in ["transitions_dict.p", ".DS_Store"]]
frames = {}
for file in video_files:
    mode_name = file.split(".")[0]
    frames[mode_name] = read_frames(file, video_folder)
modes = list(frames.keys())

compression_ratio = 10
height, width = frames["normal"][0].shape[:2]
new_height, new_width = height // compression_ratio, width // compression_ratio,

def compress_img(img):
    return cv2.resize(img.mean(axis=2), (new_width, new_height))


frames_compressed = {mode: np.array([compress_img(img) for img in frames[mode]]) for mode in modes}

transitions_dict = {mode:{} for mode in modes}

for i in range(len(modes)):
    for j in tqdm(range(i+1, len(modes))):
        mode_1, mode_2 = modes[i], modes[j]
        diff = np.expand_dims(frames_compressed[mode_1], axis=0) - np.expand_dims(frames_compressed[mode_2], axis=1)
        dists = np.linalg.norm(diff, axis=(2, 3))
        transitions_dict[mode_1][mode_2] = (dists.argmin(axis=0), dists.min(axis=0))
        transitions_dict[mode_2][mode_1] = (dists.argmin(axis=1), dists.min(axis=1))

pickle.dump(transitions_dict, open(os.path.join("videos", video_folder, "transitions_dict.p"), "wb"))
现在可以展示“change_mode”函数,该函数从预先计算的字典中检索要转换到的最佳帧。这样做是为了如果你按下例如“s”切换到微笑模式,再次按下它将切换回正常模式。
def change_mode(current_mode, toggled_mode, i):
    if current_mode == toggled_mode:
        toggled_mode = "normal"

    new_i = transitions_dict[current_mode][toggled_mode][0][i]
    dist = transitions_dict[current_mode][toggled_mode][1][i]

    return new_i, toggled_mode, frame_rates[toggled_mode]
我们还可以添加另一项改进使我们的过渡更加无缝,不是总是立即切换模式,而是等待一段时间以获得更好的过渡。例如,如果我们的头像在点头,我们可以等到头部通过中间位置才转换到正常模式。为此,我们将引入一个时间窗口(这里我将其设置为 0.5 秒),这样我们将在切换模式之前等待在此窗口内转换的最佳时间。
switch_mode_max_delay_in_s = 0.5
def change_mode(current_mode, toggled_mode, i):
    if current_mode == toggled_mode:
        toggled_mode = "normal"

    # Wait for the optimal frame to transition within acceptable window
    max_frames_delay = int(frame_rate * switch_mode_max_delay_in_s)
    global rev
    if rev:
        frames_to_wait = max_frames_delay-1 - transitions_dict[current_mode][toggled_mode][1][max(0, i+1 - max_frames_delay):i+1].argmin()
    else:
        frames_to_wait = transitions_dict[current_mode][toggled_mode][1][i:i + max_frames_delay].argmin()
    print(f"Wait {frames_to_wait} frames before transitioning")
    for _ in range(frames_to_wait):
        i, rev = next_frame_index(i, current_mode, rev)
        frame = frames[mode][i]
        cv2.imshow("Frame", frame)
        cv2.waitKey(int(1000 / frame_rate))
    new_i = transitions_dict[current_mode][toggled_mode][0][i]
    dist = transitions_dict[current_mode][toggled_mode][1][i]

    return new_i, toggled_mode, frame_rates[toggled_mode]
现在我们的过渡更加顺畅。但是,它们有时可能很明显。所以另一个想法是有目的地为视频添加冻结,就像那些在不稳定连接时可能发生的冻结一样(就是如果网络不稳定视频就卡住了),并使用它们来掩盖过渡(我们将使冻结持续时间与两个图像之间的距离成比例)。我们还将添加随机冻结,这样模式就不会变得明显。所以我们添加了这些新的代码:
# In the change_mode function:
    dist = transitions_dict[current_mode][toggled_mode][1][i]
    if freezes:
        freeze_duration = int(transition_freeze_duration_constant * dist)
        cv2.waitKey(freeze_duration)
# In the main loop:
    # Random freezes
    if freezes:
        if np.random.randint(frame_rate * 10) == 1:
            nb_frames_freeze = int(np.random.uniform(0.2, 1.5) * frame_rate)
            for _ in range(nb_frames_freeze):
                cv2.waitKey(int(1000 / frame_rate))
                i, rev = next_frame_index(i, mode, rev)
使用或不使用这些冻结保留为选项。
好的,现在我们已经真正涵盖了这些过渡的基础。我们还能为网络摄像头添加什么?
语音检测
另一件有趣的事情是添加语音检测,这样当我们说话时,视频里的“我”就会说话。
这是使用 pyaudio 完成的。感谢这个 stackoverflow 线程(https://stackoverflow.com/questions/4160175/detect-tap-with-pyaudio-from-live-mic)。
基本上,这个想法是查看一段时间内来自麦克风的声音的平均幅度,如果它足够高,可以认为我们一直在说话。最初这段代码是为了检测敲击噪音,但它也可以很好地检测语音。
AMPLITUDE_THRESHOLD = 0.010
FORMAT = pyaudio.paInt16
SHORT_NORMALIZE = (1.0/32768.0)
CHANNELS = 1
RATE = 44100
INPUT_BLOCK_TIME = 0.025
INPUT_FRAMES_PER_BLOCK = int(RATE*INPUT_BLOCK_TIME)
def get_rms(block):
    count = len(block)/2
    format = "%dh" % count
    shorts = struct.unpack(format, block)

    sum_squares = 0.0
    for sample in shorts:
        n = sample * SHORT_NORMALIZE
        sum_squares += n*n
    return math.sqrt( sum_squares / count )
pa = pyaudio.PyAudio()

stream = pa.open(format=FORMAT,
                 channels=CHANNELS,
                 rate=RATE,
                 input=True,
                 frames_per_buffer=INPUT_FRAMES_PER_BLOCK)
def detect_voice():
    error_count = 0
    voice_detected = False

    try:
        block = stream.read(INPUT_FRAMES_PER_BLOCK, exception_on_overflow=False)
    except (IOError, e):
        error_count += 1
        print("(%d) Error recording: %s" % (error_count, e))

    amplitude = get_rms(block)
    if amplitude > AMPLITUDE_THRESHOLD:
        voice_detected = True
    return voice_detected
现在我们可以将它添加到主循环中。这样做是为了在切换回正常模式之前,我们需要在一定数量的连续帧内检测到没有声音,这样我们就不会太频繁地切换。
# In the main loop:

  if voice_detection:
      if detect_voice():
          quiet_count = 0
          if mode != "talking":
              i, mode, frame_rate = change_mode(mode, "talking", i)
      else:
          if mode == "talking":
              quiet_count += 1
              if quiet_count > stop_talking_threshold:
                  quiet_count = 0
                  i, mode, frame_rate = change_mode(mode, "normal", i)
现在,当我们通过麦克风说话时,我们可以让我们的头像开始和停止说话。我这样做是为了通过按“v”来激活或停用语音检测。

这些都是迄今为止实现的所有功能。欢迎提出进一步改进的建议。
如何使用假网络摄像头
首先,从这里下载所有代码:https://github.com/FrancoisLeRoux1/Fake-webcam
你要做的是录制一些你自己的视频(在我的 Mac 上,为此使用了 Photo Booth 应用程序),并将它们放在“视频”文件夹内的一个新文件夹中。你将能够为不同的设置创建不同的文件夹,例如,你可以在其中穿不同的衬衫,或者让你的头发看起来不同。
这些视频可以而且应该很短(大约 10 秒的视频),否则如果你拍摄较长的视频,计算最佳过渡可能需要很长时间。你需要一个名为“normal”的视频,这将是你的默认模式。
然后,如果你想让你的化身说话,你必须录制一个名为“talking”的视频,你说的是随机的胡言乱语。
在此之后,你可以录制你想要的任何其他模式(例如,“微笑”、“点头”、“再见”……)。默认情况下,激活/停用这些模式的命令将是其名称的第一个字母(例如,对于“微笑”,请按“s”)。
然后你必须计算最佳转换。为此,只需运行脚本 compute-transitions.py

这应该需要几分钟。
然后当你完成后,你就可以启动你的假网络摄像头了。为此,请运行 fake-webcam.py 脚本。你需要指定视频所在的“视频”内的文件夹。你还可以指定是否要使用冻结。


所以现在你应该让你的假相机运行起来。接下来,你可以将其设置为在线会议的网络摄像头。为此,我使用了 OBS:https://obsproject.com/
选择正确的 Python 窗口作为源,然后单击 Start Virtual Camera。

你现在应该可以在你最喜欢的在线会议应用程序中选择此虚拟摄像头作为你的网络摄像头了!
到此这篇关于使用Python为你的在线会议创建一个假的摄像头的文章就介绍到这了,更多相关Python摄像头内容请搜索服务器之家以前的文章或继续浏览下面的相关文章希望大家以后多多支持服务器之家!
原文地址:https://blog.csdn.net/woshicver/article/details/126515965


