在前面的文章中也有关于 HorizontalScrollView 的使用:Android使用HorizontalScrollView实现水平滚动 。
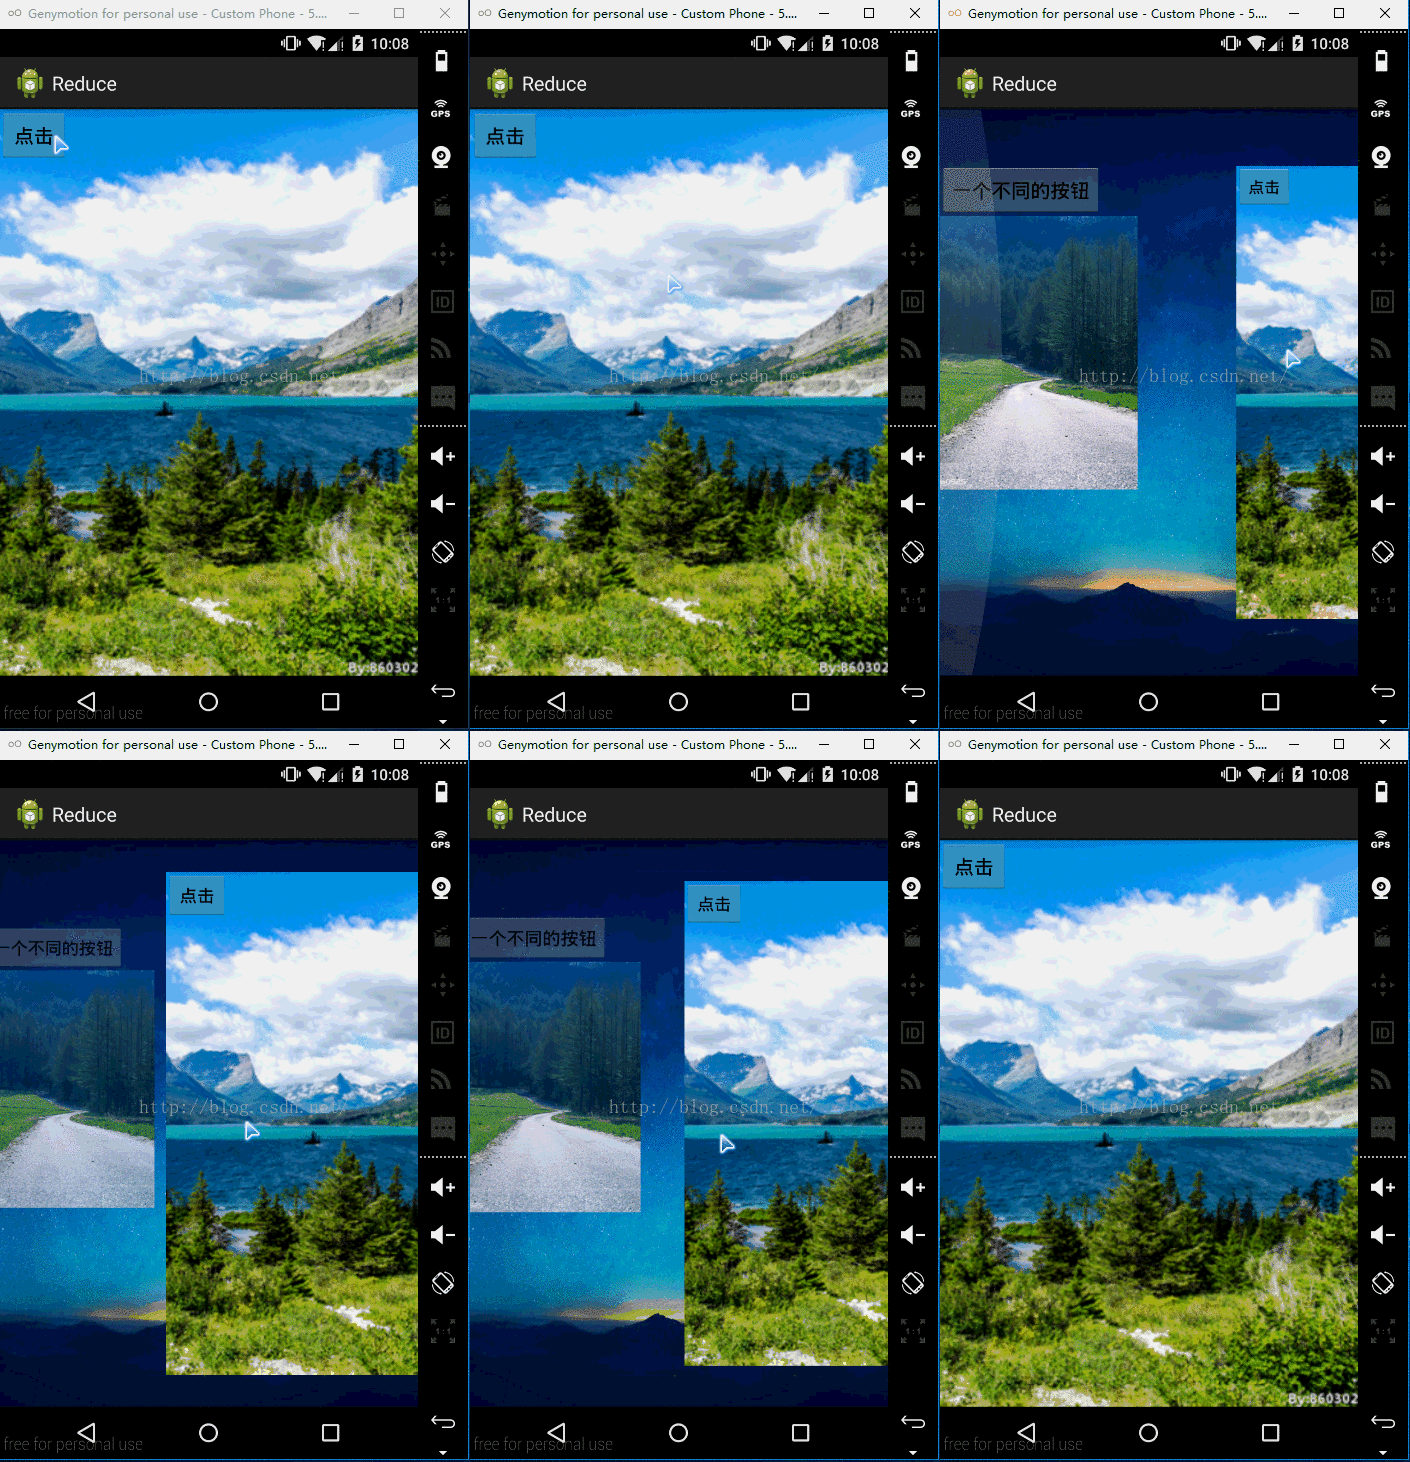
这里主要实现的是向右滑动时,左侧的视图有逐渐放大,也会越来越清晰;向左滑动时,左侧的视图逐渐减小,逐渐变的模糊,且不移出屏幕左边缘的效果。效果如下(可以在主页面上的右侧向右滑动都可以实现该效果):

这里需要用到自定义的 HorizontalScrollView ,让其作为布局文件的根标签。HorizontalScrollView 里面只能有一个子组件,所以要把左侧的视图布局文件包含在 HorizontalScrollView 的子组件里面。
activity_main.xml :
|
1
2
3
4
5
6
7
8
9
10
11
12
13
14
15
16
17
18
19
20
21
22
23
24
25
26
27
28
29
30
|
<com.crazy.reduce.ReduceSideslip xmlns:android="http://schemas.android.com/apk/res/android" xmlns:tools="http://schemas.android.com/tools" android:id="@+id/reduce_lay" android:layout_width="wrap_content" android:layout_height="match_parent" android:background="@drawable/bg" android:scrollbars="none" tools:context="com.crazy.reduce.MainActivity" > <LinearLayout android:layout_width="wrap_content" android:layout_height="match_parent" android:orientation="horizontal" > <include layout="@layout/item" /> <LinearLayout android:layout_width="match_parent" android:layout_height="match_parent" android:background="@drawable/bg_01" > <Button android:layout_width="wrap_content" android:layout_height="wrap_content" android:onClick="toggleMenu" android:text="点击" /> </LinearLayout> </LinearLayout> </com.crazy.reduce.ReduceSideslip> |
在 item.xml 布局文件的右边有个 button 按钮,这些都在 HorizontalScrollView 的子组件当中。而 item.xml 究竟是怎样的布局也都不会影响到整个的滑动。
item.xml :
|
1
2
3
4
5
6
7
8
9
10
11
12
13
14
15
16
17
18
19
20
21
22
23
24
25
26
27
28
|
<?xml version="1.0" encoding="utf-8"?><RelativeLayout xmlns:android="http://schemas.android.com/apk/res/android" android:layout_width="match_parent" android:layout_height="match_parent" > <LinearLayout android:layout_width="match_parent" android:layout_height="wrap_content" android:layout_centerHorizontal="true" android:orientation="vertical" > <Button android:id="@+id/bt_b" android:layout_width="wrap_content" android:layout_height="wrap_content" android:layout_marginTop="50dp" android:text="一个不同的按钮" /> <ImageView android:id="@+id/img" android:layout_width="wrap_content" android:layout_height="match_parent" android:scaleType="centerCrop" android:src="@drawable/bg_03" /> </LinearLayout> </RelativeLayout> |
MainActivity.java :
|
1
2
3
4
5
6
7
8
9
10
11
12
13
14
15
16
17
18
19
20
21
22
|
package com.crazy.reduce; import android.app.Activity;import android.os.Bundle;import android.view.View; public class MainActivity extends Activity { private ReduceSideslip rs; @Override protected void onCreate(Bundle savedInstanceState) { super.onCreate(savedInstanceState); setContentView(R.layout.activity_main); rs = (ReduceSideslip)findViewById(R.id.reduce_lay); } public void toggleMenu(View v) { rs.reduce(); }} |
自定义的 ReduceSideslip.java : 需要 nineoldandroids-2.4.0.jar 包,其下载地址
|
1
2
3
4
5
6
7
8
9
10
11
12
13
14
15
16
17
18
19
20
21
22
23
24
25
26
27
28
29
30
31
32
33
34
35
36
37
38
39
40
41
42
43
44
45
46
47
48
49
50
51
52
53
54
55
56
57
58
59
60
61
62
63
64
65
66
67
68
69
70
71
72
73
74
75
76
77
78
79
80
81
82
83
84
85
86
87
88
89
90
91
92
93
94
95
96
97
98
99
100
101
102
103
104
105
106
107
108
109
110
111
112
113
114
115
116
117
118
119
120
121
122
123
|
package com.crazy.reduce; import android.content.Context;import android.util.AttributeSet;import android.view.MotionEvent;import android.view.ViewGroup;import android.widget.FrameLayout;import android.widget.HorizontalScrollView;import android.widget.LinearLayout; import com.nineoldandroids.view.ViewHelper; public class ReduceSideslip extends HorizontalScrollView { private int mScreenWidth; // 屏幕宽度 private int mMnuRightPadding = 300; private int mMenuWidth; // 视图宽度(左边的视图) private int mHalfMenuWidth; private boolean isOpen; // 标记菜单是否打开 private boolean once; // 是否已经初始化回收菜单 private ViewGroup mMenu; // 左边的视图 private ViewGroup mContent; // 右边的视图 public ReduceSideslip(Context context, AttributeSet attrs) { super(context, attrs); mScreenWidth = context.getResources().getDisplayMetrics().widthPixels; } @Override protected void onMeasure(int widthMeasureSpec, int heightMeasureSpec) { if (!once) { // 要与布局文件当中的一致 LinearLayout temp = (LinearLayout)getChildAt(0); mMenu = (ViewGroup)temp.getChildAt(0); mContent = (ViewGroup)temp.getChildAt(1); mMenuWidth = mScreenWidth - mMnuRightPadding; mHalfMenuWidth = mMenuWidth/2; mMenu.getLayoutParams().width = mMenuWidth; mContent.getLayoutParams().width = mScreenWidth; } super.onMeasure(widthMeasureSpec, heightMeasureSpec); } // 在视图计算完自身及子视图的宽高后,重新排版 @Override protected void onLayout(boolean changed, int l, int t, int r, int b) { super.onLayout(changed, l, t, r, b); if (changed) { // 隐藏菜单 this.scrollTo(mMenuWidth, 0); once = true; } } public void reduce(){ if (isOpen) { closeMenu(); } else { openMenu(); } } private void openMenu() { if (isOpen) { return; } // 和 scrollTo() 相似,但是要缓和些, // 不像 scrollTo() 直接移动过去 this.smoothScrollTo(0, 0); isOpen = true; } private void closeMenu() { if (isOpen) { this.smoothScrollTo(mMenuWidth, 0); isOpen = false; } } @Override public boolean onTouchEvent(MotionEvent ev) { switch (ev.getAction()){ case MotionEvent.ACTION_UP: // 松开手 int scrollX = getScrollX(); // 水平滑动的距离 if (scrollX > mHalfMenuWidth) { this.smoothScrollTo(mMenuWidth, 0); isOpen = false; } else { this.smoothScrollTo(0, 0); isOpen = true; } return true; } return super.onTouchEvent(ev); } @Override protected void onScrollChanged(int l, int t, int oldl, int oldt) { super.onScrollChanged(l, t, oldl, oldt); // 左右视图切换时的渐变范围 (注意是 l 不是1(一)) float scale = l*1.0f/mMenuWidth; // 范围值 (0, 1) float leftScale = 1- 0.3f*scale; // 范围值(0.7, 1) float rightScale = 0.8f + 0.2f*scale; // 范围值 (0.8, 1) ViewHelper.setScaleX(mMenu, leftScale); ViewHelper.setScaleY(mMenu, leftScale); // 往右滑动时,左边的视图逐渐变亮 ViewHelper.setAlpha(mMenu, 0.6f + 0.4f * (1 - scale)); // (0.6, 1) // 往左滑动时,左边的视图不用移除屏幕左边界(可以不要) ViewHelper.setTranslationX(mMenu, mMenuWidth * scale * 0.7f); ViewHelper.setScaleX(mContent, rightScale); ViewHelper.setScaleY(mContent, rightScale); }} |
以上就是本文的全部内容,希望对大家的学习有所帮助,也希望大家多多支持服务器之家。
原文链接:https://blog.csdn.net/antimage08/article/details/50527268


