爬取xxx天气
爬取网址:https://tianqi.2345.com/today-60038.htm
安装
|
1
|
pip install scrapy |
我使用的版本是scrapy 2.5
创建scray爬虫项目
在命令行如下输入命令
|
1
|
scrapy startproject name |
name为项目名称
如,scrapy startproject spider_weather
之后再输入
|
1
|
scrapy genspider spider_name 域名 |
如,scrapy genspider changshu tianqi.2345.com
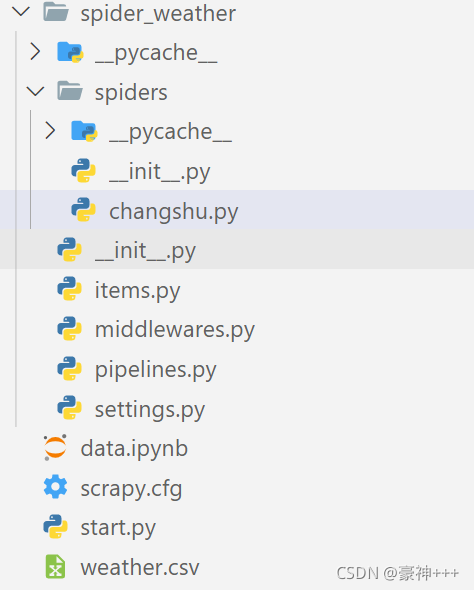
查看文件夹
- spider_weather
- spider
- __init__.py
- changshu.py
- __init__.py
- items.py
- middlewares.py
- pipelines.py
- settings.py
- scrapy.cfg

文件说明
| 名称 | 作用 |
|---|---|
| scrapy.cfg | 项目的配置信息,主要为Scrapy命令行工具提供一个基础的配置信息。(真正爬虫相关的配置信息在settings.py文件中) |
| items.py | 设置数据存储模板,用于结构化数据,如:Django的Model |
| pipelines | 数据处理行为,如:一般结构化的数据持久化 |
| settings.py | 配置文件,如:递归的层数、并发数,延迟下载等 |
| spiders | 爬虫目录,如:创建文件,编写爬虫规则 |
开始爬虫
1.在spiders文件夹里面对自己创建的爬虫文件进行数据爬取、如在此案例中的spiders/changshu.py
代码演示如下
|
1
2
3
4
5
6
7
8
9
10
11
12
13
14
15
16
17
18
19
20
21
22
|
import scrapyclass ChangshuSpider(scrapy.Spider): name = 'changshu' allowed_domains = ['tianqi.2345.com'] start_urls = ['https://tianqi.2345.com/today-60038.htm'] def parse(self, response): # 日期、天气状态、温度、风级 # 利用xpath解析数据、不会xpath的同学可以去稍微学习一下,语法简单 dates = response.xpath('//a[@class="seven-day-item "]/em/text()').getall() states = response.xpath('//a[@class="seven-day-item "]/i/text()').getall() temps = response.xpath('//a[@class="seven-day-item "]/span[@class="tem-show"]/text()').getall() winds = response.xpath('//a[@class="seven-day-item "]/span[@class="wind-name"]/text()').getall() # 返回每条数据 for date, state, temp, wind in zip(dates,states,temps,winds): yield { 'date' : date, 'state': state, 'temp': temp, 'wind': wind } |
2.在settings.py文件中进行配置
修改UA
|
1
|
USER_AGENT = 'Mozilla/5.0 (Windows NT 10.0; Win64; x64) AppleWebKit/537.36 (KHTML, like Gecko) Chrome/95.0.4638.69 Safari/537.36' |
修改机器爬虫配置
|
1
|
ROBOTSTXT_OBEY = False |
整个文件如下:
|
1
2
3
4
5
6
7
8
9
10
11
12
13
14
15
16
17
18
19
20
21
22
23
24
25
26
27
28
29
30
31
32
33
34
35
36
37
38
39
40
41
42
43
44
45
46
47
48
49
50
51
52
53
54
55
56
57
58
59
60
61
62
63
64
65
66
67
68
69
70
71
72
73
74
75
76
77
78
79
80
81
82
83
84
85
86
87
88
|
# Scrapy settings for spider_weather project## For simplicity, this file contains only settings considered important or# commonly used. You can find more settings consulting the documentation:## https://docs.scrapy.org/en/latest/topics/settings.html# https://docs.scrapy.org/en/latest/topics/downloader-middleware.html# https://docs.scrapy.org/en/latest/topics/spider-middleware.htmlBOT_NAME = 'spider_weather'SPIDER_MODULES = ['spider_weather.spiders']NEWSPIDER_MODULE = 'spider_weather.spiders'# Crawl responsibly by identifying yourself (and your website) on the user-agentUSER_AGENT = 'Mozilla/5.0 (Windows NT 10.0; Win64; x64) AppleWebKit/537.36 (KHTML, like Gecko) Chrome/95.0.4638.69 Safari/537.36'# Obey robots.txt rulesROBOTSTXT_OBEY = False# Configure maximum concurrent requests performed by Scrapy (default: 16)#CONCURRENT_REQUESTS = 32# Configure a delay for requests for the same website (default: 0)# See https://docs.scrapy.org/en/latest/topics/settings.html#download-delay# See also autothrottle settings and docs#DOWNLOAD_DELAY = 3# The download delay setting will honor only one of:#CONCURRENT_REQUESTS_PER_DOMAIN = 16#CONCURRENT_REQUESTS_PER_IP = 16# Disable cookies (enabled by default)#COOKIES_ENABLED = False# Disable Telnet Console (enabled by default)#TELNETCONSOLE_ENABLED = False# Override the default request headers:#DEFAULT_REQUEST_HEADERS = {# 'Accept': 'text/html,application/xhtml+xml,application/xml;q=0.9,*/*;q=0.8',# 'Accept-Language': 'en',#}# Enable or disable spider middlewares# See https://docs.scrapy.org/en/latest/topics/spider-middleware.html#SPIDER_MIDDLEWARES = {# 'spider_weather.middlewares.SpiderWeatherSpiderMiddleware': 543,#}# Enable or disable downloader middlewares# See https://docs.scrapy.org/en/latest/topics/downloader-middleware.html#DOWNLOADER_MIDDLEWARES = {# 'spider_weather.middlewares.SpiderWeatherDownloaderMiddleware': 543,#}# Enable or disable extensions# See https://docs.scrapy.org/en/latest/topics/extensions.html#EXTENSIONS = {# 'scrapy.extensions.telnet.TelnetConsole': None,#}# Configure item pipelines# See https://docs.scrapy.org/en/latest/topics/item-pipeline.html# ITEM_PIPELINES = {# 'spider_weather.pipelines.SpiderWeatherPipeline': 300,# }# Enable and configure the AutoThrottle extension (disabled by default)# See https://docs.scrapy.org/en/latest/topics/autothrottle.html#AUTOTHROTTLE_ENABLED = True# The initial download delay#AUTOTHROTTLE_START_DELAY = 5# The maximum download delay to be set in case of high latencies#AUTOTHROTTLE_MAX_DELAY = 60# The average number of requests Scrapy should be sending in parallel to# each remote server#AUTOTHROTTLE_TARGET_CONCURRENCY = 1.0# Enable showing throttling stats for every response received:#AUTOTHROTTLE_DEBUG = False# Enable and configure HTTP caching (disabled by default)# See https://docs.scrapy.org/en/latest/topics/downloader-middleware.html#httpcache-middleware-settings#HTTPCACHE_ENABLED = True#HTTPCACHE_EXPIRATION_SECS = 0#HTTPCACHE_DIR = 'httpcache'#HTTPCACHE_IGNORE_HTTP_CODES = []#HTTPCACHE_STORAGE = 'scrapy.extensions.httpcache.FilesystemCacheStorage' |
3.然后在命令行中输入如下代码
|
1
|
scrapy crawl changshu -o weather.csv |
注意:需要进入spider_weather路径下运行
scrapy crawl 文件名 -o weather.csv(导出文件)
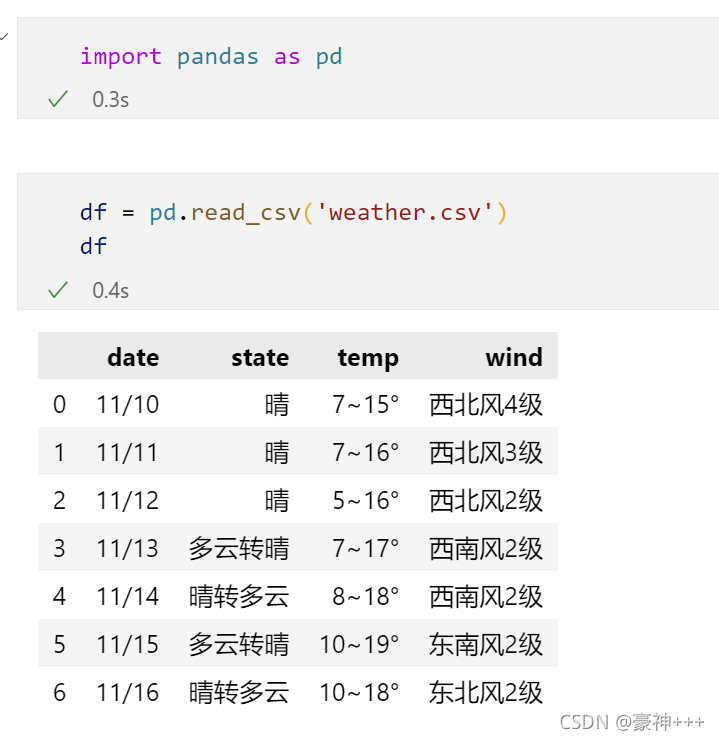
4.结果如下

补充:scrapy导出csv时字段的一些问题
scrapy -o csv格式输出的时候,发现输出文件中字段的顺序不是按照items.py中的顺序,也不是爬虫文件中写入的顺序,这样导出的数据因为某些字段变得不好看,此外,导出得csv文件不同的item之间被空行隔开,本文主要描述解决这些问题的方法。
1.字段顺序问题:
需要在scrapy的spiders同层目录,新建csv_item_exporter.py文件内容如下(文件名可改,目录定死)
|
1
2
3
4
5
6
7
8
9
10
11
|
from scrapy.conf import settingsfrom scrapy.contrib.exporter import CsvItemExporterclass MyProjectCsvItemExporter(CsvItemExporter):def init(self, *args, **kwargs):delimiter = settings.get(‘CSV_DELIMITER', ‘,')kwargs[‘delimiter'] = delimiterfields_to_export = settings.get(‘FIELDS_TO_EXPORT', [])if fields_to_export :kwargs[‘fields_to_export'] = fields_to_exportsuper(MyProjectCsvItemExporter, self).init(*args, **kwargs) |
2)在settings.py中新增以下内容
|
1
2
3
4
5
6
7
8
9
10
11
12
|
#定义输出格式FEED_EXPORTERS = {‘csv': ‘project_name.spiders.csv_item_exporter.MyProjectCsvItemExporter',}#指定csv输出字段的顺序FIELDS_TO_EXPORT = [‘name',‘title',‘info']#指定分隔符CSV_DELIMITER = ‘,' |
设定完毕,执行scrapy crawl spider -o spider.csv的时候,字段就按顺序来了
2.输出csv有空行的问题
此时你可能会发现csv文件中有空行,这是因为scrapy默认输出时,每个item之间的分隔符是空行
解决办法:
在找到exporters.py的CsvItemExporter类,大概在215行中增加newline="",即可。
也可以继承重写CsvItemExporter类
总结
到此这篇关于使用python scrapy爬取天气并导出csv文件的文章就介绍到这了,更多相关scrapy爬取天气导出csv内容请搜索服务器之家以前的文章或继续浏览下面的相关文章希望大家以后多多支持服务器之家!
原文链接:https://blog.csdn.net/qq_42025868/article/details/121245980


