楔子
Python 有一个第三方模块叫 psutil,专门用来获取操作系统以及硬件相关的信息,比如:CPU、磁盘、网络、内存等等。下面来看一下它的用法,不过在使用之前需要先安装,直接 pip install psutil 即可。
CPU 相关
获取 CPU 的逻辑核心数量
|
1
2
3
4
5
6
|
import psutilprint(psutil.cpu_count()) # 12# 或者使用 multiprocessingimport multiprocessingprint(multiprocessing.cpu_count()) # 12 |
获取 CPU 的物理核心数量
|
1
2
|
import psutilprint(psutil.cpu_count(logical=False)) # 6 |
结果为 6,说明是 6 核超线程;如果 CPU 的物理核心数和逻辑核心数相等,也为 12,则说明是 12 核非超线程。
统计 CPU 的用户/系统/空闲时间
|
1
2
3
4
5
6
7
8
9
10
11
12
13
|
import psutilprint(psutil.cpu_times())"""scputimes(user=84732.10937499999, system=37132.85937500023, idle=2003964.1249999998, interrupt=3500.765625, dpc=1089.6875)"""# 还有一个 psutil.cpu_times_percent() # 功能与之类似, 只不过返回的是比例 |
该函数返回的是一个 namedtuple,后面凡是结构长的和这里类似的,都是 namedtuple。补充一下,如果你的程序中需要创建大量的对象,并且该对象的属性固定不变,那么不妨使用 namedtuple,相比使用字典,能节省大量空间。
查看 CPU 的使用率
|
1
2
3
4
5
6
7
8
9
10
11
12
13
|
import psutilfor x in range(3): # interval:表示每隔 0.5s 刷新一次 # percpu:为 True 表示查看所有的 cpu 使用率 print(psutil.cpu_percent(interval=0.5, percpu=True))"""[9.1, 3.1, 12.5, 3.1, 15.6, 0.0, 6.2, 0.0, 12.5, 50.0, 9.4, 3.1][9.1, 6.2, 12.5, 6.2, 3.1, 0.0, 0.0, 3.1, 0.0, 15.6, 3.1, 0.0][0.0, 0.0, 15.6, 0.0, 6.2, 0.0, 6.2, 25.0, 3.1, 9.4, 6.2, 0.0]"""# 我这里 cpu 的逻辑数量是 12# 所以每个列表里面有 12 个元素 |
查看 CPU 的统计信息
包括上下文切换、中断、软中断,以及系统调用次数等等。
|
1
2
3
4
5
6
7
8
9
|
import psutilprint(psutil.cpu_stats())"""scpustats(ctx_switches=3346512902, interrupts=2288572793, soft_interrupts=0, syscalls=3324041552)""" |
查看 CPU 的频率
|
1
2
3
4
5
6
|
import psutilprint(psutil.cpu_freq())"""scpufreq(current=2208.0, min=0.0, max=2208.0)""" |
内存相关
查看内存使用情况
|
1
2
3
4
5
6
7
8
9
10
|
import psutilprint(psutil.virtual_memory())"""svmem(total=17029259264, available=7698505728, percent=54.8, used=9330753536, free=7698505728)""" |
total 表示总内存,available 表示可用内存,percent 表示内存使用率,used 表示已使用的内存,free 表示可用内存。
所以 available 加上 used 等于 total,used 除以 total 再乘以 100 等于 percent。
查看交换内存信息
|
1
2
3
4
5
6
7
8
9
10
11
|
import psutilprint(psutil.swap_memory())"""sswap(total=3087007744, used=4509839360, free=-1422831616, percent=146.1, sin=0, sout=0)""" |
说到内存,有物理内存、交换内存、虚拟内存,这三者有什么区别呢?用大白话解释就是:
1)物理内存是实际的内存条提供的临时数据存储空间,在 Windows 上右键点击计算机,再点击属性时,上面显示的安装内存(RAM)就是电脑的物理内存。这些内存是实际存在的,在你不给机器增加内存条的时候是不会改变的。
2)交换内存通常在页面调度和交换进程数据时使用,相当于在进行内存整理的时候,会先把部分数据放在硬盘的某块区域。类似我们整理衣柜,衣服一多直接整理会很麻烦,因此会先把部分衣服拿出来放在其它地方,等衣柜里的衣服整理完了,再把放在其它地方的衣服拿回来。
这个其它地方在计算机中则代表硬盘的某块区域,也就是我们所说的交换区。通常使用交换内存是因为物理内存不足导致的,正所谓衣柜,如果足够大的话就没必要拿出部分衣服放在其它地方, 直接在衣柜里就能解决了。
3)最后是虚拟内存,当操作文件,可执行程序等等,那么首先要把它们从磁盘读取到内存中,因此 CPU 除了自己那一部分小小的空间外,要想操作数据,只能操作内存里的数据。
但是当内存不够了,那么会在硬盘上开辟一份虚拟内存,将物理内存里的部分数据放在虚拟内存当中。硬盘的空间很大,即使普通电脑安装的固态硬盘也有一百个 G,因此可以拿出一部分充当虚拟内存。
不过虚拟内存虽说是内存,但毕竟在硬盘上,速度和 CPU 直接从物理内存里读取数据相差甚远。这也是为什么要将经常被访问的热点数据放在 Redis 缓存里,而不是放在硬盘或者数据库上。
磁盘相关
查看磁盘分区、磁盘使用率和磁盘 IO 信息
|
1
2
3
4
5
6
7
8
|
import psutilprint(psutil.disk_partitions())"""[sdiskpart(device='C:\\', mountpoint='C:\\', fstype='NTFS', opts='rw,fixed', maxfile=255, maxpath=260), sdiskpart(device='D:\\', mountpoint='D:\\', fstype='NTFS', opts='rw,fixed', maxfile=255, maxpath=260), sdiskpart(device='E:\\', mountpoint='E:\\', fstype='NTFS', opts='rw,fixed', maxfile=255, maxpath=260)]""" |
可以看到一共有三个盘符,fstype 表示文件系统类型,这里是 NTFS;opts 中的 rw 表示可读写。
该函数还可以接收一个参数 all,默认为 False。如果指定为 True,在 Linux 上返回的内容还会包含 /proc 等特殊文件系统的挂载信息。由于我这里是 Windows,所以两者没区别。
查看某个磁盘使用情况
|
1
2
3
4
5
6
7
8
9
|
import psutilprint(psutil.disk_usage("C:\\"))"""sdiskusage(total=267117391872, used=96894304256, free=170223087616, percent=36.3)""" |
查看磁盘 IO 统计信息
|
1
2
3
4
5
6
7
8
9
10
11
|
import psutilprint(psutil.disk_io_counters())"""sdiskio(read_count=1172461, write_count=2153031, read_bytes=36854982144, write_bytes=52718300160, read_time=551, write_time=1437)""" |
- read_count :读次数
- write_count:写次数
- read_bytes:读的字节数
- write_bytes:写的字节数
- read_time:读时间
- write_time:写时间
以上返回的是所有磁盘加起来的统计信息,我们可以指定 perdisk=True,分别列出每一个分区的统计信息。
网络相关
查看网卡的网络 IO 统计信息
|
1
2
3
4
5
6
7
8
9
10
11
12
13
14
15
16
17
18
19
20
21
22
23
24
25
26
27
28
29
30
31
32
33
34
35
36
37
38
39
40
41
42
43
44
45
46
47
48
49
50
51
52
53
54
55
|
import psutilprint(psutil.net_io_counters())"""snetio(bytes_sent=175995567, bytes_recv=2849015622, packets_sent=1052206, packets_recv=3050302, errin=0, errout=0, dropin=3491, dropout=0)"""# bytes_sent: 发送的字节数# bytes_recv: 接收的字节数# packets_sent: 发送的包数据量# packets_recv: 接收的包数据量# errin: 接收包时, 出错的次数# errout: 发送包时, 出错的次数# dropin: 接收包时, 丢弃的次数# dropout: 发送包时, 丢弃的次数# 里面还有一个 pernic 参数# 如果为 True, 则列出所有网卡的信息print(psutil.net_io_counters(pernic=True))"""{'以太网': snetio(bytes_sent=178716616, bytes_recv=2866823348, packets_sent=1058190, packets_recv=3102852, errin=0, errout=0, dropin=3491, dropout=0), 'WLAN': snetio(bytes_sent=0, bytes_recv=0, packets_sent=0, packets_recv=0, errin=0, errout=0, dropin=0, dropout=0), '本地连接* 3': snetio(bytes_sent=0, bytes_recv=0, packets_sent=0, packets_recv=0, errin=0, errout=0, dropin=0, dropout=0), '本地连接* 4': snetio(bytes_sent=0, bytes_recv=0, packets_sent=0, packets_recv=0, errin=0, errout=0, dropin=0, dropout=0), '蓝牙网络连接': snetio(bytes_sent=0, bytes_recv=0, packets_sent=0, packets_recv=0, errin=0, errout=0, dropin=0, dropout=0), 'Loopback Pseudo-Interface 1': snetio(bytes_sent=0, bytes_recv=0, packets_sent=0, packets_recv=0, errin=0, errout=0, dropin=0, dropout=0)}""" |
查看网络接口信息
|
1
2
3
4
5
6
7
8
9
10
11
12
13
14
15
16
17
18
19
20
21
22
23
24
25
26
27
28
29
30
31
32
33
34
35
36
37
38
39
40
41
42
43
44
45
46
|
import psutil# 以字典的形式返回网卡的配置信息# 包括 IP 地址、Mac地址、子网掩码、广播地址等等print(psutil.net_if_addrs())"""{'以太网': [ snicaddr(family=<AddressFamily.AF_LINK: -1>, address='9C-7B-EF-15-FC-2F', netmask=None, broadcast=None, ptp=None), snicaddr(family=<AddressFamily.AF_INET: 2>, address='192.168.4.150', netmask='255.255.240.0', broadcast=None, ptp=None), snicaddr(family=<AddressFamily.AF_INET6: 23>, address='fe80::4826:a6a6:b5f4:3647', netmask=None, broadcast=None, ptp=None)], 'WLAN': [...], '本地连接* 3': [...], '本地连接* 4': [...], '蓝牙网络连接': [...], 'Loopback Pseudo-Interface 1': [...]}"""# 返回网卡的详细信息, 包括是否启动、通信类型、传输速度、mtuprint(psutil.net_if_stats())"""{'以太网': snicstats(isup=True, duplex=<NicDuplex.NIC_DUPLEX_FULL: 2>, speed=1000, mtu=1500), '蓝牙网络连接': snicstats(isup=False, duplex=<NicDuplex.NIC_DUPLEX_FULL: 2>, speed=3, mtu=1500), 'Loopback Pseudo-Interface 1': snicstats(isup=True, duplex=<NicDuplex.NIC_DUPLEX_FULL: 2>, speed=1073, mtu=1500), 'WLAN': snicstats(isup=False, duplex=<NicDuplex.NIC_DUPLEX_FULL: 2>, speed=0, mtu=1500), '本地连接* 3': snicstats(isup=False, duplex=<NicDuplex.NIC_DUPLEX_FULL: 2>, speed=0, mtu=1500), '本地连接* 4': snicstats(isup=False, duplex=<NicDuplex.NIC_DUPLEX_FULL: 2>, speed=0, mtu=1500)}""" |
查看当前机器的网络连接
|
1
2
3
4
5
6
7
8
9
10
11
12
13
14
15
16
17
18
19
20
21
22
23
24
25
|
import psutil# 以列表的形式返回每个网络连接的详细信息# 里面接受一个参数, 默认是 "inet"# 当然我们也可以指定为其它, 比如 "tcp"print(psutil.net_connections())"""[sconn(fd=-1, family=<AddressFamily.AF_INET: 2>, type=<SocketKind.SOCK_DGRAM: 2>, laddr=addr(ip='192.168.4.150', port=137), raddr=(), status='NONE', pid=4), sconn(fd=-1, family=<AddressFamily.AF_INET: 2>, type=<SocketKind.SOCK_DGRAM: 2>, laddr=addr(ip='127.0.0.1', port=54872), raddr=(), status='NONE', pid=11652), sconn(fd=-1, family=<AddressFamily.AF_INET: 2>, type=<SocketKind.SOCK_STREAM: 1>, laddr=addr(ip='192.168.4.150', port=11253), raddr=addr(ip='117.50.19.136', port=80), status='CLOSE_WAIT', pid=11568), .... .... ....]""" |
是不是很方便呢?在 Linux 中有两个命令可以做到这一点,分别是 netstat 和 ss。另外该函数会返回所有的连接信息,所以当连接数很多的时候,会占用较高的内存。
查看当前登录的用户信息
|
1
2
3
4
5
6
7
|
import psutilprint(psutil.users())"""[suser(name='satori', terminal=None, host='0.0.0.0', started=1609841661.0, pid=None)]""" |
查看系统的启动时间
|
1
2
3
4
5
6
7
|
import psutilfrom datetime import datetimeprint(psutil.boot_time()) # 1654012221.2945454print( datetime.fromtimestamp(psutil.boot_time())) # 2022-05-31 23:50:21.294545 |
进程管理
psutil 还提供了很多和进程管理相关的功能函数,非常的丰富,我们来看一下。
查看当前存在的所有进程的 pid
|
1
2
3
4
5
6
|
import psutilprint(psutil.pids())"""[0, 4, 148, 532, 668, 796, 904, 912, 976, ...]""" |
查看某个进程是否存在
|
1
2
3
4
|
import psutilprint(psutil.pid_exists(22333)) # Falseprint(psutil.pid_exists(532)) # True |
返回所有进程(Process)对象组成的迭代器
|
1
2
3
4
5
6
7
8
9
|
import psutilprint(psutil.process_iter())"""<generator object process_iter at 0x000...>"""# 遍历的话,会得到每一个进程对象# 进程对象在 psutil 里面的类型是 Process |
根据 pid 获取一个进程对应的 Process 对象
|
1
2
3
4
5
6
7
8
9
|
import psutilprint(psutil.Process(14124))"""psutil.Process(pid=14124, name='WeChat.exe', status='running', started='10:54:43')"""# 进程名称是 WeChat.exe,状态为运行中# 启动时间是早上 10 点 54 分 |
进程管理操作
我们说根据 pid 可以获取一个进程对应的 Process 对象,而这个对象里面包含了该进程的全部信息。
|
1
2
3
4
5
6
7
8
9
10
11
12
13
14
15
16
17
18
19
20
21
22
23
24
25
26
27
28
29
30
31
32
33
34
35
36
37
38
39
40
41
42
43
44
45
46
47
48
49
50
51
52
53
54
55
56
57
58
59
60
61
62
63
64
65
66
67
68
69
70
71
72
73
74
75
76
77
78
79
80
81
82
83
84
85
86
87
88
89
90
91
92
93
94
95
96
97
98
99
100
101
102
103
104
105
106
107
108
109
110
111
112
113
114
115
116
117
118
119
120
121
122
123
124
125
126
127
128
129
130
131
132
133
134
135
136
137
138
139
140
141
142
|
import psutilp = psutil.Process(14124)# 进程名称print(p.name())"""WeChat.exe"""# 进程的exe路径print(p.exe())"""D:\WeChat\WeChat.exe"""# 进程的工作目录print(p.cwd())"""D:\WeChat"""# 进程启动的命令行print(p.cmdline())"""['D:\\WeChat\\WeChat.exe']"""# 当前进程idprint(p.pid)"""14124"""# 父进程idprint(p.ppid())"""8860"""# 父进程print(p.parent())"""psutil.Process(pid=8860, name='explorer.exe', status='running', started='10:53:58')"""# 子进程列表print(p.children())"""[psutil.Process(pid=6852, name='WechatBrowser.exe', status='running', started='10:54:59'), psutil.Process(pid=1960, name='WeChatPlayer.exe', status='running', started='10:54:59'), psutil.Process(pid=10432, name='WeChatApp.exe', status='running', started='10:55:33')]"""# 进程状态print(p.status())"""running"""# 进程用户名print(p.username())"""LAPTOP-264ORES3\satori"""# 进程创建时间,返回时间戳print(p.create_time())"""1654570483.2370846"""# 进程终端# 在windows上无法使用try: print(p.terminal())except Exception as e: print(e)"""'Process' object has no attribute 'terminal'"""# 进程使用的cpu时间print(p.cpu_times())"""pcputimes(user=27.8125, system=13.484375, children_user=0.0, children_system=0.0)"""# 进程所使用的的内存print(p.memory_info())"""pmem(rss=110141440, vms=116899840, num_page_faults=661356, peak_wset=221048832, wset=110141440, peak_paged_pool=834824, paged_pool=806216, peak_nonpaged_pool=144584, nonpaged_pool=78560, pagefile=116899840, peak_pagefile=197505024, private=116899840)"""# 进程打开的文件print(p.open_files())# 进程相关的网络连接print(p.connections())"""[pconn(fd=-1, family=<AddressFamily.AF_INET: 2>, type=<SocketKind.SOCK_STREAM: 1>, laddr=addr(ip='192.168.4.150', port=7693), raddr=addr(ip='58.251.111.106', port=8080), status='ESTABLISHED'), pconn(fd=-1, family=<AddressFamily.AF_INET: 2>, type=<SocketKind.SOCK_STREAM: 1>, laddr=addr(ip='127.0.0.1', port=8680), raddr=(), status='LISTEN')]"""# 进程内的线程数量,这个进程开启了多少个线程print(p.num_threads()) # 58# 这个进程内的所有线程信息print(p.threads())"""[pthread(id=14128, user_time=11.3125, system_time=7.578125), pthread(id=13428, user_time=0.0, system_time=0.0), pthread(id=13616, user_time=0.0, system_time=0.0), pthread(id=13600, user_time=0.015625, system_time=0.328125), pthread(id=7364, user_time=0.078125, system_time=0.015625), ... ]"""# 进程的环境变量print(p.environ())# 结束进程# 执行之后微信就会被强制关闭, 这里就不试了# p.terminal() |
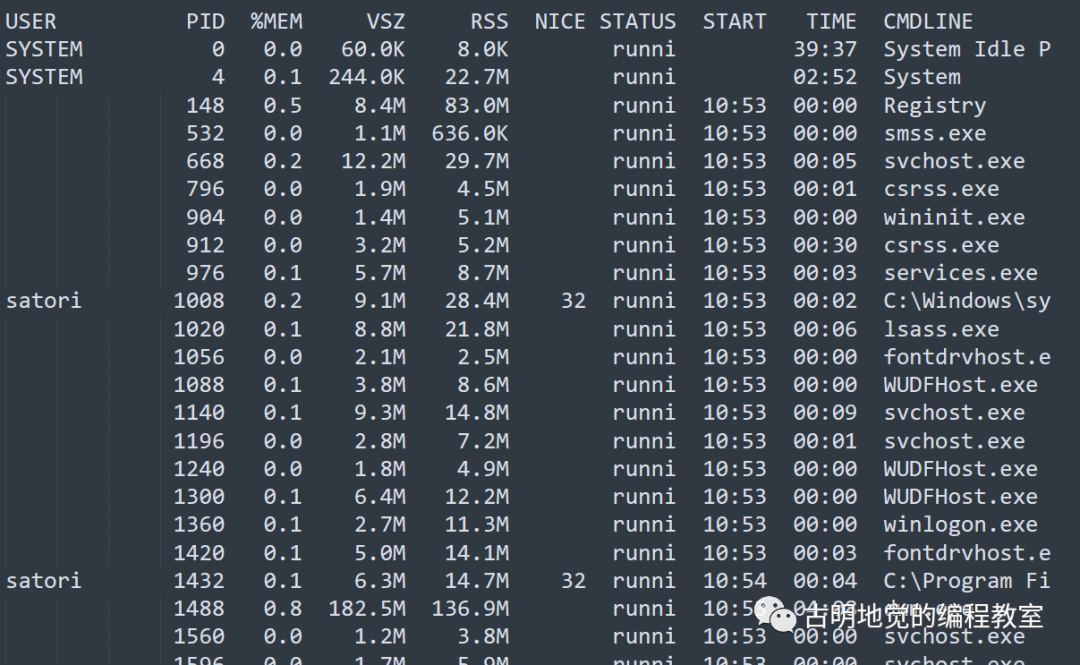
我们还可以调用 psutil.test 来模拟 ps 命令。
|
1
2
3
|
import psutilpsutil.test() |
输出如下:

它是怎么做的呢?还记得我们之前说的 process_iter 吗?会返回所有进程的 Process 对象,直接依次输出里面的信息即可。同理,我们也可以通过 process_iter 找到某一个进程对应的进程 id。
|
1
2
3
4
5
6
7
8
9
|
import psutilfor prcs in psutil.process_iter(): if prcs.name().lower() == "wechat.exe": print(prcs)"""psutil.Process(pid=14124, name='WeChat.exe', status='running', started='10:54:43')""" |
有了这个操作之后,我们便可以找到对应的进程,然后借助操作系统的 kernal 修改进程内部的数据。
到此这篇关于Python利用psutil实现获取硬件,网络和进程信息的文章就介绍到这了,更多相关Python psutil获取信息内容请搜索服务器之家以前的文章或继续浏览下面的相关文章希望大家以后多多支持服务器之家!
原文链接:https://mp.weixin.qq.com/s/aBNlRj2DF2B9cMCbjb7sww


