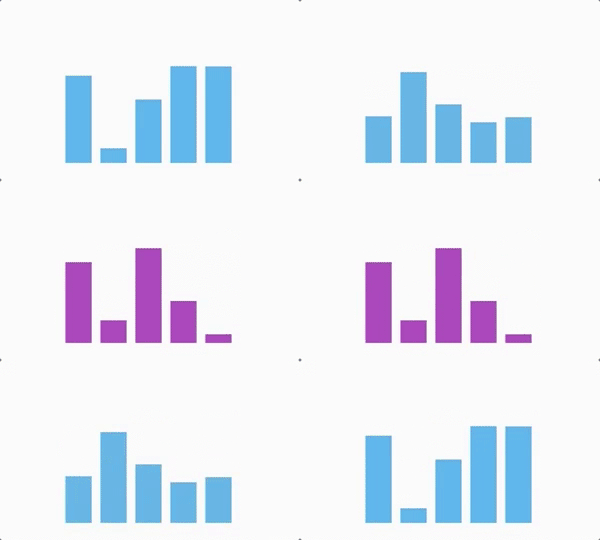
在上一篇文章:Flutter进阶—实现动画效果(三)中,实现了一个随机高度、颜色的条形。这一篇文章我们会实现多个条形,同样是随机高度、颜色。
首先在bar.dart中创建BarChart类,并使用固定长度的Bar实例列表。我们将使用5个条形,表示一周的5个工作日。然后,我们需要将创建空白和随机实例的责任从Bar转移到BarChart。
|
1
2
3
4
5
6
7
8
9
10
11
12
13
14
15
16
17
18
19
20
21
22
23
24
25
26
27
28
29
30
31
32
33
34
35
36
37
38
39
40
41
42
43
44
45
46
47
48
49
50
51
52
53
54
55
56
57
58
59
60
61
62
63
64
65
66
67
68
69
70
71
72
73
74
75
76
77
78
79
80
81
82
83
84
85
86
87
88
89
90
91
92
93
94
95
96
97
98
99
100
101
102
103
104
105
106
107
108
109
110
111
112
113
114
115
116
117
118
119
120
121
122
123
124
125
126
127
128
129
130
131
132
133
134
135
136
137
138
139
140
|
import 'package:flutter/material.dart';import 'package:flutter/animation.dart';import 'dart:ui' show lerpDouble;import 'dart:math';import 'color_palette.dart';class BarChart { static const int barCount = 5; final List<Bar> bars; BarChart(this.bars) { assert(bars.length == barCount); } factory BarChart.empty() { return new BarChart( /* List.filled( int length, E fill, { bool growable: false } ) 创建给定长度的固定长度列表,并用fill在每个位置初始化值 length必须是非负整数 */ new List.filled( barCount, new Bar(0.0, Colors.transparent) ) ); } factory BarChart.random(Random random) { final Color color = ColorPalette.primary.random(random); return new BarChart( /* List.generate( int length, E generator( int index ), { bool growable: true } ) 创建给定长度的固定长度列表,并用generator创建的值在每个位置初始化值 创建的列表是固定长度,除非growable为true */ new List.generate( barCount, (i) => new Bar( random.nextDouble()*100.0, color ) ) ); } static BarChart lerp(BarChart begin, BarChart end, double t) { return new BarChart( new List.generate( barCount, (i) => Bar.lerp(begin.bars[i], end.bars[i], t) ) ); }}class BarChartTween extends Tween<BarChart> { BarChartTween(BarChart begin, BarChart end) : super(begin: begin, end: end); @override BarChart lerp(double t) => BarChart.lerp(begin, end, t);}class Bar { Bar(this.height, this.color); final double height; final Color color; static Bar lerp(Bar begin, Bar end, double t) { return new Bar( lerpDouble(begin.height, end.height, t), Color.lerp(begin.color, end.color, t) ); }}class BarTween extends Tween<Bar> { BarTween(Bar begin, Bar end) : super(begin: begin, end: end); @override Bar lerp(double t) => Bar.lerp(begin, end, t);}class BarChartPainter extends CustomPainter { static const barWidthFraction = 0.75; BarChartPainter(Animation<BarChart> animation) : animation = animation, super(repaint: animation); final Animation<BarChart> animation; @override void paint(Canvas canvas, Size size) { void drawBar(Bar bar, double x, double width, Paint paint) { paint.color = bar.color; canvas.drawRect( new Rect.fromLTWH( x, size.height-bar.height, width, bar.height ), paint ); } /* Paint:Canvas绘制时使用的样式说明 style:是否绘制内部的形状、形状的边缘或两者都有,默认为PaintingStyle.fill */ final paint = new Paint()..style = PaintingStyle.fill; final chart = animation.value; // 每个条形占用的空间宽度 final barDistance = size.width/(1+chart.bars.length); // 每个条形占用空间75%的宽度 final barWidth = barDistance*barWidthFraction; // 用于计算每个条形的x坐标点 var x = barDistance-barWidth/2; for (final bar in chart.bars) { drawBar(bar, x, barWidth, paint); x += barDistance; } } @override bool shouldRepaint(BarChartPainter old) => false;} |
BarChartPainter在条形之间均匀分配可用宽度,并使每个条形占用可用宽度的75%。接下来我们要更新main.dart,用BarChart、BarChartTween替换Bar、BarTween。
|
1
2
3
4
5
6
7
8
9
10
11
12
13
14
15
16
17
18
19
20
21
22
23
24
25
26
27
28
29
30
31
32
33
34
35
36
37
38
39
40
41
42
43
44
45
46
47
48
49
|
// ...class _MyHomePageState extends State<MyHomePage> with TickerProviderStateMixin { final random = new Random(); AnimationController animation; BarChartTween tween; @override void initState() { super.initState(); animation = new AnimationController( duration: const Duration(milliseconds: 300), vsync: this ); tween = new BarChartTween(new BarChart.empty(), new BarChart.random(random)); animation.forward(); } @override void dispose() { animation.dispose(); super.dispose(); } void changeData() { setState(() { tween = new BarChartTween( tween.evaluate(animation), new BarChart.random(random), ); animation.forward(from: 0.0); }); } @override Widget build(BuildContext context) { return new Scaffold( body: new Center( child: new CustomPaint( size: new Size(200.0, 100.0), painter: new BarChartPainter(tween.animate(animation)) ) ), floatingActionButton: new FloatingActionButton( onPressed: changeData, child: new Icon(Icons.refresh), ), ); }} |
现在应用程序的效果如下图:

以上就是本文的全部内容,希望对大家的学习有所帮助,也希望大家多多支持服务器之家。
原文链接:https://blog.csdn.net/hekaiyou/article/details/72625480


