发现问题
项目需要,需要删除文件夹中的冗余图片。涉及图像文件名的操作,图像文件名存储在list中
python list删除元素有remove()和pop(),remove()对元素进行操作,pop()对索引进行操作,并会返回pop掉的值。一个只会从列表移除一个数
一.如果已经有了一个列表l,令h=l,对l操作时同时会影响h,貌似原因是内存共享的,正确的方法是h=l.copy()
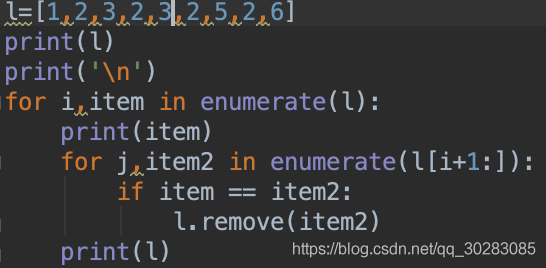
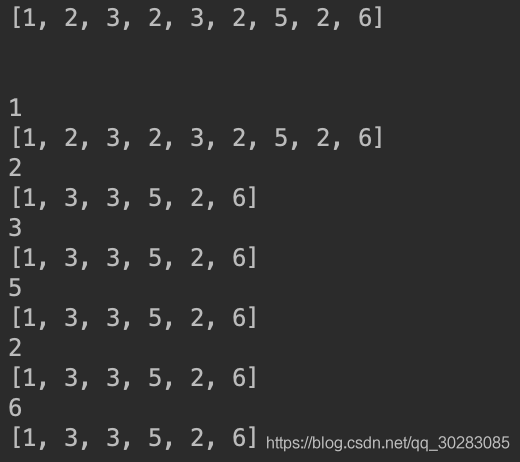
二.测试时,发现一个问题,如下面代码和结果:


item=2时,并没有把2全部删掉,后面重复的3也没有删去。
**查阅一些资料后发现:list的遍历是基于下标的不是基于元素,你删掉一个元素后,列表就发生了变化,所有的元素都往前移动了一个位置,假设要删除重的2,一个列表中索引为4,对应的值为2,索引为5,对应的值为2,索引为6,对应的值为3,当前循环删掉索引4时对应的值2之后,索引4的值为2,索引5,值为3,下一次循环,本来要再删一个2,但此时索引为5对应的为3,就漏掉了一个2。
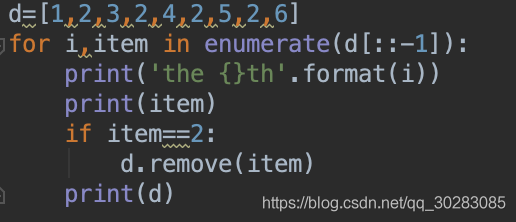
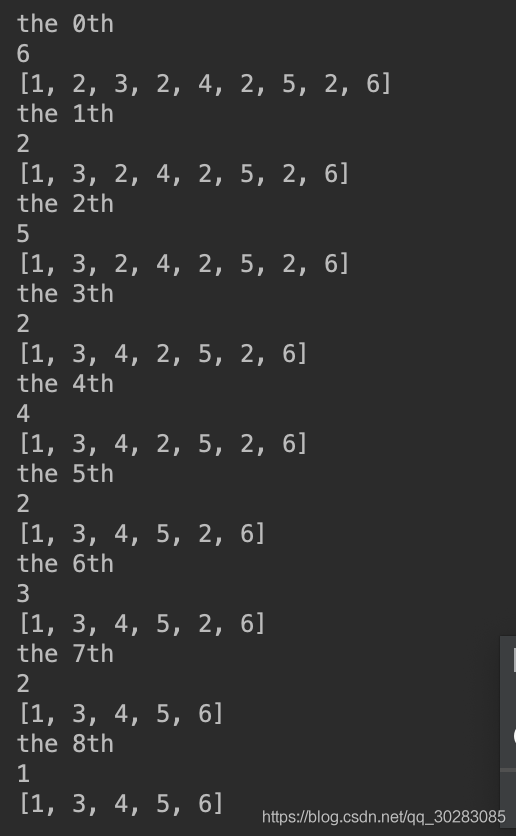
解决方案:
(1)倒序循环遍历:


(2)实际用的方法,判断到重复元素后,将那个item复制为0或‘0',相当于用一个标识符占住重复元素的位置,循环时先判断是否为‘0',最后通过
list = list(set(list))
list.remove('0')
即可
附图像去冗余算法,判断图像相似通过,感知哈希算法和三通道直方图,及图像尺寸
|
1
2
3
4
5
6
7
8
9
10
11
12
13
14
15
16
17
18
19
20
21
22
23
24
25
26
27
28
29
30
31
32
33
34
35
36
37
38
39
40
41
42
43
44
45
46
47
48
49
50
51
52
53
54
55
56
57
58
59
60
61
62
63
64
65
66
67
68
69
70
71
|
from img_similarity import runtwoImageSimilaryFunimport osfrom PIL import Imageimport shutilimport timeimport numpy as np def similar(path1, path2): img1 = Image.open(path1) img2 = Image.open(path2) w1 = img1.size[0] # 图片的宽 h1 = img2.size[1] # 图片的高 w2 = img2.size[0] # 图片的宽 h2 = img2.size[1] # 图片的高 w_err = abs(w1 - w2)/w1 h_err = abs(h1 - h2)/h1 if w_err > 0.1 or h_err >0.1: return 0 else: phash, color_hist = runtwoImageSimilaryFun(path1, path2) if phash <=8 or color_hist >=0.9: return 1 else: return 0 path = './crop_img'result_imgdirs_path = './removed_repeat_img'folderlist = os.listdir(path)folderlist.sort()for item in folderlist: folder_path = path + '/' + item new_folder_path = result_imgdirs_path + '/' + item os.makedirs(new_folder_path) imglist = os.listdir(folder_path) imglist.sort() time_start = time.time() for i,item1 in enumerate(imglist): if item1 == '0': continue path1 = folder_path + '/' + item1 for j, item2 in enumerate(imglist[i + 1:]): if item2 == '0': continue path2 = folder_path + '/' + item2 t = similar(path1, path2) if t: #将判断为相似的图片在trans_list中的名字置‘0',代表不需要复制 imglist[i+j+1] = '0' imglist = list(set(imglist)) imglist.remove('0') time_end = time.time() time_c = time_end - time_start print('{} similarity judgement list time cost {}s'.format(item, time_c)) time_start = time.time() #移动图片 for item3 in imglist: ori_img_path = folder_path + '/' + item3 new_img_path = new_folder_path + '/' + item3 shutil.copy(ori_img_path, new_img_path) time_end = time.time() time_c = time_end - time_start # 运行所花时间 print('{} move image time cost {}s'.format(item, time_c)) |
img_similarity.py
|
1
2
3
4
5
6
7
8
9
10
11
12
13
14
15
16
17
18
19
20
21
22
23
24
25
26
27
28
29
30
31
32
33
34
35
36
37
38
39
40
41
42
43
44
45
46
47
48
49
50
51
52
53
54
55
56
57
58
59
60
61
62
63
64
65
66
67
68
69
70
71
72
73
74
75
76
77
78
79
80
81
82
83
84
85
86
87
88
89
90
91
92
93
94
95
96
97
98
99
100
101
102
103
104
105
106
107
108
109
110
111
112
113
114
115
116
117
118
119
120
121
122
123
124
125
126
127
128
129
130
131
132
133
134
135
136
137
138
139
140
141
142
143
144
145
146
147
148
149
150
151
152
153
154
155
156
157
158
159
160
161
162
163
164
165
166
167
168
169
170
171
172
173
174
175
176
177
178
179
180
181
182
183
184
185
186
187
188
189
190
191
192
193
194
195
196
197
198
199
200
201
202
203
204
205
206
207
208
209
210
211
212
213
214
215
216
217
218
219
220
221
222
223
224
225
226
227
228
229
230
231
232
233
234
235
236
237
238
239
240
241
242
243
244
245
246
247
248
249
250
251
|
import cv2import numpy as npfrom PIL import Imageimport requestsfrom io import BytesIOimport matplotlib matplotlib.use('TkAgg')import matplotlib.pyplot as plt def aHash(img): # 均值哈希算法 # 缩放为8*8 img = cv2.resize(img, (8, 8)) # 转换为灰度图 gray = cv2.cvtColor(img, cv2.COLOR_BGR2GRAY) # s为像素和初值为0,hash_str为hash值初值为'' s = 0 hash_str = '' # 遍历累加求像素和 for i in range(8): for j in range(8): s = s + gray[i, j] # 求平均灰度 avg = s / 64 # 灰度大于平均值为1相反为0生成图片的hash值 for i in range(8): for j in range(8): if gray[i, j] > avg: hash_str = hash_str + '1' else: hash_str = hash_str + '0' return hash_str def dHash(img): # 差值哈希算法 # 缩放8*8 img = cv2.resize(img, (9, 8)) # 转换灰度图 gray = cv2.cvtColor(img, cv2.COLOR_BGR2GRAY) hash_str = '' # 每行前一个像素大于后一个像素为1,相反为0,生成哈希 for i in range(8): for j in range(8): if gray[i, j] > gray[i, j + 1]: hash_str = hash_str + '1' else: hash_str = hash_str + '0' return hash_str def pHash(img): # 感知哈希算法 # 缩放32*32 img = cv2.resize(img, (32, 32)) # , interpolation=cv2.INTER_CUBIC # 转换为灰度图 gray = cv2.cvtColor(img, cv2.COLOR_BGR2GRAY) # 将灰度图转为浮点型,再进行dct变换 dct = cv2.dct(np.float32(gray)) # opencv实现的掩码操作 dct_roi = dct[0:8, 0:8] hash = [] avreage = np.mean(dct_roi) for i in range(dct_roi.shape[0]): for j in range(dct_roi.shape[1]): if dct_roi[i, j] > avreage: hash.append(1) else: hash.append(0) return hash def calculate(image1, image2): # 灰度直方图算法 # 计算单通道的直方图的相似值 hist1 = cv2.calcHist([image1], [0], None, [256], [0.0, 255.0]) hist2 = cv2.calcHist([image2], [0], None, [256], [0.0, 255.0]) # 计算直方图的重合度 degree = 0 for i in range(len(hist1)): if hist1[i] != hist2[i]: degree = degree + \ (1 - abs(hist1[i] - hist2[i]) / max(hist1[i], hist2[i])) else: degree = degree + 1 degree = degree / len(hist1) return degree def classify_hist_with_split(image1, image2, size=(256, 256)): # RGB每个通道的直方图相似度 # 将图像resize后,分离为RGB三个通道,再计算每个通道的相似值 image1 = cv2.resize(image1, size) image2 = cv2.resize(image2, size) sub_image1 = cv2.split(image1) sub_image2 = cv2.split(image2) sub_data = 0 for im1, im2 in zip(sub_image1, sub_image2): sub_data += calculate(im1, im2) sub_data = sub_data / 3 return sub_data def cmpHash(hash1, hash2): # Hash值对比 # 算法中1和0顺序组合起来的即是图片的指纹hash。顺序不固定,但是比较的时候必须是相同的顺序。 # 对比两幅图的指纹,计算汉明距离,即两个64位的hash值有多少是不一样的,不同的位数越小,图片越相似 # 汉明距离:一组二进制数据变成另一组数据所需要的步骤,可以衡量两图的差异,汉明距离越小,则相似度越高。汉明距离为0,即两张图片完全一样 n = 0 # hash长度不同则返回-1代表传参出错 if len(hash1) != len(hash2): return -1 # 遍历判断 for i in range(len(hash1)): # 不相等则n计数+1,n最终为相似度 if hash1[i] != hash2[i]: n = n + 1 return n def getImageByUrl(url): # 根据图片url 获取图片对象 html = requests.get(url, verify=False) image = Image.open(BytesIO(html.content)) return image def PILImageToCV(): # PIL Image转换成OpenCV格式 path = "/Users/waldenz/Documents/Work/doc/TestImages/t3.png" img = Image.open(path) plt.subplot(121) plt.imshow(img) print(isinstance(img, np.ndarray)) img = cv2.cvtColor(np.asarray(img), cv2.COLOR_RGB2BGR) print(isinstance(img, np.ndarray)) plt.subplot(122) plt.imshow(img) plt.show() def CVImageToPIL(): # OpenCV图片转换为PIL image path = "/Users/waldenz/Documents/Work/doc/TestImages/t3.png" img = cv2.imread(path) # cv2.imshow("OpenCV",img) plt.subplot(121) plt.imshow(img) img2 = Image.fromarray(cv2.cvtColor(img, cv2.COLOR_BGR2RGB)) plt.subplot(122) plt.imshow(img2) plt.show() def bytes_to_cvimage(filebytes): # 图片字节流转换为cv image image = Image.open(filebytes) img = cv2.cvtColor(np.asarray(image), cv2.COLOR_RGB2BGR) return img def runAllImageSimilaryFun(para1, para2): # 均值、差值、感知哈希算法三种算法值越小,则越相似,相同图片值为0 # 三直方图算法和单通道的直方图 0-1之间,值越大,越相似。 相同图片为1 # t1,t2 14;19;10; 0.70;0.75 # t1,t3 39 33 18 0.58 0.49 # s1,s2 7 23 11 0.83 0.86 挺相似的图片 # c1,c2 11 29 17 0.30 0.31 if para1.startswith("http"): # 根据链接下载图片,并转换为opencv格式 img1 = getImageByUrl(para1) img1 = cv2.cvtColor(np.asarray(img1), cv2.COLOR_RGB2BGR) img2 = getImageByUrl(para2) img2 = cv2.cvtColor(np.asarray(img2), cv2.COLOR_RGB2BGR) else: # 通过imread方法直接读取物理路径 img1 = cv2.imread(para1) img2 = cv2.imread(para2) hash1 = aHash(img1) hash2 = aHash(img2) n1 = cmpHash(hash1, hash2) print('均值哈希算法相似度aHash:', n1) hash1 = dHash(img1) hash2 = dHash(img2) n2 = cmpHash(hash1, hash2) print('差值哈希算法相似度dHash:', n2) hash1 = pHash(img1) hash2 = pHash(img2) n3 = cmpHash(hash1, hash2) print('感知哈希算法相似度pHash:', n3) n4 = classify_hist_with_split(img1, img2) print('三直方图算法相似度:', n4) n5 = calculate(img1, img2) print("单通道的直方图", n5) print("%d %d %d %.2f %.2f " % (n1, n2, n3, round(n4[0], 2), n5[0])) print("%.2f %.2f %.2f %.2f %.2f " % (1 - float(n1 / 64), 1 - float(n2 / 64), 1 - float(n3 / 64), round(n4[0], 2), n5[0])) plt.subplot(121) plt.imshow(Image.fromarray(cv2.cvtColor(img1, cv2.COLOR_BGR2RGB))) plt.subplot(122) plt.imshow(Image.fromarray(cv2.cvtColor(img2, cv2.COLOR_BGR2RGB))) plt.show() def runtwoImageSimilaryFun(para1, para2): # 均值、差值、感知哈希算法三种算法值越小,则越相似,相同图片值为0 # 三直方图算法和单通道的直方图 0-1之间,值越大,越相似。 相同图片为1 # t1,t2 14;19;10; 0.70;0.75 # t1,t3 39 33 18 0.58 0.49 # s1,s2 7 23 11 0.83 0.86 挺相似的图片 # c1,c2 11 29 17 0.30 0.31 if para1.startswith("http"): # 根据链接下载图片,并转换为opencv格式 img1 = getImageByUrl(para1) img1 = cv2.cvtColor(np.asarray(img1), cv2.COLOR_RGB2BGR) img2 = getImageByUrl(para2) img2 = cv2.cvtColor(np.asarray(img2), cv2.COLOR_RGB2BGR) else: # 通过imread方法直接读取物理路径 img1 = cv2.imread(para1) img2 = cv2.imread(para2) hash1 = pHash(img1) hash2 = pHash(img2) n3 = cmpHash(hash1, hash2) n4 = classify_hist_with_split(img1, img2) return n3, n4 if __name__ == "__main__": p1 = '/Users/Desktop/11/24.jpeg' p2 = '/Users/Desktop/11/25.jpeg' runAllImageSimilaryFun(p1, p2) |
总结
到此这篇关于Python列表删除重复元素与图像相似度判断及删除的文章就介绍到这了,更多相关Python列表删除重复元素内容请搜索服务器之家以前的文章或继续浏览下面的相关文章希望大家以后多多支持服务器之家!
原文链接:https://blog.csdn.net/qq_30283085/article/details/106106395


