上次亚马逊的商品信息都获取到了,自然要看一下评论的部分。用户的评论能直观的反映当前商品值不值得购买,亚马逊的评分信息也能获取到做一个评分的权重。
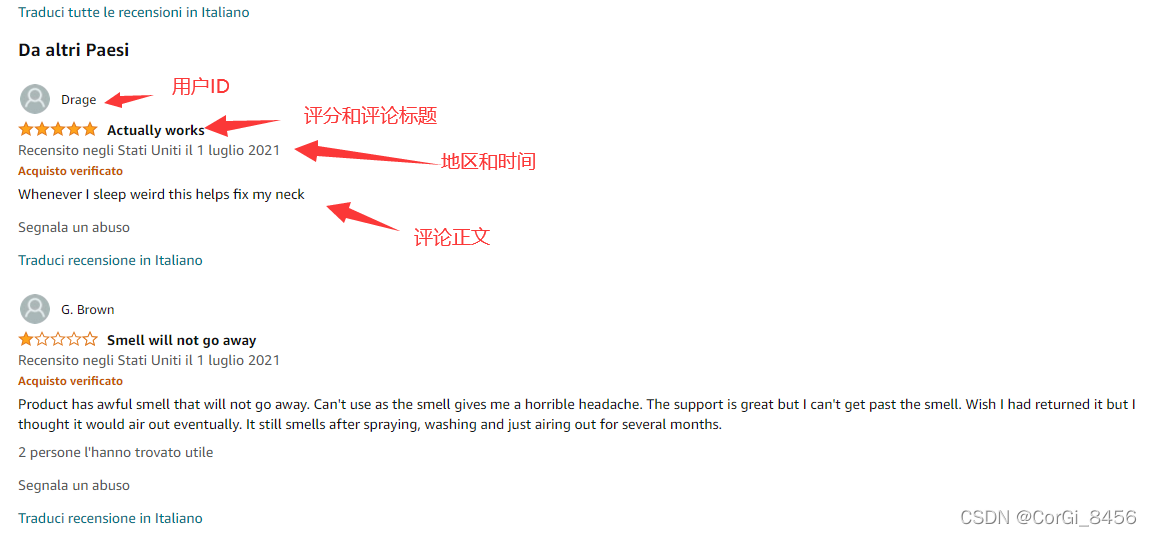
亚马逊的评论区由用户ID,评分及评论标题,地区时间,评论正文这几个部分组成,本次获取的内容就是这些。
测试链接:https://www.amazon.it/product-reviews/B08GHGTGQ2/ref=cm_cr_arp_d_paging_btm_14?ie=UTF8&pageNumber=14&reviewerType=all_reviews&pageSize=10&sortBy=recent
一、分析亚马逊的评论请求
首先打开开发者模式的Network,Clear清屏做一次请求:
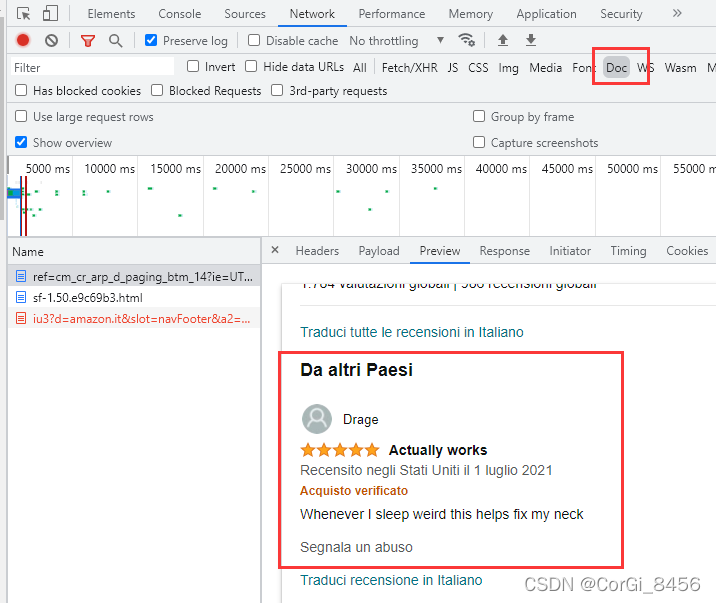
你会发现在Doc中的get请求正好就有我们想要的评论信息。
可是真正的评论数据可不是全部都在这里的,页面往下翻,有个翻页的button:

点击翻页请求下一页,在Fetch/XHR选项卡中多了一个新的请求,刚才的Doc选项卡中并无新的get请求。这下发现了所有的评论信息是XHR类型的请求。

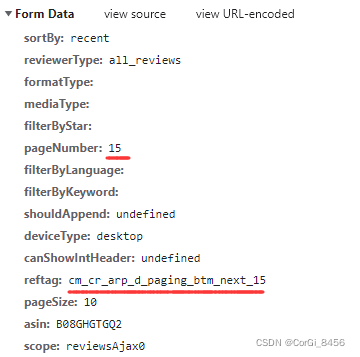
获取到post请求的链接和payload数据,里面含有控制翻页的参数,真正的评论请求已经找到了。
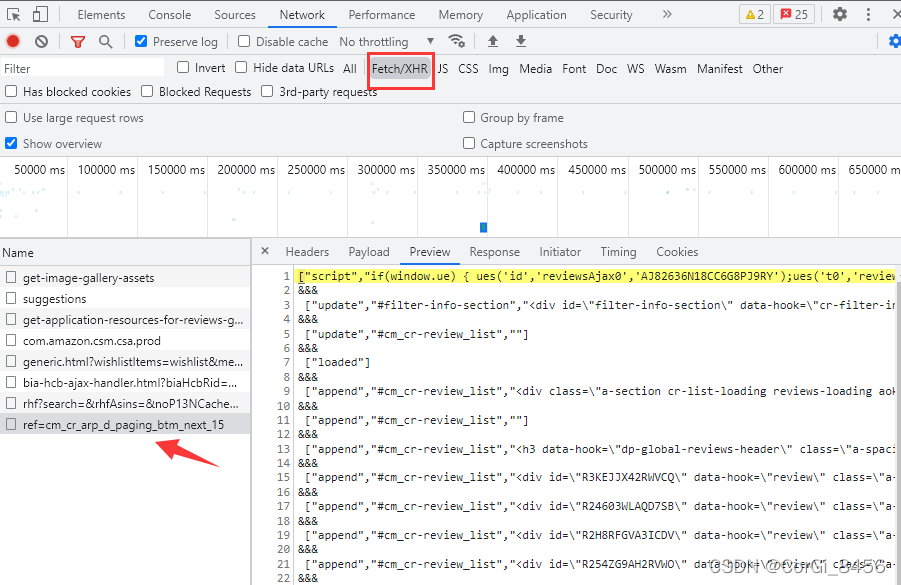
这一堆就是未处理的信息,这些请求未处理的信息里面,带有data-hook="review"的就是带有评论的信息。分析完毕,下面开始一步一步去写请求。
二、获取亚马逊评论的内容
首先拼凑请求所需的post参数,请求链接,以便之后的自动翻页,然后带参数post请求链接:
headers = {
    "authority": "www.amazon.it",
    "accept": "text/html,application/xhtml+xml,application/xml;q=0.9,image/avif,image/webp,image/apng,*/*;q=0.8,application/signed-exchange;v=b3;q=0.9",
    "user-agent": "Mozilla/5.0 (Windows NT 10.0; Win64; x64) AppleWebKit/537.36 (KHTML, like Gecko) Chrome/97.0.4692.71 Safari/537.36",
}

page = 1
post_data = {
    "sortBy": "recent",
    "reviewerType": "all_reviews",
    "formatType": "",
    "mediaType": "",
    "filterByStar": "",
    "filterByLanguage": "",
    "filterByKeyword": "",
    "shouldAppend": "undefined",
    "deviceType": "desktop",
    "canShowIntHeader": "undefined",
    "pageSize": "10",
    "asin": "B08GHGTGQ2",
}
# 翻页关键payload参数赋值
post_data["pageNumber"] = page,
post_data["reftag"] = f"cm_cr_getr_d_paging_btm_next_{page}",
post_data["scope"] = f"reviewsAjax{page}",
# 翻页链接赋值
spiderurl=f"https://www.amazon.it/hz/reviewsrender/ajax/reviews/get/ref=cm_cr_getr_d_paging_btm_next_{page}"
res = requests.post(spiderurl,headers=headers,data=post_data)
if res and res.status_code == 200:
    res = res.content.decode("utf-8")
    print(res)

现在已经获取到了这一堆未处理的信息,接下来开始对这些数据进行处理。
三、亚马逊评论信息的处理
上图的信息会发现,每一段的信息都由“&&&”进行分隔,而分隔之后的每一条信息都是由'","'分隔开的:

所以用python的split方法进行处理,把字符串分隔成list列表:
# 返回值字符串处理
contents = res.split("&&&")
for content in contents:
    infos = content.split("","")
由'","'分隔的数据通过split处理生成新的list列表,评论内容是列表的最后一个元素,去掉里面的""," "和多余的符号,就可以通过css/xpath选择其进行处理了:
for content in contents:
    infos = content.split("","")
    info = infos[-1].replace(""]","").replace("
","").replace("","")
    # 评论内容判断
    if "data-hook="review"" in info:
        sel = Selector(text=info)
        data = {}
        data["username"] = sel.xpath("//span[@class="a-profile-name"]/text()").extract_first() #用户名
        data["point"] = sel.xpath("//span[@class="a-icon-alt"]/text()").extract_first() #评分
        data["date"] = sel.xpath("//span[@data-hook="review-date"]/text()").extract_first() #日期地址
        data["review"] = sel.xpath("//span[@data-hook="review-title"]/span/text()").extract_first() #评价标题
        data["detail"] = sel.xpath("//span[@data-hook="review-body"]").extract_first() #评价内容
        image = sel.xpath("div[@class="review-image-tile-section"]").extract_first()
        data["image"] = image if image else "not image" #图片
        print(data)
四、代码整合
4.1 代理设置
稳定的IP代理是你数据获取最有力的工具。目前国内还是无法稳定的访问亚马逊,会出现连接失败的情况。我这里使用的ipidea代理请求的意大利地区的亚马逊,可以通过账密和api获取代理,速度还是非常稳定的。
地址:http://www.ipidea.net/?utm-source=csdn&utm-keyword=?wb
下面的代理获取的方法:
# api获取ip
    def getApiIp(self):
        # 获取且仅获取一个ip------意大利
        api_url = "获取代理地址"
        res = requests.get(api_url, timeout=5)
        try:
            if res.status_code == 200:
                api_data = res.json()["data"][0]
                proxies = {
                    "http": "http://{}:{}".format(api_data["ip"], api_data["port"]),
                    "https": "http://{}:{}".format(api_data["ip"], api_data["port"]),
                }
                print(proxies)
                return proxies
            else:
                print("获取失败")
        except:
            print("获取失败")
4.2 while循环翻页
while循环进行翻页,评论最大页数是99页,99页之后就break跳出while循环:
 def getPLPage(self):
        while True:
            # 翻页关键payload参数赋值
            self.post_data["pageNumber"]= self.page,
            self.post_data["reftag"] = f"cm_cr_getr_d_paging_btm_next_{self.page}",
            self.post_data["scope"] = f"reviewsAjax{self.page}",
            # 翻页链接赋值
            spiderurl = f"https://www.amazon.it/hz/reviews-render/ajax/reviews/get/ref=cm_cr_getr_d_paging_btm_next_{self.page}"
            res = self.getRes(spiderurl,self.headers,"",self.post_data,"POST",check)#自己封装的请求方法
            if res:
                res = res.content.decode("utf-8")
                # 返回值字符串处理
                contents = res.split("&&&")
                for content in contents:
                    infos = content.split("","")
                    info = infos[-1].replace(""]","").replace("
","").replace("","")
                    # 评论内容判断
                    if "data-hook="review"" in info:
                        sel = Selector(text=info)
                        data = {}
                        data["username"] = sel.xpath("//span[@class="a-profile-name"]/text()").extract_first() #用户名
                        data["point"] = sel.xpath("//span[@class="a-icon-alt"]/text()").extract_first() #评分
                        data["date"] = sel.xpath("//span[@data-hook="review-date"]/text()").extract_first() #日期地址
                        data["review"] = sel.xpath("//span[@data-hook="review-title"]/span/text()").extract_first() #评价标题
                        data["detail"] = sel.xpath("//span[@data-hook="review-body"]").extract_first() #评价内容
                        image = sel.xpath("div[@class="review-image-tile-section"]").extract_first()
                        data["image"] = image if image else "not image" #图片
                        print(data)
            if self.page <= 99:
                print("Next Page")
                self.page += 1
            else:
                break
最后的整合代码:
# coding=utf-8
import requests
from scrapy import Selector

class getReview():
    page = 1
    headers = {
        "authority": "www.amazon.it",
        "accept": "text/html,application/xhtml+xml,application/xml;q=0.9,image/avif,image/webp,image/apng,*/*;q=0.8,application/signed-exchange;v=b3;q=0.9",
        "user-agent": "Mozilla/5.0 (Windows NT 10.0; Win64; x64) AppleWebKit/537.36 (KHTML, like Gecko) Chrome/97.0.4692.71 Safari/537.36",
    }
    post_data = {
        "sortBy": "recent",
        "reviewerType": "all_reviews",
        "formatType": "",
        "mediaType": "",
        "filterByStar": "",
        "filterByLanguage": "",
        "filterByKeyword": "",
        "shouldAppend": "undefined",
        "deviceType": "desktop",
        "canShowIntHeader": "undefined",
        "pageSize": "10",
        "asin": "B08GHGTGQ2",
    #post_data中asin参数目前写死在
    #"https://www.amazon.it/product-reviews/B08GHGTGQ2?ie=UTF8&pageNumber=1&reviewerType=all_reviews&pageSize=10&sortBy=recent"
    #这个链接里,不排除asin值变化的可能,如要获取get请求即可
    def getPLPage(self):
        while True:
            # 翻页关键payload参数赋值
            self.post_data["pageNumber"]= self.page,
            self.post_data["reftag"] = f"cm_cr_getr_d_paging_btm_next_{self.page}",
            self.post_data["scope"] = f"reviewsAjax{self.page}",
            # 翻页链接赋值
            spiderurl = f"https://www.amazon.it/hz/reviews-render/ajax/reviews/get/ref=cm_cr_getr_d_paging_btm_next_{self.page}"
            res = self.getRes(spiderurl,self.headers,"",self.post_data,"POST",check)#自己封装的请求方法
            if res:
                res = res.content.decode("utf-8")
                # 返回值字符串处理
                contents = res.split("&&&")
                for content in contents:
                    infos = content.split("","")
                    info = infos[-1].replace(""]","").replace("
","").replace("","")
                    # 评论内容判断
                    if "data-hook="review"" in info:
                        sel = Selector(text=info)
                        data = {}
                        data["username"] = sel.xpath("//span[@class="a-profile-name"]/text()").extract_first() #用户名
                        data["point"] = sel.xpath("//span[@class="a-icon-alt"]/text()").extract_first() #评分
                        data["date"] = sel.xpath("//span[@data-hook="review-date"]/text()").extract_first() #日期地址
                        data["review"] = sel.xpath("//span[@data-hook="review-title"]/span/text()").extract_first() #评价标题
                        data["detail"] = sel.xpath("//span[@data-hook="review-body"]").extract_first() #评价内容
                        image = sel.xpath("div[@class="review-image-tile-section"]").extract_first()
                        data["image"] = image if image else "not image" #图片
                        print(data)
            if self.page <= 99:
                print("Next Page")
                self.page += 1
            else:
                break
    # api获取ip
    def getApiIp(self):
        # 获取且仅获取一个ip------意大利
        api_url = "获取代理地址"
        res = requests.get(api_url, timeout=5)
        try:
            if res.status_code == 200:
                api_data = res.json()["data"][0]
                proxies = {
                    "http": "http://{}:{}".format(api_data["ip"], api_data["port"]),
                    "https": "http://{}:{}".format(api_data["ip"], api_data["port"]),
                }
                print(proxies)
                return proxies
                print("获取失败")
        except:
            print("获取失败")
    #专门发送请求的方法,代理请求三次,三次失败返回错误
    def getRes(self,url,headers,proxies,post_data,method):
        if proxies:
            for i in range(3):
                try:
                    # 传代理的post请求
                    if method == "POST":
                        res = requests.post(url,headers=headers,data=post_data,proxies=proxies)
                    # 传代理的get请求
                    else:
                        res = requests.get(url, headers=headers,proxies=proxies)
                    if res:
                        return res
                except:
                    print(f"第{i+1}次请求出错")
                else:
                    return None
        else:
                proxies = self.getApiIp()
                    # 请求代理的post请求
                        res = requests.post(url, headers=headers, data=post_data, proxies=proxies)
                    # 请求代理的get请求
                        res = requests.get(url, headers=headers, proxies=proxies)
                    print(f"第{i+1}次请求出错")
if __name__ == "__main__":
    getReview().getPLPage()
总结
本次的亚马逊评论获取就是两个坑,一是评论信息通过的XHR请求方式,二是评论信息的处理。分析之后这次的数据获取还是非常简单的,找到正确的请求方式,稳定的IP代理让你事半功倍,找到信息的共同点进行处理,问题就迎刃而解了。
到此这篇关于基于Python获取亚马逊的评论的文章就介绍到这了,更多相关Python亚马逊的评论内容请搜索服务器之家以前的文章或继续浏览下面的相关文章希望大家以后多多支持服务器之家!
原文链接:https://blog.csdn.net/corgi_8456/article/details/122579206


