一、简介
在这篇文章中,我们将演示如何利用强大的Spring Data JPA API 与数据库交互,本课的内存H2 数据库。
Spring Data JPA 提供了一组非常强大且高度抽象的接口,用于与任何底层数据库进行交互。数据库可以是 MySQL、MongoDB、Elasticsearch 或任何其他支持的数据库。Spring Data JPA 的其他优势包括:
- 支持基于 JPA 约定构建扩展存储库。
- 内置分页支持和动态查询执行。
- 支持基于 XML 的实体映射。
在本例中,我们将使用 H2 内存数据库。数据库的选择不应影响我们将构建的 Spring Data 定义,因为这是 Spring Data JPA 提供的主要优势。它使我们能够将数据库查询与应用程序逻辑完全分离。
二、项目设置
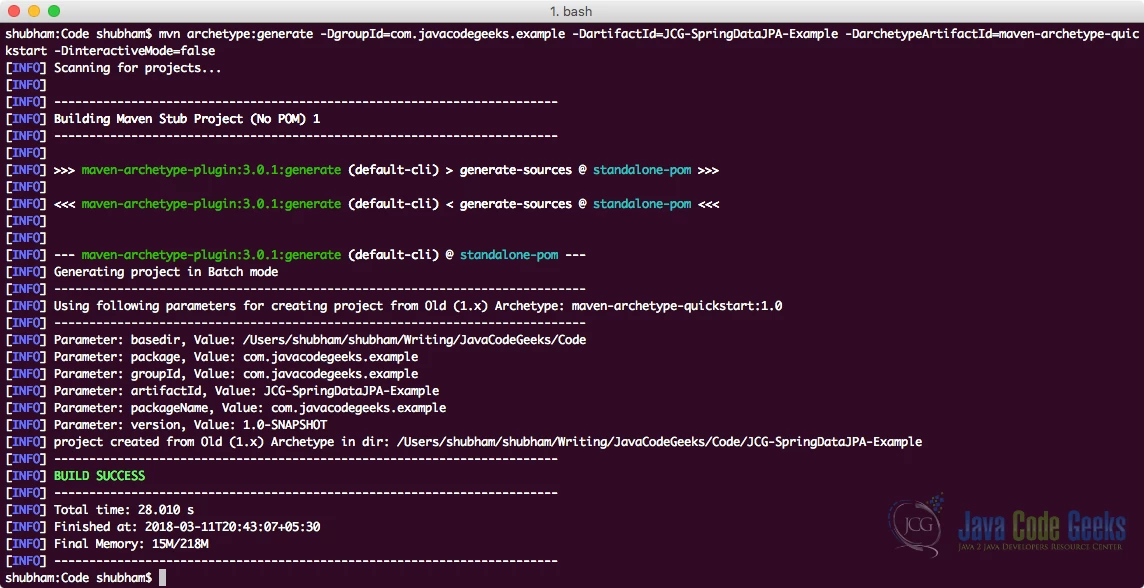
我们将使用众多 Maven 原型之一来为我们的示例创建一个示例项目。要创建项目,请在您将用作工作区的目录中执行以下命令:
<font style="vertical-align: inherit;"><font style="vertical-align: inherit;">mvn archetype:generate -DgroupId=com.javacodegeeks.example -DartifactId=JCG-SpringDataJPA-example -DarchetypeArtifactId=maven-archetype-quickstart -DinteractiveMode=false font>font>
如果您是第一次运行 maven,则需要几秒钟来完成生成命令,因为 maven 必须下载所有必需的插件和工件才能完成生成任务。

artifactId请注意,现在,您将拥有一个与所选目录同名的新目录。现在,请随意在您最喜欢的 IDE 中打开该项目。
最后,我们没有使用 IDE 来制作这个项目,而是使用了一个简单的 maven 命令。这有助于我们从您可能使用的任何特定 IDE 中进行项目设置和初始化。
三、 Maven依赖
首先,我们需要将适当的 Maven 依赖项添加到我们的项目中。我们将以下依赖项添加到我们的pom.xml文件中:
pom.xml
<font style="vertical-align: inherit;"><font style="vertical-align: inherit;"><父>font>font><font>font><font style="vertical-align: inherit;"><font style="vertical-align: inherit;">
  <groupId>org.springframework.bootgroupId>font>font><font>font><font style="vertical-align: inherit;"><font style="vertical-align: inherit;">
  <artifactId>spring-boot-starter-parentartifactId>font>font><font>font><font style="vertical-align: inherit;"><font style="vertical-align: inherit;">
  <version>1.5.10.RELEASEversion>font>font><font>font><font style="vertical-align: inherit;"><font style="vertical-align: inherit;">
  <relativePath/> <!-- 从存储库中查找父级 -->font>font><font>font><font style="vertical-align: inherit;"><font style="vertical-align: inherit;">
font>font><font>font>
<font>font><font style="vertical-align: inherit;"><font style="vertical-align: inherit;">
<属性>font>font><font>font><font style="vertical-align: inherit;"><font style="vertical-align: inherit;">
  <project.build.sourceEncoding>UTF-8project.build.sourceEncoding>font>font><font>font><font style="vertical-align: inherit;"><font style="vertical-align: inherit;">
  <project.reporting.outputEncoding>UTF-8project.reporting.outputEncoding>font>font><font>font><font style="vertical-align: inherit;"><font style="vertical-align: inherit;">
  <java.version>1.8java.version>font>font><font>font><font style="vertical-align: inherit;"><font style="vertical-align: inherit;">
font>font><font>font>
<font>font><font style="vertical-align: inherit;"><font style="vertical-align: inherit;">
<依赖项>font>font><font>font>
<font>font><font style="vertical-align: inherit;"><font style="vertical-align: inherit;">
  <依赖>font>font><font>font><font style="vertical-align: inherit;"><font style="vertical-align: inherit;">
    <groupId>org.springframework.bootgroupId>font>font><font>font><font style="vertical-align: inherit;"><font style="vertical-align: inherit;">
    <artifactId>spring-boot-starter-data-jpaartifactId>font>font><font>font><font style="vertical-align: inherit;"><font style="vertical-align: inherit;">
  font>font><font>font>
<font>font><font style="vertical-align: inherit;"><font style="vertical-align: inherit;">
  <依赖>font>font><font>font><font style="vertical-align: inherit;"><font style="vertical-align: inherit;">
    <groupId>org.springframework.bootgroupId>font>font><font>font><font style="vertical-align: inherit;"><font style="vertical-align: inherit;">
    <artifactId>spring-boot-starter-webartifactId>font>font><font>font><font style="vertical-align: inherit;"><font style="vertical-align: inherit;">
  font>font><font>font>
<font>font><font style="vertical-align: inherit;"><font style="vertical-align: inherit;">
  <依赖>font>font><font>font><font style="vertical-align: inherit;"><font style="vertical-align: inherit;">
    <groupId>com.h2databasegroupId>font>font><font>font><font style="vertical-align: inherit;"><font style="vertical-align: inherit;">
    <artifactId>h2artifactId>font>font><font>font><font style="vertical-align: inherit;"><font style="vertical-align: inherit;">
    <scope>运行时scope>font>font><font>font><font style="vertical-align: inherit;"><font style="vertical-align: inherit;">
  font>font><font>font>
  <font>font><font style="vertical-align: inherit;"><font style="vertical-align: inherit;">
  <依赖>font>font><font>font><font style="vertical-align: inherit;"><font style="vertical-align: inherit;">
    <groupId>org.springframework.bootgroupId>font>font><font>font><font style="vertical-align: inherit;"><font style="vertical-align: inherit;">
    <artifactId>spring-boot-starter-testartifactId>font>font><font>font><font style="vertical-align: inherit;"><font style="vertical-align: inherit;">
    <scope>测试scope>font>font><font>font><font style="vertical-align: inherit;"><font style="vertical-align: inherit;">
  font>font><font>font>
  <font>font><font style="vertical-align: inherit;"><font style="vertical-align: inherit;">
font>font><font>font>
<font>font><font style="vertical-align: inherit;"><font style="vertical-align: inherit;">
<构建>font>font><font>font><font style="vertical-align: inherit;"><font style="vertical-align: inherit;">
  <插件>font>font><font>font><font style="vertical-align: inherit;"><font style="vertical-align: inherit;">
    <插件>font>font><font>font><font style="vertical-align: inherit;"><font style="vertical-align: inherit;">
      <groupId>org.springframework.bootgroupId>font>font><font>font><font style="vertical-align: inherit;"><font style="vertical-align: inherit;">
      <artifactId>spring-boot-maven-pluginartifactId>font>font><font>font><font style="vertical-align: inherit;"><font style="vertical-align: inherit;">
    font>font><font>font><font style="vertical-align: inherit;"><font style="vertical-align: inherit;">
  font>font><font>font><font style="vertical-align: inherit;"><font style="vertical-align: inherit;">
build>font>font><font>font>
请注意,我们还在此处添加了 H2 数据库依赖项,并将其范围作为运行时,因为一旦应用程序停止,H2 数据就会被冲走。在本课中,我们不会关注 H2 的实际工作方式,而是将自己限制在 Spring Data JPA API 上。
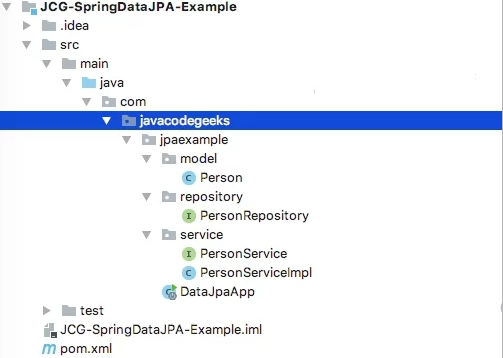
四、项目结构
在我们继续开始为项目编写代码之前,让我们在这里展示一下在将所有代码添加到项目后我们将拥有的项目结构:

我们将项目分成多个包,遵循关注点分离的原则,代码保持模块化。
五、定义模型
我们将首先在我们的项目中添加一个非常简单的模型,a Person. 它的定义将非常标准,例如:
人.java
import javax.persistence.Entity;<font>font> import javax.persistence.GeneratedValue;<font>font> import javax.persistence.Id;<font>font>
<font>font> @Entity<font>font> public class Person {<font>font>
<font>font> @Id<font>font> @GeneratedValue<font>font> private Long id;<font>font> private String name;<font>font> private int age;<font>font>
<font>font> public Person() {<font>font>
    }<font>font>
<font>font> public Person(String name, int age) {<font>font> this.name = name;<font>font> this.age = age;<font>font>
    }<font>font>
<font>font>
    //standard getters and setters<font>font>
<font>font> @Override<font>font> public String toString() {<font>font> return String.format("Person{id=%d, name='%s', age=%d}", id, name, age);<font>font>
    }<font>font>
}<font>font>
为简洁起见,我们省略了标准的 getter 和 setter,但它们是必要的,因为 Jackson 在对象的序列化和反序列化期间使用它们。
注释将此 POJO 标记为将由 Spring Data API 管理的@Entity对象,并且其字段将被视为表列(除非标记为transient)。
最后,我们为该toString()方法添加了一个自定义实现,以便我们在测试应用程序时可以打印相关数据。
六、 定义 JPA 存储库
JPA 为我们提供了一种非常简单的方式来定义 JPA Repository 接口。
在了解如何定义 JPA 存储库之前,我们需要记住,每个 JPA 接口仅在利用 JPA 相关功能时与数据库表的单个实体交互。如果我们看一下接口定义,我们会深刻理解这一点:
import com.javacodegeeks.jpaexample.model.Person;<font>font> import org.springframework.data.jpa.repository.JpaRepository;<font>font> import org.springframework.stereotype.Repository;<font>font>
<font>font> @Repository<font>font> public interface PersonRepository extends JpaRepository<Person, Long> {<font>font>
}<font>font>
虽然上面的接口定义是空的,但我们还是有几点需要理解:
- @Repository注释将此接口标记为在应用程序启动时初始化的 Spring Bean。有了这个注解,Spring 可以优雅地管理异常数据库交互抛出。
- 我们用作Person参数来表示此 JPA 接口将管理Person实体。
- 最后,我们还将数据类型Long作为参数传递。这表示该Person实体包含一个唯一标识符,该标识符属于Long。
七、制作Service接口
在本节中,我们将定义一个服务接口,它将充当实现的合同,并代表我们的服务必须支持的所有操作。这些操作将与创建新用户和获取与数据库中的对象相关的信息有关。
这是我们将使用的合约定义:
import com.javacodegeeks.jpaexample.model.Person;<font>font> import java.util.List;<font>font>
<font>font> public interface PersonService {<font>font>
<font>font> Person createPerson(Person person);<font>font> Person getPerson(Long id);<font>font> Person editPerson(Person person);<font>font> void deletePerson(Person person);<font>font> void deletePerson(Long id);<font>font> List getAllPersons(int pageNumber, int pageSize);<font>font> List getAllPersons();<font>font> long countPersons();<font>font>
}<font>font>
我们在本合同中提到了所有四个 CRUD 操作以及分页的概念。
当我们介绍基于 apageSize和 a从数据库中获取所有对象时,创建分页 API 很重要pageNumber。该pageSize属性表示从数据库中获取的对象的数量,而该pageNumber属性充当查询的跳过部分。
八、 提供服务实施
我们将使用上面的接口定义来提供它的实现,以便我们可以执行与Person我们之前定义的实体相关的 CRUD 操作。我们将在这里进行:
import com.javacodegeeks.jpaexample.model.Person;<font>font> import com.javacodegeeks.jpaexample.repository.PersonRepository;<font>font> import org.springframework.beans.factory.annotation.Autowired;<font>font> import org.springframework.data.domain.PageRequest;<font>font> import org.springframework.stereotype.Service;<font>font>
<font>font> import java.util.List;<font>font>
<font>font> @Service<font>font> public class PersonServiceImpl implements PersonService {<font>font>
<font>font> @Autowired<font>font> private PersonRepository personRepository;<font>font>
<font>font> @Override<font>font> public Person createPerson(Person person) {<font>font> return personRepository.save(person);<font>font>
    }<font>font>
<font>font> @Override<font>font> public Person getPerson(Long id) {<font>font> return personRepository.findOne(id);<font>font>
    }<font>font>
<font>font> @Override<font>font> public Person editPerson(Person person) {<font>font> return personRepository.save(person);<font>font>
    }<font>font>
<font>font> @Override<font>font> public void deletePerson(Person person) {<font>font> personRepository.delete(person);<font>font>
    }<font>font>
<font>font> @Override<font>font> public void deletePerson(Long id) {<font>font> personRepository.delete(id);<font>font>
    }<font>font>
<font>font> @Override<font>font> public List<Person> getAllPersons(int pageNumber, int pageSize) {<font>font> return personRepository.findAll(new PageRequest(pageNumber, pageSize)).getContent();<font>font>
    }<font>font>
<font>font> @Override<font>font> public List<Person> getAllPersons() {<font>font> return personRepository.findAll();<font>font>
    }<font>font>
<font>font> @Override<font>font> public long countPersons() {<font>font> return personRepository.count();<font>font>
    }<font>font>
}<font>font>
令人惊讶的是,所有的方法实现都只是一行代码。这显示了 JPA 存储库提供给我们的抽象级别。
上面的大部分操作都很容易理解。需要注意的主要事情是,我们从未在我们制作的 Repository 中提供任何方法getAllPersons()等!那么这些方法是如何出现的呢?再次,答案在于 JPA Repositories 提供给我们的抽象。像findAll(),delete()等所有方法save(...)都内置在JpaRepository我们在存储库接口定义中扩展的方法中。
九、 使用 CommandLineRunner
为了测试我们现在编写的所有代码以及数据库交互部分,我们将CommandLineRunner在 Spring Boot 应用程序的主类中使用 。A在调用 Spring Boot 应用程序CommandLineRunner的方法之前运行main(),因此它是执行任何初始化步骤或测试代码的理想空间。
为了测试应用程序,我们将使用服务 bean 在我们的类中执行数据库操作:
import com.javacodegeeks.jpaexample.model.Person;<font>font> import com.javacodegeeks.jpaexample.service.PersonService;<font>font> import org.slf4j.Logger;<font>font> import org.slf4j.LoggerFactory;<font>font> import org.springframework.beans.factory.annotation.Autowired;<font>font> import org.springframework.boot.CommandLineRunner;<font>font> import org.springframework.boot.SpringApplication;<font>font> import org.springframework.boot.autoconfigure.SpringBootApplication;<font>font>
<font>font> @SpringBootApplication<font>font> public class DataJpaApp implements CommandLineRunner {<font>font>
<font>font> private static final Logger LOG = LoggerFactory.getLogger("JCG");<font>font>
<font>font> @Autowired<font>font> private PersonService service;<font>font>
<font>font> public static void main(String[] args) {<font>font> SpringApplication.run(DataJpaApp.class, args);<font>font>
  }<font>font>
<font>font> @Override<font>font> public void run(String... strings) {<font>font>
<font>font> LOG.info("Current objects in DB: {}", service.countPersons());<font>font>
<font>font> Person person = service.createPerson(new Person("Shubham", 23));<font>font> LOG.info("Person created in DB : {}", person);<font>font>
<font>font> LOG.info("Current objects in DB: {}", service.countPersons());<font>font>
<font>font> person.setName("Programmer");<font>font> Person editedPerson = service.editPerson(person);<font>font> LOG.info("Person edited in DB  : {}", person);<font>font>
<font>font> service.deletePerson(person);<font>font> LOG.info("After deletion, count: {}", service.countPersons());<font>font>
  }<font>font>
}<font>font>
在上面的示例代码中,我们只是简单地调用了我们在服务中创建的一些重要方法,例如创建一些数据并在以后的方法调用中访问它。
现在,我们最终将使用 Maven 本身运行我们的项目(同样独立于任何 IDE 来运行我们的项目)。
十、运行应用程序
使用 maven 运行应用程序很容易,只需使用以下命令:
mvn spring-boot:run
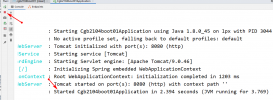
运行项目后,我们将看到以下输出:

数据 JPA 项目输出
正如预期的那样,我们首先创建了一些示例数据并通过调用count()方法来确认它。最后,我们删除了数据,并通过count()方法调用再次确认。
原文地址:https://www.toutiao.com/article/7090822194565038592/


