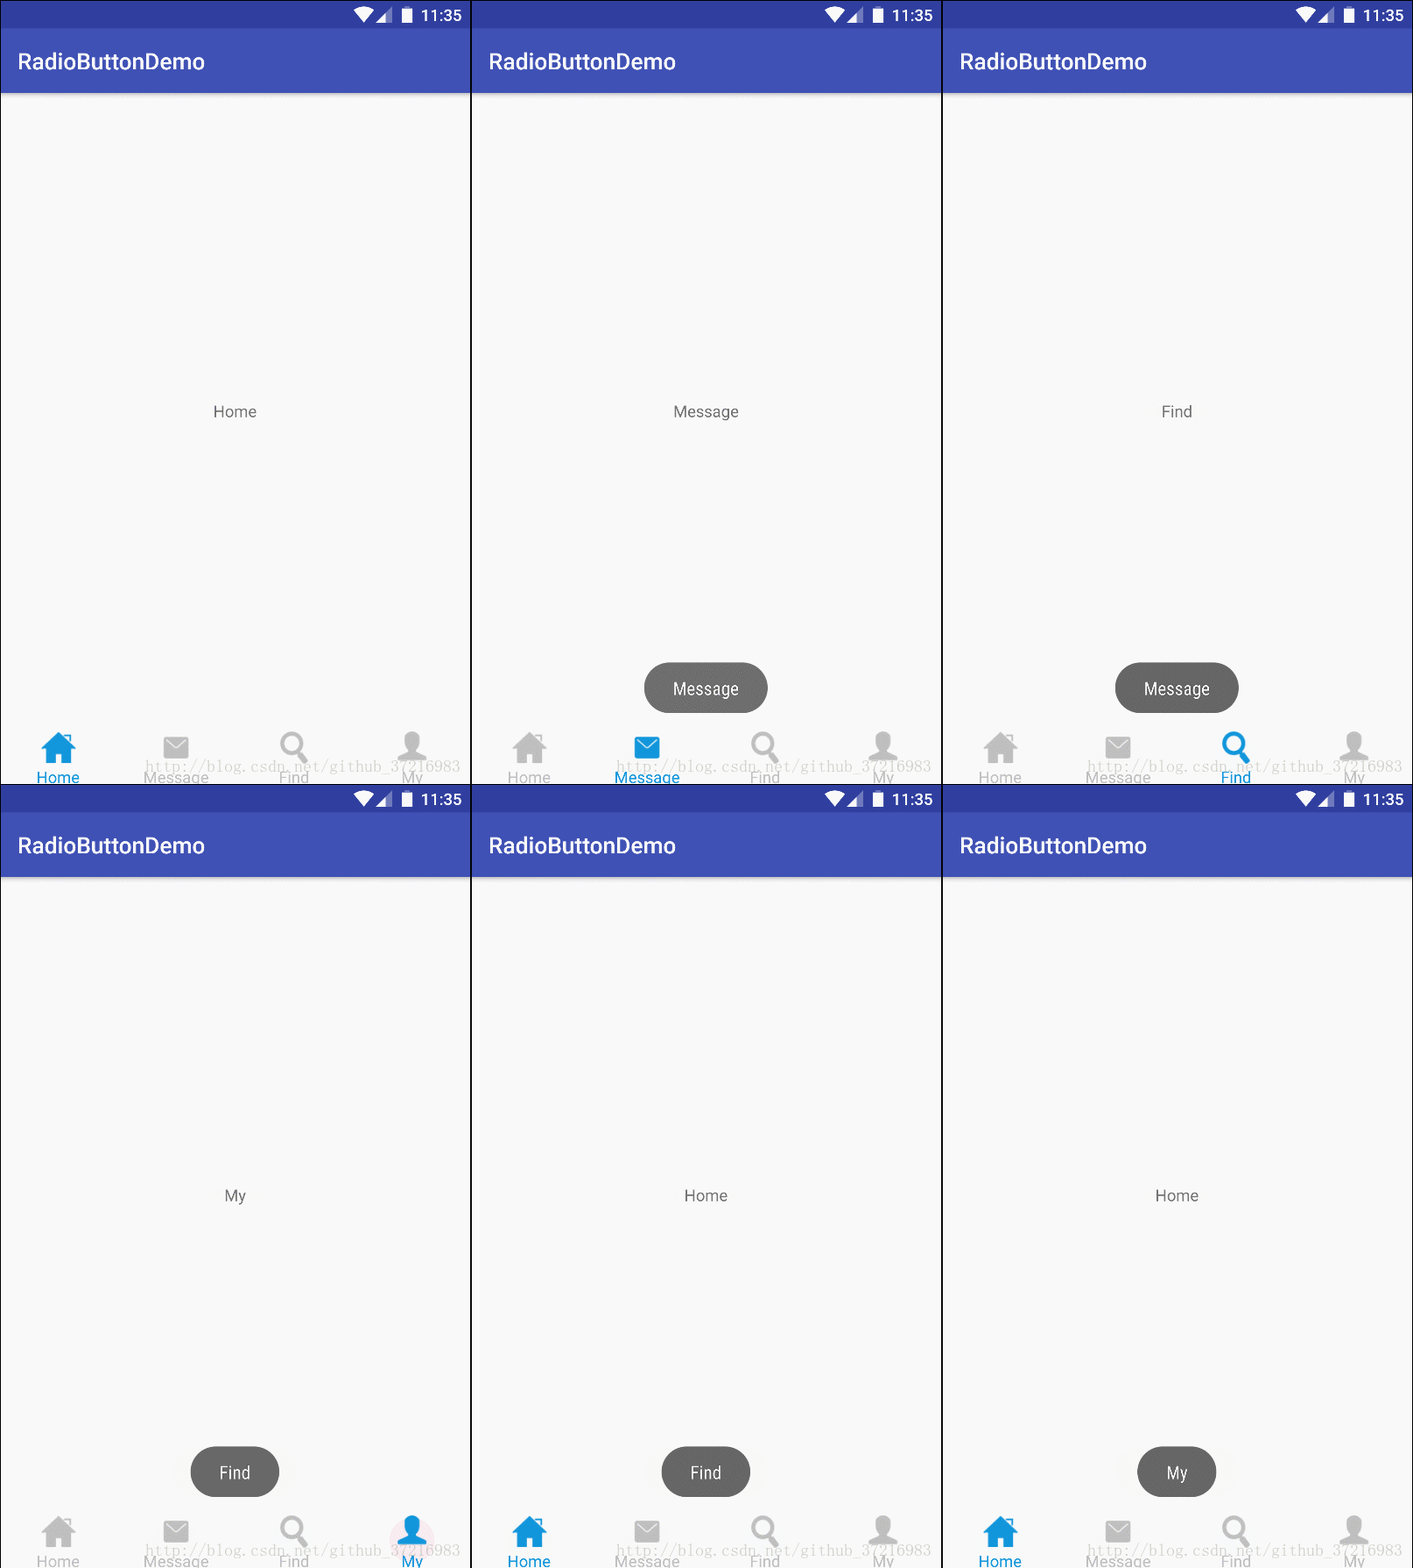
底部导航栏,在我们App项目中是非常常用!而且实现它的方式很多,今天我们就来使用RadioButton+Fragment实现底部导航栏!
下面就让我们动手吧,首先我们打开RadioButtonDemo这个项目,首先修改activity_main.xml文件如下:
|
1
2
3
4
5
6
7
8
9
10
11
12
13
14
15
16
17
18
19
20
21
22
23
24
25
26
27
28
29
30
31
32
33
34
35
36
37
38
39
40
41
42
43
44
45
46
47
48
49
50
51
52
53
54
55
56
57
58
59
60
61
62
63
64
65
66
67
68
69
|
<?xml version="1.0" encoding="utf-8"?><LinearLayout xmlns:android="http://schemas.android.com/apk/res/android" xmlns:app="http://schemas.android.com/apk/res-auto" xmlns:tools="http://schemas.android.com/tools" android:layout_width="match_parent" android:layout_height="match_parent" android:orientation="vertical" tools:context="com.example.jackhu.radiobuttondemo.MainActivity"> <FrameLayout android:id="@+id/mFragment" android:layout_width="match_parent" android:layout_height="0dp" android:layout_weight="1"></FrameLayout> <RadioGroup android:layout_marginBottom="2dp" android:id="@+id/mRadioGroup" android:orientation="horizontal" android:layout_width="match_parent" android:layout_height="48dp"> <RadioButton android:drawableTop="@drawable/rbhome" android:button="@null" android:checked="true" android:textColor="@color/colorRadioButtonP" android:id="@+id/mRb_home" android:gravity="center" android:layout_width="0dp" android:text="Home" android:layout_weight="1" android:layout_height="match_parent" /> <RadioButton android:drawableTop="@drawable/rb_message" android:button="@null" android:textColor="@color/colorRadioButtonN" android:id="@+id/mRb_message" android:gravity="center" android:layout_width="0dp" android:text="Message" android:layout_weight="1" android:layout_height="match_parent" /> <RadioButton android:drawableTop="@drawable/rbfind" android:button="@null" android:textColor="@color/colorRadioButtonN" android:id="@+id/mRb_find" android:gravity="center" android:layout_width="0dp" android:text="Find" android:layout_weight="1" android:layout_height="match_parent" /> <RadioButton android:drawableTop="@drawable/rbmy" android:button="@null" android:textColor="@color/colorRadioButtonN" android:id="@+id/mRb_my" android:gravity="center" android:layout_width="0dp" android:text="My" android:layout_weight="1" android:layout_height="match_parent" /> </RadioGroup></LinearLayout> |
这里我们在布局文件Fragment控件:用于显示界面的切换。
RadioGroup控件包含了4个RadioButton:用于显示按钮。我们给第一个按钮check为true默认选中。其中android:button=”@null” 取消圆点。
drawableTop属性:
|
1
2
3
4
5
|
<?xml version="1.0" encoding="utf-8"?><selector xmlns:android="http://schemas.android.com/apk/res/android"> <item android:state_checked="true" android:drawable="@drawable/home_p"/> <item android:drawable="@drawable/home_n"/></selector> |
显示选择和未选中的状态的图标
创建Fragment,加载Fragment布局文件,类代码如下:
|
1
2
3
4
5
6
7
8
9
10
11
12
13
14
15
16
17
18
19
20
21
22
23
24
25
26
27
28
29
30
31
32
33
34
35
|
package com.example.jackhu.radiobuttondemo.fragment;import android.os.Bundle;import android.support.v4.app.Fragment;import android.view.LayoutInflater;import android.view.View;import android.view.ViewGroup;import com.example.jackhu.radiobuttondemo.R;/** * A simple {@link Fragment} subclass. */public class HomeFragment extends Fragment { public HomeFragment() { // Required empty public constructor } //单例模式 public static HomeFragment newInstance(){ HomeFragment homeFragment=new HomeFragment(); return homeFragment; } @Override public View onCreateView(LayoutInflater inflater, ViewGroup container, Bundle savedInstanceState) { // Inflate the layout for this fragment return inflater.inflate(R.layout.fragment_home, container, false); }} |
接下来我们来修改MainActivity.class中的代码,在这里实现点击按钮切换Fragment的具体功能,代码如下:
|
1
2
3
4
5
6
7
8
9
10
11
12
13
14
15
16
17
18
19
20
21
22
23
24
25
26
27
28
29
30
31
32
33
34
35
36
37
38
39
40
41
42
43
44
45
46
47
48
49
50
51
52
53
54
55
56
57
58
59
60
61
62
63
64
65
66
67
68
69
70
71
72
73
74
75
76
77
78
79
80
81
82
83
84
85
86
87
88
89
90
91
92
93
94
95
96
97
98
99
100
101
102
103
104
105
106
107
108
109
110
111
112
113
114
115
116
117
118
119
120
121
122
123
124
125
126
127
128
129
130
131
132
133
134
135
136
|
package com.example.jackhu.radiobuttondemo;import android.support.annotation.IdRes;import android.support.v4.app.Fragment;import android.support.v4.app.FragmentManager;import android.support.v4.app.FragmentTransaction;import android.support.v4.content.ContextCompat;import android.support.v7.app.AppCompatActivity;import android.os.Bundle;import android.widget.RadioButton;import android.widget.RadioGroup;import android.widget.Toast;import com.example.jackhu.radiobuttondemo.fragment.FindFragment;import com.example.jackhu.radiobuttondemo.fragment.HomeFragment;import com.example.jackhu.radiobuttondemo.fragment.MessageFragment;import com.example.jackhu.radiobuttondemo.fragment.MyFragment;import java.util.ArrayList;import java.util.List;public class MainActivity extends AppCompatActivity implements RadioGroup.OnCheckedChangeListener { private RadioGroup mRadioGroup; private List<Fragment> fragments = new ArrayList<>(); private Fragment fragment; private FragmentManager fm; private FragmentTransaction transaction; private RadioButton rb_Home,rb_Message,rb_Find,rb_My; @Override protected void onCreate(Bundle savedInstanceState) { super.onCreate(savedInstanceState); setContentView(R.layout.activity_main); initView(); //初始化组件 mRadioGroup.setOnCheckedChangeListener(this); //点击事件 fragments = getFragments(); //添加布局 //添加默认布局 normalFragment(); } //默认布局 private void normalFragment() { fm=getSupportFragmentManager(); transaction=fm.beginTransaction(); fragment=fragments.get(0); transaction.replace(R.id.mFragment,fragment); transaction.commit(); } private void initView() { mRadioGroup = (RadioGroup) findViewById(R.id.mRadioGroup); rb_Home= (RadioButton) findViewById(R.id.mRb_home); rb_Message= (RadioButton) findViewById(R.id.mRb_message); rb_Find= (RadioButton) findViewById(R.id.mRb_find); rb_My= (RadioButton) findViewById(R.id.mRb_my); } @Override public void onCheckedChanged(RadioGroup group, @IdRes int checkedId) { fm=getSupportFragmentManager(); transaction=fm.beginTransaction(); switch (checkedId){ case R.id.mRb_home: fragment=fragments.get(0); transaction.replace(R.id.mFragment,fragment); Toast.makeText(this, "Home", Toast.LENGTH_SHORT).show(); break; case R.id.mRb_message: fragment=fragments.get(1); transaction.replace(R.id.mFragment,fragment); Toast.makeText(this, "Message", Toast.LENGTH_SHORT).show(); break; case R.id.mRb_find: fragment=fragments.get(2); transaction.replace(R.id.mFragment,fragment); Toast.makeText(this, "Find", Toast.LENGTH_SHORT).show(); break; case R.id.mRb_my: fragment=fragments.get(3); transaction.replace(R.id.mFragment,fragment); Toast.makeText(this, "My", Toast.LENGTH_SHORT).show(); break; } setTabState(); transaction.commit(); } //设置选中和未选择的状态 private void setTabState() { setHomeState(); setMessageState(); setFindState(); setMyState(); } private void setMyState() { if (rb_My.isChecked()){ rb_My.setTextColor(ContextCompat.getColor(this,R.color.colorRadioButtonP)); }else{ rb_My.setTextColor(ContextCompat.getColor(this,R.color.colorRadioButtonN)); } } private void setFindState() { if (rb_Find.isChecked()){ rb_Find.setTextColor(ContextCompat.getColor(this,R.color.colorRadioButtonP)); }else{ rb_Find.setTextColor(ContextCompat.getColor(this,R.color.colorRadioButtonN)); } } private void setMessageState() { if (rb_Message.isChecked()){ rb_Message.setTextColor(ContextCompat.getColor(this,R.color.colorRadioButtonP)); }else{ rb_Message.setTextColor(ContextCompat.getColor(this,R.color.colorRadioButtonN)); } } private void setHomeState() { if (rb_Home.isChecked()){ rb_Home.setTextColor(ContextCompat.getColor(this,R.color.colorRadioButtonP)); }else{ rb_Home.setTextColor(ContextCompat.getColor(this,R.color.colorRadioButtonN)); } } public List<Fragment> getFragments() { fragments.add(new HomeFragment()); fragments.add(new MessageFragment()); fragments.add(new FindFragment()); fragments.add(new MyFragment()); return fragments; }} |
好了,这样的话,所有的代码就已经完成了,可以运行一下看看完整的效果了最终效果图:

以上就是本文的全部内容,希望对大家的学习有所帮助,也希望大家多多支持服务器之家。
原文链接:https://blog.csdn.net/github_37216983/article/details/68628540


