本文实例为大家分享了swift绘制渐变色的具体代码,供大家参考,具体内容如下
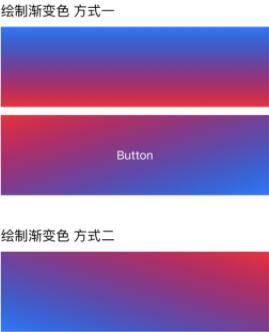
示意图:
|
1
2
3
4
5
6
7
8
9
10
11
12
13
14
15
16
17
18
19
20
21
22
23
24
25
26
27
28
29
30
|
import foundationimport uikit class gradientvc: uiviewcontroller { @iboutlet weak var butone: gradientcustombutton! @iboutlet weak var viewtwo: uiview! override func viewdidload() { super.viewdidload() /// 方式一 xib添加渐变色 /// 方式一 代码添加渐变色 butone.isgradient = true butone.startcolor = uicolor(hexstring: "#fd0134")! butone.endcolor = uicolor(hexstring: "#007aff")! butone.startpoint = cgpoint(x: 0,y: 0) butone.endpoint = cgpoint(x: 1,y: 1) /// 方式二 //viewtwo.addgradient(start_color: "#8238ff", end_color: "#007aff") //viewtwo.layer.maskstobounds = true viewtwo.addgradient(colors: [uicolor(hexstring: "#fd0134")!, uicolor(hexstring: "#007aff")!], point: (cgpoint(x: 1.0, y: 0.0), cgpoint(x: 0.0, y: 1.0)), frame: cgrect(x: 0, y: 0, width: uiscreen.main.bounds.width-40, height: 100), radius: 0) }} |
方式一:
使用xib或代码的方式添加渐变色.
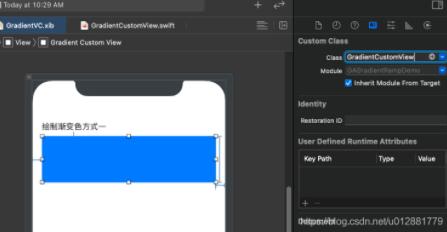
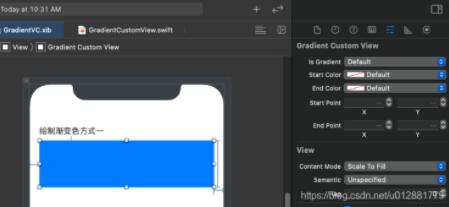
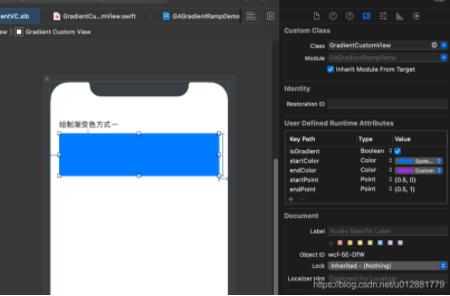
这种方式有个缺点, 若是要对更多的视图(比如uilabel)添加渐变色, 需要继续创建一个子类继承于它进行功能的拓展.
|
1
2
3
4
5
6
7
8
9
10
11
12
13
14
15
16
17
18
19
20
21
22
23
24
25
26
27
28
29
30
31
32
33
34
35
36
37
38
39
40
41
42
43
44
45
46
47
48
49
50
51
52
53
54
55
56
|
import foundationimport uikit class gradientcustomview: uiview { @ibinspectable var isgradient: bool = false @ibinspectable var startcolor: uicolor = .white @ibinspectable var endcolor: uicolor = .white @ibinspectable var locations: [nsnumber] = [0 , 1] @ibinspectable var startpoint: cgpoint = .zero @ibinspectable var endpoint: cgpoint = .zero private var gradientbglayer: cagradientlayer? override func layoutsubviews() { super.layoutsubviews() gradientbglayer?.removefromsuperlayer() if isgradient { gradientbglayer = cagradientlayer() gradientbglayer!.colors = [startcolor.cgcolor, endcolor.cgcolor] gradientbglayer!.locations = locations gradientbglayer!.frame = bounds gradientbglayer!.startpoint = startpoint gradientbglayer!.endpoint = endpoint self.layer.insertsublayer(gradientbglayer!, at: 0) } } } class gradientcustombutton: uibutton { @ibinspectable var isgradient: bool = false @ibinspectable var startcolor: uicolor = .white @ibinspectable var endcolor: uicolor = .white @ibinspectable var locations: [nsnumber] = [0 , 1] @ibinspectable var startpoint: cgpoint = .zero @ibinspectable var endpoint: cgpoint = .zero private var gradientbglayer: cagradientlayer? override func layoutsubviews() { super.layoutsubviews() gradientbglayer?.removefromsuperlayer() if isgradient { gradientbglayer = cagradientlayer() gradientbglayer!.colors = [startcolor.cgcolor, endcolor.cgcolor] gradientbglayer!.locations = locations gradientbglayer!.frame = bounds gradientbglayer!.startpoint = startpoint gradientbglayer!.endpoint = endpoint self.layer.insertsublayer(gradientbglayer!, at: 0) } } } |
方式二:
直接拓展uiview,让每个继承于uiview的视图都可以调用拓展的方法.
这种方式的缺点就是无法在xib中使用
|
1
2
3
4
5
6
7
8
9
10
11
12
13
14
15
16
17
18
19
20
21
22
23
24
25
26
27
28
29
30
31
32
33
34
35
36
37
38
39
40
41
42
43
44
45
46
47
48
49
50
51
52
53
54
55
56
57
58
59
60
61
62
63
64
65
66
67
68
69
70
71
72
73
74
75
76
77
78
79
80
81
82
83
84
85
86
87
88
89
90
91
92
93
94
95
96
97
98
99
100
101
102
103
104
105
106
107
108
109
110
111
112
113
114
115
116
117
118
119
120
121
122
123
124
125
126
127
128
129
130
131
132
|
import foundationimport uikit extension uiview { @discardableresult func addgradient(colors: [uicolor], point: (cgpoint, cgpoint) = (cgpoint(x: 0.5, y: 0), cgpoint(x: 0.5, y: 1)), locations: [nsnumber] = [0, 1], frame: cgrect = cgrect.zero, radius: cgfloat = 0, at: uint32 = 0) -> cagradientlayer { let bglayer1 = cagradientlayer() bglayer1.colors = colors.map { $0.cgcolor } bglayer1.locations = locations if frame == .zero { bglayer1.frame = self.bounds } else { bglayer1.frame = frame } bglayer1.startpoint = point.0 bglayer1.endpoint = point.1 bglayer1.cornerradius = radius self.layer.insertsublayer(bglayer1, at: at) return bglayer1 } func addgradient(start: cgpoint = cgpoint(x: 0.5, y: 0), end: cgpoint = cgpoint(x: 0.5, y: 1), colors: [uicolor], locations: [nsnumber] = [0, 1], frame: cgrect = cgrect.zero, radius: cgfloat = 0, at: uint32 = 0) { let bglayer1 = cagradientlayer() bglayer1.colors = colors.map { $0.cgcolor } bglayer1.locations = locations bglayer1.frame = frame bglayer1.startpoint = start bglayer1.endpoint = end bglayer1.cornerradius = radius self.layer.insertsublayer(bglayer1, at: at) } func addgradient(start_color:string,end_color : string,frame : cgrect?=nil,cornerradius : cgfloat?=0, at: uint32 = 0){ var bounds : cgrect = self.bounds if let frame = frame { bounds = frame } let bglayer1 = cagradientlayer() bglayer1.colors = [uicolor(hexstring: start_color)!.cgcolor, uicolor(hexstring: end_color)!.cgcolor] bglayer1.locations = [0, 1] bglayer1.frame = bounds bglayer1.startpoint = cgpoint(x: 0, y: 0.61) bglayer1.endpoint = cgpoint(x: 0.61, y: 0.61) bglayer1.cornerradius = cornerradius ?? 0 self.layer.insertsublayer(bglayer1, at: at) } func addgradient(start_color:string, end_color : string, frame : cgrect?=nil, borader: cgfloat = 0, boradercolor: uicolor = .clear, at: uint32 = 0, corners: uirectcorner?, radius: cgfloat = 0) { var bounds : cgrect = self.bounds if let frame = frame { bounds = frame } let bglayer1 = cagradientlayer() bglayer1.colors = [uicolor(hexstring: start_color)!.cgcolor, uicolor(hexstring: end_color)!.cgcolor] bglayer1.locations = [0, 1] bglayer1.frame = bounds bglayer1.startpoint = cgpoint(x: 0, y: 0.61) bglayer1.endpoint = cgpoint(x: 0.61, y: 0.61) bglayer1.bordercolor = boradercolor.cgcolor bglayer1.borderwidth = borader if corners != nil { let cornerpath = uibezierpath(roundedrect: bounds, byroundingcorners: corners!, cornerradii: cgsize(width: radius, height: radius)) let radiuslayer = cashapelayer() radiuslayer.frame = bounds radiuslayer.path = cornerpath.cgpath bglayer1.mask = radiuslayer } self.layer.insertsublayer(bglayer1, at: at) } func addgradient(startpoint: cgpoint = cgpoint(x: 0, y: 0.5), start_color:string, endpoint: cgpoint = cgpoint(x: 1, y: 0.5), end_color : string, frame : cgrect? = nil, cornerradius : cgfloat?=0){ var bounds : cgrect = self.bounds if let frame = frame { bounds = frame } let bglayer1 = cagradientlayer() bglayer1.frame = bounds bglayer1.startpoint = startpoint bglayer1.endpoint = endpoint bglayer1.colors = [uicolor(hexstring: start_color)!.cgcolor, uicolor(hexstring: end_color)!.cgcolor] bglayer1.locations = [0, 1] bglayer1.cornerradius = cornerradius ?? 0 self.layer.addsublayer(bglayer1) } func addverticalgradient(start_color:string,end_color : string,frame : cgrect?=nil,cornerradius : cgfloat?=0){ var bounds : cgrect = self.bounds if let frame = frame { bounds = frame } let bglayer1 = cagradientlayer() bglayer1.colors = [uicolor(hexstring: start_color)!.cgcolor, uicolor(hexstring: end_color)!.cgcolor] bglayer1.locations = [0, 1] bglayer1.frame = bounds bglayer1.startpoint = cgpoint(x: 0.5, y: 0) bglayer1.endpoint = cgpoint(x: 1, y: 1) bglayer1.cornerradius = cornerradius ?? 0 self.layer.insertsublayer(bglayer1, at: 0) } //将当前视图转为uiimage func asimage() -> uiimage { let renderer = uigraphicsimagerenderer(bounds: bounds) return renderer.image { renderercontext in layer.render(in: renderercontext.cgcontext) } }} |
demo:https://github.com/Gamin-fzym/GAGradientRampDemo.git
以上就是本文的全部内容,希望对大家的学习有所帮助,也希望大家多多支持服务器之家。
原文链接:https://blog.csdn.net/wsyx768/article/details/119422014


