前言:
1、我的linux是64位的redhat6.5,安装的oracle版本是11.2.0的。
2、我这是自己安装的linux虚拟机,主机名为ora11g,ip为192.168.100.122
3、这台机器以前没有安装过oracle数据库,这是第一次安装;系统安装好了之后,仅仅只配了ip地址;所以新手完全可以按照我的步骤装一次oracle。
准备工作:
1、确认主机名一致:
|
1
|
[root@ora11g ~]# vi /etc/hosts |
在末尾添加 (#其中192.168.100.123为本机ip地址,ora11g为本机主机名,请根据服务器不同自行更改)
|
1
|
192.168.100.123 ora11g |
2、上传数据库安装压缩包,比如/home/下,并解压,会得到一个database的文件夹。
打系统补丁包
1、建立光盘源
1)查看光盘位置,可以看出/dev/sr0即为系统光盘文件
|
1
|
[root@ora11g ~]# df -h |
提示内容为
|
1
2
3
4
5
|
filesystem size used avail use% mounted on/dev/sda3 26g 2.8g 22g 12% /tmpfs 936m 224k 936m 1% /dev/shm/dev/sda1 194m 34m 151m 19% /boot/dev/sr0 3.6g 3.6g 0 100% /media/rhel_6.5 x86_64 disc 1 |
2)、挂载光盘 (挂载点为mnt目录)
|
1
|
[root@ora11g ~]# mount /dev/sr0 /mnt/ |
3)、创建本地yum源并编辑
|
1
2
3
|
[root@ora11g ~]# touch /etc/yum.repos.d/redhat.repo[root@ora11g ~]# vi /etc/yum.repos.d/redhat.repo |
在redhat.repo中添加内容(#后面文字为说明,复制的时候请自行删除)
|
1
2
3
4
5
|
[sever]name=redhat6.5 #自定义名称baseurl=file:///mnt/ #本地光盘挂载路径enabled=1 #启用yum源,0为不启用,1为启用gpgcheck=0 #检查gpg-key,0为不启用 |
4)、把 yum.conf中的gpgcheck改为0
|
1
|
vi /etc/yum.conf |
2、打补丁
rqm -qa | grep compat(补丁包名) 为查看系统是否有这个补丁包
yum install compat(补丁包名) 为安装这个补丁包
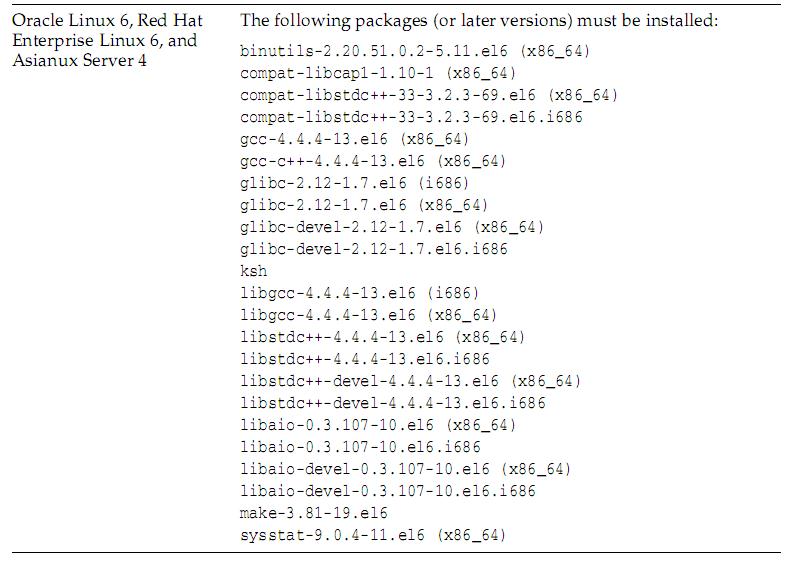
1)、redhat6.5版本64位系统所需系统补丁截图


2)、打补丁(根据我系统安装的版本检查完后发现只需要安装以下补丁,这里不在赘述)
|
1
2
3
4
5
6
7
8
9
10
11
12
13
14
15
16
17
18
19
20
21
|
[root@ora11g ~]#yum install compat-libcap* [root@ora11g ~]#yum install compat-libstdc++-33* [root@ora11g ~]#yum install compat-libstdc++-33*.i686 [root@ora11g ~]#yum install gcc*[root@ora11g ~]#yum install glibc-devel-*.i686[root@ora11g ~]#yum install libstdc++-devel*.i686[root@ora11g ~]#yum install libaio*.i686[root@ora11g ~]#yum install libaio-devel*[root@ora11g ~]#yum install unixodbc*[root@ora11g ~]#yum install unixodbc*.i686[root@ora11g ~]#yum install ksh |
(ps:上述的包为我这个系统中没有的补丁包,在安装的时候针对不同系统有不同的情况,请注意。请对照图片中所列的补丁包一一确认,其中(*86_64)与(.i686)为不同的补丁包,i686的需要的后面加上.i686,可以参照上面的写法。)
可以使用下面命令检验补丁包是否打完
|
1
2
3
|
[root@ora11g ~]#rpm -q binutils compat-libcap1 compat-libstdc++-33 gcc gcc-c++ glibc glibc-devel ksh[root@ora11g ~]#rpm -q libgcc libstdc++ libstdc++-devel libaio libaio-devel make sysstat unixodbc unixodbc-devel |
修改系统文件参数
1、配置linux内核参数
|
1
|
[root@ora11g ~]# vi /etc/sysctl.conf |
注释掉kernel.shmmax与kernel.shmall,并追加以下内容
|
1
2
3
4
5
6
7
8
9
10
11
|
kernel.shmmax = 68719476736kernel.shmall = 4294967296fs.file-max = 6815744kernel.shmmni = 4096kernel.sem = 250 32000 100 128net.ipv4.ip_local_port_range = 9000 65500net.core.rmem_default = 262144net.core.rmem_max = 4194304net.core.wmem_default = 262144net.core.wmem_max = 1048586fs.aio-max-nr = 1048576 |
2、配置资源使用情况
|
1
|
[root@ora11g ~]# vi /etc/security/limits.conf |
追加以下内容
|
1
2
3
4
5
|
oracle soft nproc 2047oracle hard nproc 16384oracle soft nofile 1024oracle hard nofile 65536oracle hard stack 10240 |
3、登陆设置
|
1
|
[root@ora11g ~]# vi /etc/pam.d/login |
追加以下内容
|
1
2
|
session required /lib64/security/pam_limits.sosession required pam_limits.so |
|
1
|
[root@ora11g ~]# vi /etc/profile |
追加以下内容
|
1
2
3
4
5
6
7
8
|
if [ $user = "oracle" ]; thenif [ $shell = "/bin/ksh" ]; thenulimit -p 16384ulimit -n 65536elseulimit -u 16384 -n 65536fifi |
4、关闭selinux ,确保selinux=disabled
|
1
|
[root@ora11g ~]# vi /etc/selinux/config |
创建用户、用户组和安装目录
1、创建oinstall和dba组和oracle用户
|
1
2
3
4
5
6
7
8
9
|
[root@ora11g ~]# groupadd oinstall[root@ora11g ~]# groupadd dba[root@ora11g ~]# useradd -g oinstall -g dba oracle[root@ora11g ~]# passwd oracle##之后会输入两次oracle密码 |
2、创建安装目录并修改所属用户和组
|
1
2
3
|
[root@ora11g ~]# mkdir -p /u01/app/oracle[root@ora11g ~]# chown -r oracle:oinstall /u01/app/ |
修改环境变量
1、切换到oracle用户。
|
1
|
[root@ora11g ~]# su - oracle |
2、修改环境变量
|
1
|
[oracle@ora11g ~]$ vi .bash_profile |
追加以下内容
|
1
2
3
4
5
|
export oracle_base=/u01/app/oracleexport oracle_home=$oracle_base/product/11.2.0/db_1export oracle_sid=ora11gexport path=$path:$home/bin:$oracle_home/binexport ld_library_path=$oracle_home/lib:/usr/lib |
移动database文件
移动文件并修改权限等
|
1
2
3
4
5
|
[root@ora11g ~]# mv /home/database/ /u01/[root@ora11g ~]# chown -r oracle:oinstall database/[root@ora11g ~]# chmod -r 777 database/ |
下面才是正菜(静默安装oracle)
1、静默安装oracle软件
1)、编辑响应文件db_install.rsp
|
1
|
[root@ora11g ~]# vi /u01/database/response/db_install.rsp |
需要修改的配置有以下内容(参考大神说明 http://blog.csdn.net/jameshadoop/article/details/48086933)
|
1
2
3
4
5
6
7
8
9
10
11
12
13
14
15
16
17
18
19
20
21
22
23
24
25
26
27
28
29
30
31
32
33
34
|
oracle.install.option=install_db_swonly #选择安装类型:1.只装数据库软件 2.安装数据库软件并建库 3.升级数据库oracle_hostname=ora11g #指定操作系统主机名,通过hostname命令获得unix_group_name=oinstall #指定oracle inventory目录的所有者,通常会是oinstall或者dbainventory_location=/u01/app/orainventory #指定产品清单oracle inventory目录的路径selected_languages=en,zh_cn,zh_tw #指定数据库语言,可以选择多个,用逗号隔开oracle_home=/u01/app/oracle/product/11.2.0/db_1 #设置oralce_home的路径oracle_base=/u01/app/oracle # 设置oralce_base的路径oracle.install.db.installedition=ee #选择oracle安装数据库软件的版本oracle.install.db.iscustominstall=falseoracle.install.db.dba_group=dba #指定拥有osdba、osoper权限的用户组,通常会是dba组oracle.install.db.oper_group=oinstalloracle.install.db.config.starterdb.type=general_purpose #选择数据库的用途,一般用途/事物处理,数据仓库oracle.install.db.config.starterdb.globaldbname=ora11g #指定globalnameoracle.install.db.config.starterdb.sid=ora11g #指定sidoracle.install.db.config.starterdb.characterset=zhs16gbk #选择字符集。不正确的字符集会给数据显示和存储带来麻烦无数。 #通常中文选择的有zhs16gbk简体中文库,根据公司规定自行选择oracle.install.db.config.starterdb.password.all=123456 #设定所有数据库用户使用同一个密码,其它数据库用户就不用单独设置了。decline_security_updates=true # false表示不需要设置安全更新,注意,在11.2的静默安装中疑似有一个bug # response file中必须指定为true,否则会提示错误,不管是否正确填写了邮件地址 |
2)、切换到oracle用户进入到/u01/database目录下执行安装命令
|
1
2
3
|
[oracle@ora11g ~]$ cd /u01/database/[oracle@ora11g database]$ ./runinstaller -silent -ignoreprereq responsefile /u01/database/response/db_install.rsp |
使用root用户使用tail -f 查看实时日志,不赘述。
3)、等到窗口出现以下命令时
出现类似如下提示表示安装完成:
|
1
2
3
4
5
6
7
8
9
10
11
12
|
#-------------------------------------------------------------------.../u01/app/orainventory/orainstroot.sh/u01/app/oracle/product/11.2.0/db_1/root.shto execute the configuration scripts:1. open a terminal window 2. log in as "root"3. run the scripts 4. return to this window and hit "enter" key to continue successfully setup software.#------------------------------------------------------------------- |
新开窗口使用root用户登陆并执行以下命令
|
1
2
|
[root@ora11g ~]# /u01/app/orainventory/orainstroot.sh[root@ora11g ~]# /u01/app/oracle/product/11.2.0/db_1/root.sh |
oracle软件安装完成。
2、静默安装监听,( $oracle_home/bin/netca /silent /responsefile u01/database/response/netca.rsp)
|
1
|
[oracle@ora11g ~]$ /u01/app/oracle/product/11.2.0/db_1/bin/netca /silent /responsefile /u01/database/response/netca.rsp |
3、静默建库
1)、编辑dbca.rsp
|
1
|
[root@ora11g ~]# vi /u01/database/response/dbca.rsp |
修改配置如下
|
1
2
3
4
5
6
7
8
9
10
11
12
13
14
15
16
|
#以下内容不要修改responsefile_version = "11.2.0"operation_type = "createdatabase"#以下内容必须设置gdbname = "ora11g"sid = "ora11g"templatename = "general_purpose.dbc"#以下内容根据需要修改characterset = "zhs16gbk" |
2)、使用oracle用户执行建库命令(注意执行监听的时候是 /silent /responsefile 而执行建库则是 -silent -responsefile)
|
1
|
[oracle@ora11g ~]$ /u01/app/oracle/product/11.2.0/db_1/bin/dbca -silent -responsefile /u01/database/response/dbca.rsp |
之后会提示输入sys和system的密码,我的都是123456,所有输入2次都是一样的。(我这里命令行会先删除界面的内容才可以输入,不知道是不是系统的原因还是别的导致的)
界面会提示安装进度
|
1
2
3
4
5
6
7
8
9
10
11
12
13
14
15
16
17
18
19
|
copying database files...37% completecreating and starting oracle instance...62% completecompleting database creation...100% completelook at the log file "/u01/app/oracle/cfgtoollogs/dbca/orcl/orcl.log" for further details. |
之后就完成了数据库的安装。
总结
以上就是这篇文章的全部内容了,希望本文的内容对大家的学习或者工作能带来一定的帮助,如果有疑问大家可以留言交流。
原文链接:http://www.cnblogs.com/lpdong/p/6266281.html


