最近在项目中应用到springboot与mybatis,在进行整合过程中遇到一些坑,在此将其整理出来,便于以后查阅与复习。
项目运行环境为:eclispe+jdk1.8+maven
搭建spring boot环境
首先建立maven project,在生成的pom文件中加入依赖,代码如下:
|
1
2
3
4
5
6
7
8
9
10
11
12
13
14
15
16
17
18
19
20
21
22
23
24
25
26
27
28
29
30
31
32
33
34
35
36
37
38
39
40
41
42
43
44
45
46
47
48
49
50
51
52
53
54
55
56
57
58
59
60
61
62
|
<parent> <groupid>org.springframework.boot</groupid> <artifactid>spring-boot-starter-parent</artifactid> <version>1.5.2.release</version> <relativepath/> <!-- lookup parent from repository --></parent><properties> <project.build.sourceencoding>utf-8</project.build.sourceencoding> <project.reporting.outputencoding>utf-8</project.reporting.outputencoding> <java.version>1.8</java.version></properties><dependencies> <dependency> <groupid>org.springframework.boot</groupid> <artifactid>spring-boot-starter-web</artifactid> </dependency> <dependency> <groupid>org.springframework.boot</groupid> <artifactid>spring-boot-starter-test</artifactid> </dependency> <dependency> <groupid>org.mybatis.spring.boot</groupid> <artifactid>mybatis-spring-boot-starter</artifactid> <version>1.3.0</version> </dependency> <dependency> <groupid>mysql</groupid> <artifactid>mysql-connector-java</artifactid> <scope>runtime</scope> </dependency> <!--分页插件--> <dependency> <groupid>com.github.pagehelper</groupid> <artifactid>pagehelper-spring-boot-starter</artifactid> <version>1.2.1</version> </dependency> <!-- alibaba的druid数据库连接池 --> <dependency> <groupid>com.alibaba</groupid> <artifactid>druid</artifactid> <version>1.0.29</version> </dependency></dependencies><build> <plugins> <plugin> <groupid>org.springframework.boot</groupid> <artifactid>spring-boot-maven-plugin</artifactid> </plugin> <!-- mybatis generator 自动生成代码插件 --> <plugin> <groupid>org.mybatis.generator</groupid> <artifactid>mybatis-generator-maven-plugin</artifactid> <version>1.3.2</version> <configuration> <configurationfile>${basedir}/src/main/resources/generator/generatorconfig.xml</configurationfile> <overwrite>true</overwrite> <verbose>true</verbose> </configuration> </plugin> </plugins></build> |
配置好依赖后进行maven install,此时注意的坑:
坑一:启动maven install报错:
[error] failed to execute goal org.springframework.boot:spring-boot-maven-plugin:1.5.2.release:repackage (default) on project springboot-mybatis: execution default of goal org.springframework.boot:spring-boot-maven-plugin:1.5.2.release:repackage failed: unable to find main class -> [help 1]
[error]
[error] to see the full stack trace of the errors, re-run maven with the -e switch.
[error] re-run maven using the -x switch to enable full debug logging.
[error]
[error] for more information about the errors and possible solutions, please read the following articles:
[error] [help 1] http://cwiki.apache.org/confluence/display/maven/pluginexecutionexception
报错原因是没有启动类
解决方法:编写启动类main.java正常运行!
|
1
2
3
4
5
6
|
@springbootapplicationpublic class main { public static void main(string[] args) { springapplication.run(main.class, args); }} |
坑二:启动maven install报错:
[error] failed to execute goal org.apache.maven.plugins:maven-compiler-plugin:3.1:compile (default-compile) on project springboot-mybatis: compilation failure
[error] no compiler is provided in this environment. perhaps you are running on a jre rather than a jdk?
[error] -> [help 1]
[error]
[error] to see the full stack trace of the errors, re-run maven with the -e switch.
[error] re-run maven using the -x switch to enable full debug logging.
[error]
[error] for more information about the errors and possible solutions, please read the following articles:
[error] [help 1] http://cwiki.apache.org/confluence/display/maven/mojofailureexception
报错原因:项目的java环境与电脑环境不符合,例如我的新建项目运行环境为j2se-1.5,报错是在我将其改为jre1.8之后
解决方案:
右键项目——build path——configure build path——libraries——双击jre system libraries如下图所示:
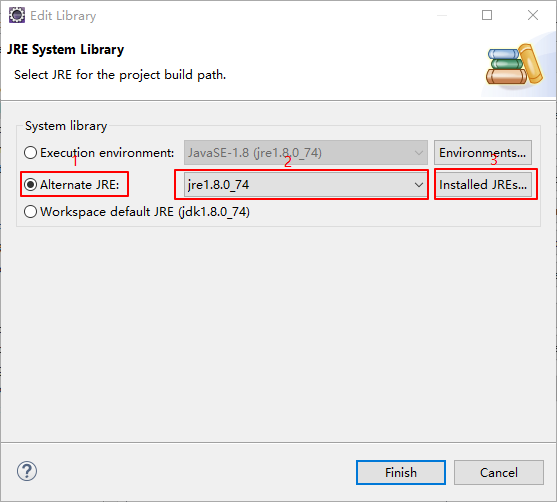
选择alternate jre 如2处的下拉框只有jre,点击3处的install jres,依次经过add——standard vm——next——directory,选择本机的jdk位置点击finish
在install jres位置将默认勾选更改jdk,如下图所示,并保存。
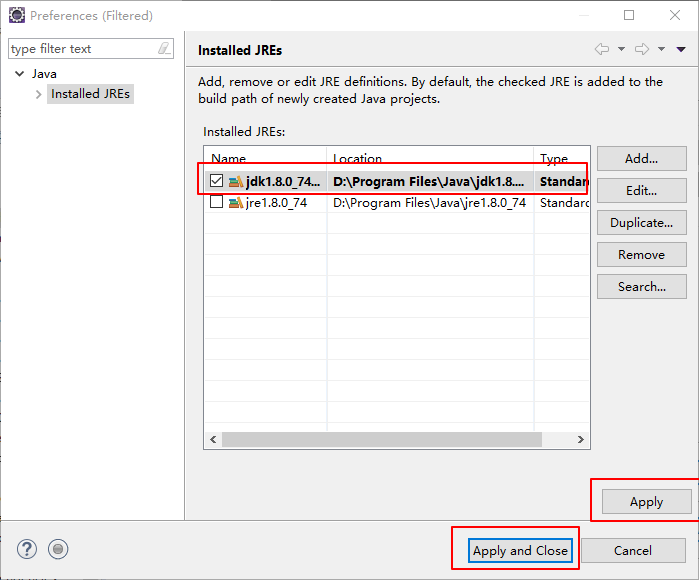
再次maven install项目正常。如下所示:
[info] build success
[info] ------------------------------------------------------------------------
[info] total time: 3.351 s
[info] finished at: 2018-09-05t21:20:48+08:00
[info] final memory: 23m/181m
[info] ------------------------------------------------------------------------
在src/main/resources新建文件:application.yml,内容如下所示:
|
1
2
3
4
5
6
7
8
9
10
11
12
13
14
15
16
17
18
|
server: port: 8080spring: datasource: name: test url: jdbc:mysql://localhost:3306/test username: root password: 123456 driver-class-name: com.mysql.jdbc.driver## 该配置节点为独立的节点mybatis: mapper-locations: classpath:mapper/*.xml#pagehelper分页插件pagehelper: helperdialect: mysql reasonable: true supportmethodsarguments: true params: count=countsql |
至此springboot环境搭建完毕!
逆向工程应用
首先应该注意到在pom文件中有配置逆向工程xml文件的位置:src/main/resources/generator/generatorconfig.xml
因而在src/main/resources下新建generator文件夹,并建立generatorconfig.xml文件,代码如下:
|
1
2
3
4
5
6
7
8
9
10
11
12
13
14
15
16
17
18
19
20
21
22
23
24
25
26
27
28
29
30
31
32
33
34
35
36
|
<?xml version="1.0" encoding="utf-8"?><!doctype generatorconfiguration public "-//mybatis.org//dtd mybatis generator configuration 1.0//en" "http://mybatis.org/dtd/mybatis-generator-config_1_0.dtd"><generatorconfiguration> <!-- 数据库驱动:选择你的本地硬盘上面的数据库驱动包--> <classpathentry location="e:\plugins\maven\repo\mysql\mysql-connector-java\5.1.41\mysql-connector-java-5.1.41.jar"/> <context id="db2tables" targetruntime="mybatis3"> <commentgenerator> <property name="suppressdate" value="true"/> <!-- 是否去除自动生成的注释 true:是 : false:否 --> <property name="suppressallcomments" value="true"/> </commentgenerator> <!--数据库链接url,用户名、密码 --> <jdbcconnection driverclass="com.mysql.jdbc.driver" connectionurl="jdbc:mysql://localhost/test" userid="root" password="123456"> </jdbcconnection> <javatyperesolver> <property name="forcebigdecimals" value="false"/> </javatyperesolver> <!-- 生成pojo类的位置--> <javamodelgenerator targetpackage="com.luis.entity" targetproject="src/main/java"> <property name="enablesubpackages" value="true"/> <property name="trimstrings" value="true"/> </javamodelgenerator> <!-- 生成映射文件的包名和位置--> <sqlmapgenerator targetpackage="mapper" targetproject="src/main/resources"> <!-- enablesubpackages 是否让schema作为包的后缀--> <property name="enablesubpackages" value="false"/> </sqlmapgenerator> <!-- 生成mapper接口的位置--> <javaclientgenerator type="xmlmapper" targetpackage="com.luis.mapper" targetproject="src/main/java"> <!-- enablesubpackages 是否让schema作为包的后缀--> <property name="enablesubpackages" value="false"/> </javaclientgenerator> <!-- 指定数据库表 --> <table schema="" tablename="user"></table> </context></generatorconfiguration> |
根据个人环境将配置文件中的配置进行更改,如数据库密码,包名,对应数据库表
所用的数据库表如下:
|
1
2
3
4
5
6
7
8
9
10
11
|
drop table if exists `user`;create table `user` ( `id` bigint(20) not null, `name` varchar(255) not null, `age` int(4) not null, primary key (`id`)) engine=innodb default charset=utf8;insert into `user` values ('1', 'wanger', '22');insert into `user` values ('2', 'zhangsan', '18');insert into `user` values ('3', 'lisi', '23');insert into `user` values ('4', 'wangwu', '21'); |
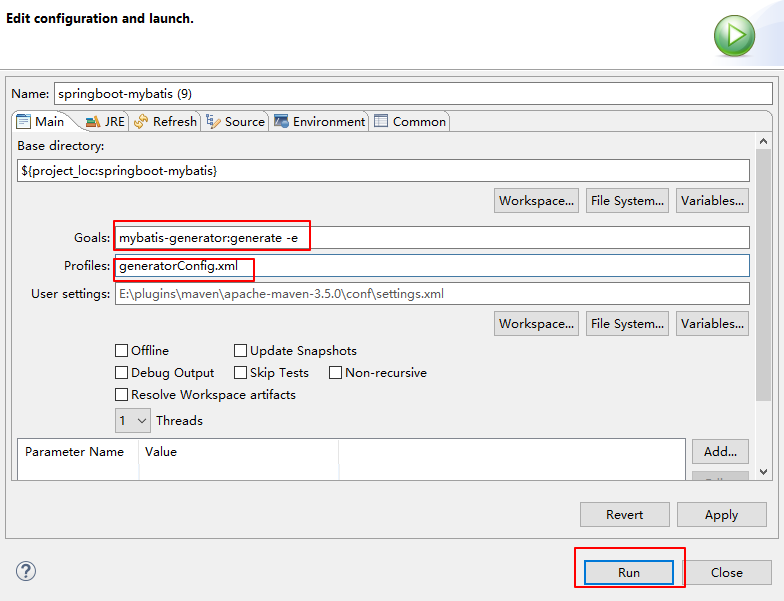
配置完成后,右键项目,选择run as——maven build——在下面两处分别填入:
goals: mybatis-generator:generate -e
profiles: generatorconfig.xml
如下图所示:
出现如下所示,代码生成成功,刷新项目即可。
[info] generating example class for table user
[info] generating record class for table user
[info] generating mapper interface for table user
[info] generating sql map for table user
[info] saving file usermapper.xml
[info] saving file userexample.java
[info] saving file user.java
[info] saving file usermapper.java
[info] ------------------------------------------------------------------------
[info] build success
[info] ------------------------------------------------------------------------
需要注意的是:逆向工程生成的代码不会覆盖,因而不能重复多次生成。
此处也有个小坑,逆向工程的代码生成后,启动项目会报如下错误:
***************************
application failed to start
***************************description:
field usermapper in com.luis.service.impl.userserviceimpl required a bean of type 'com.luis.mapper.usermapper' that could not be found.
action:
consider defining a bean of type 'com.luis.mapper.usermapper' in your configuration.
解决方案:
1、给生成的mapper接口文件前加注解:@mapper 即可解决。但需要给每一个mapper文件前加,繁琐,因而有第二种类
解决办法
2、在启动类前加@mapperscan({"com.luis.mapper"}),其中com.luis.mapper为mapper文件的所在位置。
参考自:http://412887952-qq-com.iteye.com/blog/2392672
分页应用
逆向工程已经生成了entity类,及dao层的mapper接口与*mapper.xml文件,因而/只用编写service层与web层。
首先在userservice中编写接口,代码如下:
|
1
2
3
4
|
public interface userservice { user selectbyname(string name); list<user> findalluser(int pagenum, int pagesize);} |
在userserviceimpl文件进行实现,代码如下所示:
|
1
2
3
4
5
6
7
8
9
10
11
12
13
14
15
16
17
18
19
20
21
22
23
24
25
26
27
28
|
@servicepublic class userserviceimpl implements userservice { @autowired private usermapper usermapper; @override public user selectbyname(string name) { userexample example = new userexample(); criteria criteria = example.createcriteria(); criteria.andnameequalto(name); list<user> users = usermapper.selectbyexample(example); if (users != null && users.size() > 0) { return users.get(0); } return null; } /** * pagenum 开始页数 * pagesize 每页显示的数据条数 */ @override public list<user> findalluser(int pagenum, int pagesize) { //将参数传给方法实现分页 pagehelper.startpage(pagenum, pagesize); userexample example = new userexample(); list<user> list = usermapper.selectbyexample(example); return list; }} |
最后在controller层对查询结果进行接收,usercontroller代码如下:
|
1
2
3
4
5
6
7
8
9
10
11
12
13
14
15
16
17
18
19
20
21
22
|
@controller@restcontrollerpublic class usercontroller { @autowired private userservice userservice; @requestmapping("/test") public user queruserbyname() { user user = userservice.selectbyname("luis"); system.out.println(user.tostring()); return user; } @requestmapping("/list") public list<user> queruser() { list<user> list = userservice.findalluser(1, 2); //获取分页信息 pageinfo<user> pageinfo = new pageinfo<>(list); system.out.println("total:" + pageinfo.gettotal()); system.out.println("pages:" + pageinfo.getpages()); system.out.println("pagesize:" + pageinfo.getpagesize()); return list; }} |
测试
此前在项目编写过程中已经对可能出现的错误进行了总结,最后,对项目的功能进行测试,通过加@restcontroller注解将数据传输到浏览器中。
测试mybatis与springboot,浏览器输入http://localhost:8080/test,浏览器输出:
{"id":1,"name":"wanger","age":22}
分页测试,浏览器输入http://localhost:8080/list,浏览器输出:
[{"id":1,"name":"wanger","age":22},{"id":2,"name":"zhangsan","age":18}]
eclipse输出:
total:4

	pages:2

	pagesize:2
项目搭建完毕,具体代码参见github
总结
以上所述是小编给大家介绍的mybatis逆向工程与分页在springboot中的应用,希望对大家有所帮助,希望对大家有所帮助,如果大家有任何疑问请给我留言,小编会及时回复大家的。在此也非常感谢大家对服务器之家网站的支持!
原文链接:https://www.cnblogs.com/liuyi6/archive/2018/09/06/9595856.html


